After 14 simple steps, we have finally reached the point where we can leverage the new module that we have just completed.
We are going to write an app!!!
In fact, we are going to first write a simple 5-line prototype just to prove that it works. And then we are going to write a full-fledged windowing GUI application that runs inside our OS of choice!

Are you excited? Let’s go!
We start by creating a new Python file in our tests folder called kitty_time_demo.py with the following lines:
from the_cat_api.cat_api import TheCatApi
cat_api = TheCatApi()
kitty = cat_api.get_kitty()
cat_api.fetch_image_data(kitty)
kitty.save_to()
And if we run this script, a new kitty image should appear in our tests folder. Each time we run this script, yet another kitty image will show up!
Line by line:
- Import
TheCatApiclass fromthe_cat_apilib into our python file - Create an instance of
TheCatApiusing default values - Call the
get_kitty()method and store it in thekittyvariable - Use the
fetch_image_data()method to download the image data - Call the
save_to()method to save the image data out to disk
So simple, so amazing! But we can do better. This 5 line script only downloads a random kitty. Maybe we want to preview the kitty first before saving the kitty image.
Let’s write an interactive GUI app!
Create a new Python project
Start off by selecting File -> New Project and name your project something like “kitty_time” or whatever strikes your cat fancy.
Select New Environment using Pipenv and click the “Create” button. You should now have a new Python project with a main.py
Next, we are going to bring our py-cat-api repo into new project by selecting File -> Open... and selecting the “py-cat-api” folder.

Choose the Attach option to join this module into your new project.
At this point, we should have two major projects in our Project view:
- kitty_time
- py-cat-api
Make a GUI with TKinter
In the main.py file, enter the following lines of code:
import tkinter as tk
from PIL import Image, ImageTk
import io

from the_cat_api.cat_api import TheCatApi, TheCatApiException
from the_cat_api.models import *

cat_api = None

class KittyTimeApp(tk.Tk):
    def __init__(self):
        super().__init__()
        self.title('Kitty Time!')
        self.geometry('1024x768')
        self.resizable(False, False)

if __name__ == '__main__':
    cat_api = TheCatApi()
    app = KittyTimeApp()
    app.mainloop()
If you try to run this code an empty window will appear. You can drag this window around and close it, but nothing else. This is because we haven’t really set up a visual GUI frame yet.
Start by adding a TKinter Frame class after the KittyTimeApp reference and a reference to the new class on the 2nd to last line:
import tkinter as tk
from PIL import Image, ImageTk
import io

from the_cat_api.cat_api import TheCatApi, TheCatApiException
from the_cat_api.models import *

cat_api = None

class KittyTimeApp(tk.Tk):
    def __init__(self):
        super().__init__()
        self.title('Kitty Time!')
        self.geometry('1024x768')
        self.resizable(False, False)

class KittyFrame(tk.Frame):
    def __init__(self, root: tk.Tk):
        super().__init__(root)

        # Frame geometry setup
        self.grid(row=0, column=0, sticky='news')
        root.columnconfigure(0, weight=1)
        root.rowconfigure(0, weight=1)

        # Top row buttons and label
        self.get_kitty_button = tk.Button(self, text='Get a Kitty')
        self.get_kitty_button['command'] = self.get_kitty_button_clicked
        self.get_kitty_button.grid(row=0, column=0, padx=10, pady=10, sticky='NW')

        self.save_kitty_button = tk.Button(self, text='Save Kitty')
        self.save_kitty_button['command'] = self.save_kitty_button_clicked
        self.save_kitty_button.grid(row=0, column=1, padx=10, pady=10, sticky='NW')

        self.url_label = tk.Label(self, text="Yay! It's kitty time!")
        self.url_label.grid(row=0, column=2, padx=10, pady=10, sticky='NSE')
        self.update()

if __name__ == '__main__':
    cat_api = TheCatApi()
    app = KittyTimeApp()
    frame = KittyFrame(app)
    app.mainloop()
If you run this program now, you will see the beginnings of a GUI. A couple buttons and a message box declaring “Yay! It’s kitty time!”
class KittyFrame(tk.Frame):
    def __init__(self, root: tk.Tk):
        super().__init__(root)

        # Member variables
        self.kitty = None
        self.kitty_img = None
        self.kitty_photo_img = None

        # Frame geometry setup
        self.grid(row=0, column=0, sticky='news')
        root.columnconfigure(0, weight=1)
        root.rowconfigure(0, weight=1)

        # Top row buttons and label
        self.get_kitty_button = tk.Button(self, text='Get a Kitty')
        self.get_kitty_button['command'] = self.get_kitty_button_clicked
        self.get_kitty_button.grid(row=0, column=0, padx=10, pady=10, sticky='NW')

        self.save_kitty_button = tk.Button(self, text='Save Kitty')
        self.save_kitty_button['command'] = self.save_kitty_button_clicked
        self.save_kitty_button.grid(row=0, column=1, padx=10, pady=10, sticky='NW')

        self.url_label = tk.Label(self, text="Yay! It's kitty time!")
        self.url_label.grid(row=0, column=2, padx=10, pady=10, sticky='NSE')
        self.update()

        # Next row of another frame
        width = root.winfo_width()
        height = root.winfo_height()
        borderwidth = 5
        self.picture_frame = tk.Frame(self, borderwidth=borderwidth, relief='ridge', width=width, height=height)
        self.picture_frame.grid(row=1, column=0, columnspan=3, padx=5, pady=5)
        self.rowconfigure(1, weight=1)
        self.columnconfigure(2, weight=1)

        self.picture_frame.update()
        pf_width = self.picture_frame.winfo_width()
        pf_height = self.picture_frame.winfo_height()

        self.picture_frame_canvas = tk.Canvas(self.picture_frame, width=pf_width, height=pf_height)
        self.picture_frame_canvas.grid(row=0, column=0)
        self.picture_frame.rowconfigure(0, weight=1)
        self.picture_frame.columnconfigure(0, weight=1)
Above is the full GUI setup for our app. The only thing left unhandled are the button clicks. So let’s add them to the KittyFrame class:
    def get_kitty_button_clicked(self):
        # get kitty url and download kitty image to memory
        self.kitty = cat_api.get_kitty()
        self.url_label.config(text=self.kitty.url)
        cat_api.fetch_image_data(self.kitty)  # type: ImageShort

        # get picture frame size
        self.picture_frame.update()
        pf_width = self.picture_frame.winfo_width()
        pf_height = self.picture_frame.winfo_height()
        pf_ratio = pf_width / pf_height

        # convert and resize kitty Image
        self.kitty_img = Image.open(io.BytesIO(self.kitty.data))
        img_ratio = self.kitty_img.width / self.kitty_img.height
        if img_ratio > pf_ratio:
            resized_image = self.kitty_img.resize((pf_width, int(pf_width * (1 / img_ratio))), Image.ANTIALIAS)
        else:
            resized_image = self.kitty_img.resize((int(pf_height * img_ratio), pf_height), Image.ANTIALIAS)
        self.kitty_photo_img = ImageTk.PhotoImage(image=resized_image)

        self.picture_frame_canvas.create_image((int(pf_width / 2), int(pf_height / 2)), image=self.kitty_photo_img)

    def save_kitty_button_clicked(self):
        self.kitty.save_to()
If you look carefully, you should be able to spot 3 lines from our original 5 line script in there:
kitty = cat_api.get_kitty()
cat_api.fetch_image_data(kitty)
kitty.save_to()
What are all the other lines for? Mostly resizing the kitty image to then display in the 1024×768 window properly. You can see that we calculate the picture frame ratio and then scale the kitty image accordingly.
When you run this 100-line script, you get something like this:
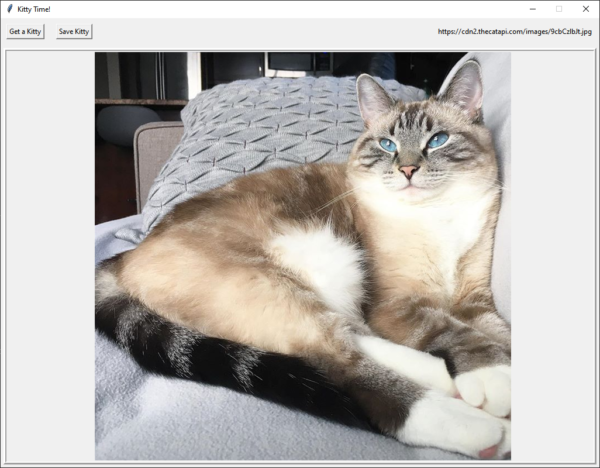
Click the Get a Kitty button to fetch a random kitty. If you like the kitty, click Save Kitty and the application will save a copy to disk.
And that’s how your wrap a REST API!
Fifteen (15) steps later and we now have a Python library that properly abstracts TheCatApi. We have only added a few endpoints so far, but you can always add more as you need them.
5 replies on “Step 15: Make an app that consumes your module”
[…] Part 15: Make an app that consumes your module […]
Hey. Thanks for this. I learnt a lot! I used dataclasses to try and do my own thing. It was a great tutorial.
I really appreciate you saying that. It was my hope that this would help Intermediate-level Python devs progress to a more advanced level. 😊
[…] Step 15: Make an app that consumes your module […]
Thanks for this great tutorial. Best one I’ve seen in that topic so far!