At this point, we’ve essentially completed a barebones REST API library for TheCatApi.com in Python. Now we need to write our unit tests. If you haven’t written unit tests before, this might be a good opportunity to learn some of the basics of unit testing.
If you have written unit tests before and know how to do it, well, feel free to skip this chapter. No one I know actually likes writing unit tests even if they are REALLY good for the overall quality of your code.
This isn’t going to be an in-depth explanation of unit testing in Python. That would take a whole book or two. Instead, we’re just going to cover the basics. (If you are interesting in learning more on your own, check out the book “Python Testing with pytest” by Brian Okken.)
What is Unit Testing?
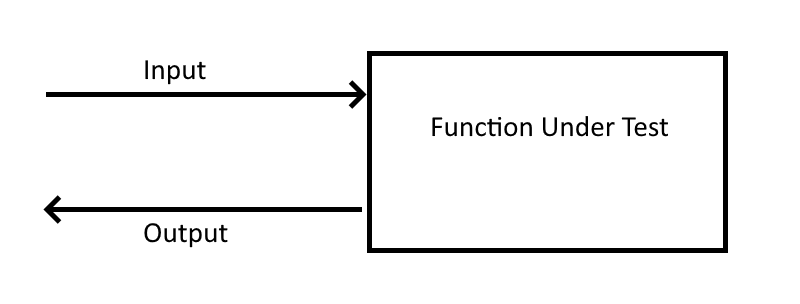
Unit Testing is a type of testing where the “object under test” (for example, a function in your program) is isolated and tested separately tested outside of the system that it normally operates in. It’s often called “bench testing” in the real world of mechanical engineering.
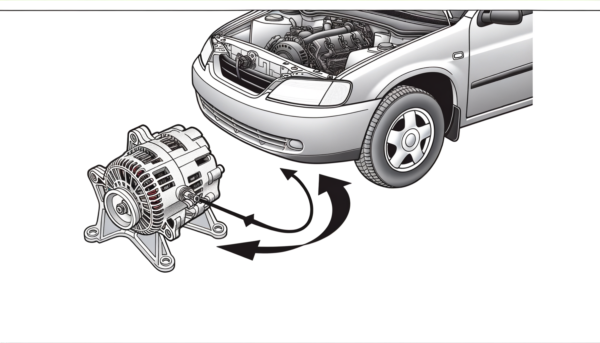
As an example, if your car has a part like an alternator and you suspect that it might not be operating correctly, you can take the alternator out of the car, connect its pulley to a separate belt and motor, and then measure the electrical output of the alternator with a multimeter at various motor RPMs.
Unit testing of a function is very similar. Given an input, we expect a certain output. If the function yields that certain output, then the test passes; if not, then the test fails.
We want to test both inputs that will cause successful results as well as ones that we know will/can cause an error.
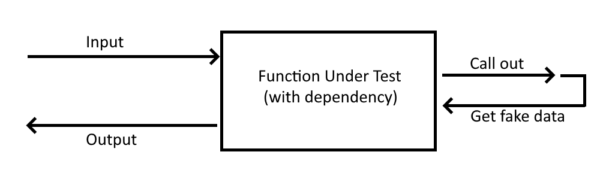
If you’re already starting to think ahead about testing you may realize that our fictional “function under test” may have a dependency. And that’s also a situation that we have to handle as well.
Triple-A
There is a methodology in unit testing known as Arrange, Act, Assert (abbreviated as AAA):
- Arrange: Setup a code environment that mimics the actual environment that your function under test would normally operate in, including any “fake” or “mock” versions of dependencies that the function would normally require.
- Act: Call the function in this test environment.
- Assert: When the function under test returns its result, evaluate (by asserting) that the result should be equivalent to something else. If it is, the test passes; if not, the test fails.
Dependencies, Fakes, and Mocks
As we have already alluded to, sometimes your “function under test” has a dependency that it relies on to get its job done. Since we are unit testing this function, we are NOT actually interested in using the real dependency.
No, what we want to create is a “mock” or “fake” one to take the place of the real dependency. (There’s actually a difference between a Mock and a Fake, but the differences are fairly subtle.)
For our example, we will be using Mocks to complete our data fakery.
PyCharm can build a Unit Test skeleton
Start by creating a new Module in your py-cat-api top folder. Name this new module tests. This module should be at the same level as the_cat_api (and not inside it).
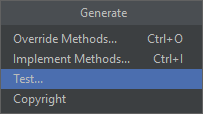
Open up your rest_adapter.py file and put the cursor on the RestAdapter class and right-click to get a context menu. Select the Generate option in the menu.
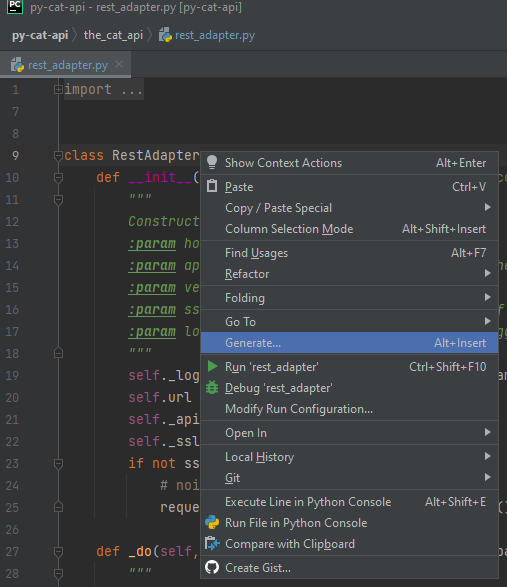
RestAdapter class and select Generate...A small window should appear. Select the Test... option.
A new window titled Create test should now appear. It should automatically select the correct path of your library as well as the tests folder.
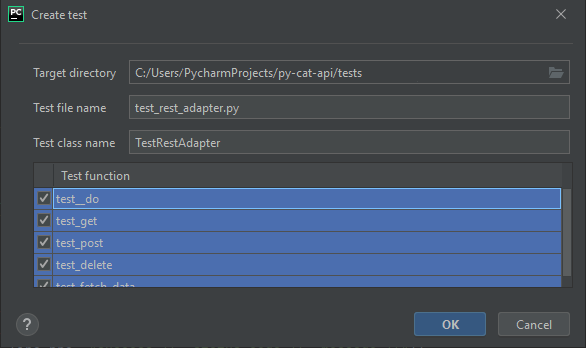
Ctrl+A, and press the spacebarHighlight the one of the proposed test functions with your mouse, press Ctrl + A (Cmd+A on Mac), and then press the space bar. This will select all possible test functions. Click OK and PyCharm will auto-generate a test_rest_adapter.py with test function stubs for you to fill in.
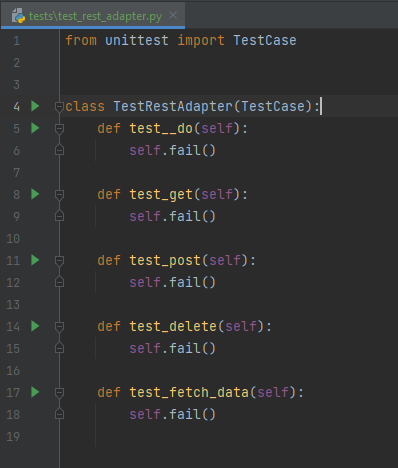
fail().In your tests folder, there should be a new file with your test function stubs waiting for you. Let’s get to it and fill in the logic to test our functions.
Arrange
The first step is to “Arrange” all the fake data and the function under test in a way that is helpful to us. We will start by creating a new function in our TestRestAdapter class. It should look like so:
class TestRestAdapter(TestCase):
    def setUp(self):
        self.rest_adapter = RestAdapter()
        self.response = requests.Response()
setUp is a method already understood by TestCase and we are “overriding” the method here. It will get called before every test method in the class.
We will start by writing our first unit test in the TestRestAdapter class:
    def test__do_good_request_returns_result(self):
        # Arrange
        self.response.status_code = 200
        self.response._content = "{}".encode()
We continue to “arrange” our fake data for the test. Since we called the test “test__do_good_request_returns_result”, we indicate that this test is supposed to testing the scenario where everything goes well and nothing goes wrong. So we know that the status_code should be 200 and that the “content” of the JSON should not raise an error, so we encode an “empty” JSON message as “{}”. (The least complex form of JSON that can be had that is still valid.)
Now that we have “arranged” our test, we…
Act
If we look at the _do() method, we can see that it depends on the requests module and that this module is directly referenced in the rest_adapter. So how do we replace the requests module with a mock of it? We “monkey-patch” it out using the mock.patch method.
    def test__do_good_request_returns_result(self):
        self.response.status_code = 200
        self.response._content = "{}".encode()
        with mock.patch("requests.request", return_value=self.response):
This with mock.patch statement replaces any reference to requests.request in any subsequent calls that might use requests.request with a mock of it. How does this work?
When requests.request is called, it then returns whatever we specify as a return_value. In our case, we return the self.response object we created at setUp time.
To ACT, we add a line:
result = self.rest_adapter._do('GET', '')
    def test__do_good_request_returns_result(self):
        self.response.status_code = 200
        self.response._content = "{}".encode()
        with mock.patch("requests.request", return_value=self.response):
            result = self.rest_adapter._do('GET', '')
The line calls the “function under test” with normal data and gets back a result. But what is this result we got back? What are we expecting? This is where we…
Assert
We now need to assert whether something happened or not. Did we get a Result back? Or did an exception or error occur?
    def test__do_good_request_returns_result(self):
        self.response.status_code = 200
        self.response._content = "{}".encode()
        with mock.patch("requests.request", return_value=self.response):
            result = self.rest_adapter._do('GET', '')
            self.assertIsInstance(result, Result)
As shown in the last line, we “assert” that the result we got back is an instance of type Result. (An exception would cause this test to fail.)
Writing more tests that test the “failing” cases
Here is an interesting example of testing a “failing” case:
    def test__do_bad_json_raises_catapi_exception(self):
        bad_json = '{"some bad json": '
        self.response._content = bad_json
        with mock.patch("requests.request", return_value=self.response):
            with self.assertRaises(TheCatApiException):
self.rest_adapter._do('GET', '')- We “arrange” by creating some “bad JSON” and set the Response content to this bad JSON.
- We then indicate that we will “assert” whatever happens in the “with” section.
- Then we “act”.
The with self.assertRaises(TheCatApiException): line captures what happens in the self.rest_adapter._do action.
And sure enough, the bad JSON causes the code to raise a TheCatApiException and the test passes.
(Yes, you need to test both the “good” scenarios as well as the “bad” ones.)
Part 15: Make an app that consumes your module
For more examples, checkout the unit tests in the GitHub repo here:
https://github.com/PretzelLogix/py-cat-api/tree/14_unit_tests
4 replies on “Step 14: Writing Unit Tests”
[…] Step 14: Writing Unit Tests! […]
Hi, thanks for the article, it was really interesting and easy to follow. But I didn’t understand what happens in this test, specifically in the `assertTrue` portion:
“`python
def test_delete_method_passes_in_delete(self):
self.response.status_code = 200
self.response._content = “{}”.encode()
with mock.patch(“requests.request”, return_value=self.response) as request:
self.rest_adapter.delete(”)
self.assertTrue(request.method, ‘DELETE’)
“`
Hello Jrom,
If we look at the code we’re trying to test, it should be easy to understand.
def delete(self, endpoint: str, ep_params: Dict = None, data: Dict = None) -> Result:return self._do(http_method='DELETE', endpoint=endpoint, ep_params=ep_params, data=data)This method calls the `_do()` method and it really only does 1 thing that we can test for. It passes in the string “DELETE” because we want to execute a DELETE (instead of, say, a GET or a POST)
With the unit test, we want to test that (indeed) this method really does make the DELETE call and not some other call. As I talked about in the beginning of this post, a unit test passes something in and gets something back. But in this case, we do NOT get anything back. So what we do is examine the state of `request` after we call the `rest_adapter.delete()` method. And what we are asking is: Did the `request` object have its attribute `method` set to `DELETE`?
I hope this clears things up. And I also highly recommend that you check out the book “Python Testing with pytest” by Brian Okken.
[…] Step 14: Write your unit tests […]