Update Mar-2016: Most of the kits in the review now contain Raspberry Pi 3 models. The kits themselves haven’t changed significantly (minor SD card and power supply swaps), but the RPi2 has been swapped out for RPi 3. 🙂
Update 20-Feb-2015: All kits have been updated to include Raspberry Pi 2 models! (except for the Make kit.)
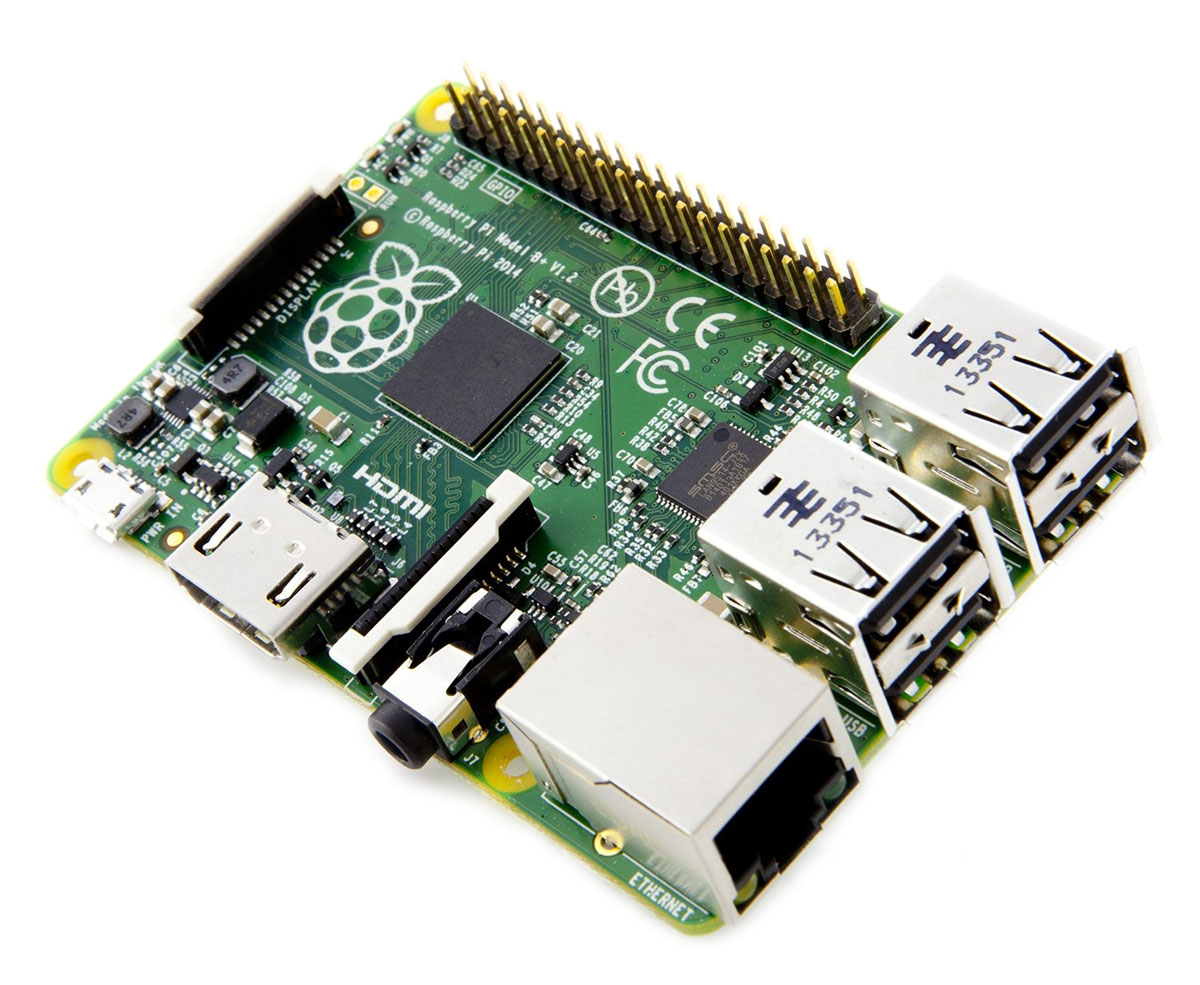
The Raspberry Pi is an amazing low-cost computer. Unlike the ever-popular Arduino microcontroller, the Raspberry Pi was designed to be a full-blown computer from the start. It can run various flavors of Linux/Unix, act as a Media Center, and even moonlight as a Microcontroller.
 And what better way to get started with a Raspberry Pi than with a starter kit? The question is: which one to get?
First Impressions
This review covers 5 of the most popular Raspberry Pi starter kits currently on the market in 2016:
- Canakit Raspberry Pi 3 Model B Ultimate Starter kit
- Vilros Raspberry Pi 3 Model B Ultimate kit
- Make: Raspberry Pi Starter Kit
- Sunfounder Project Super Starter Kit for Raspberry Pi
- Adafruit Raspberry Pi Model B Starter Pack with Raspberry Pi 3 option
Canakit
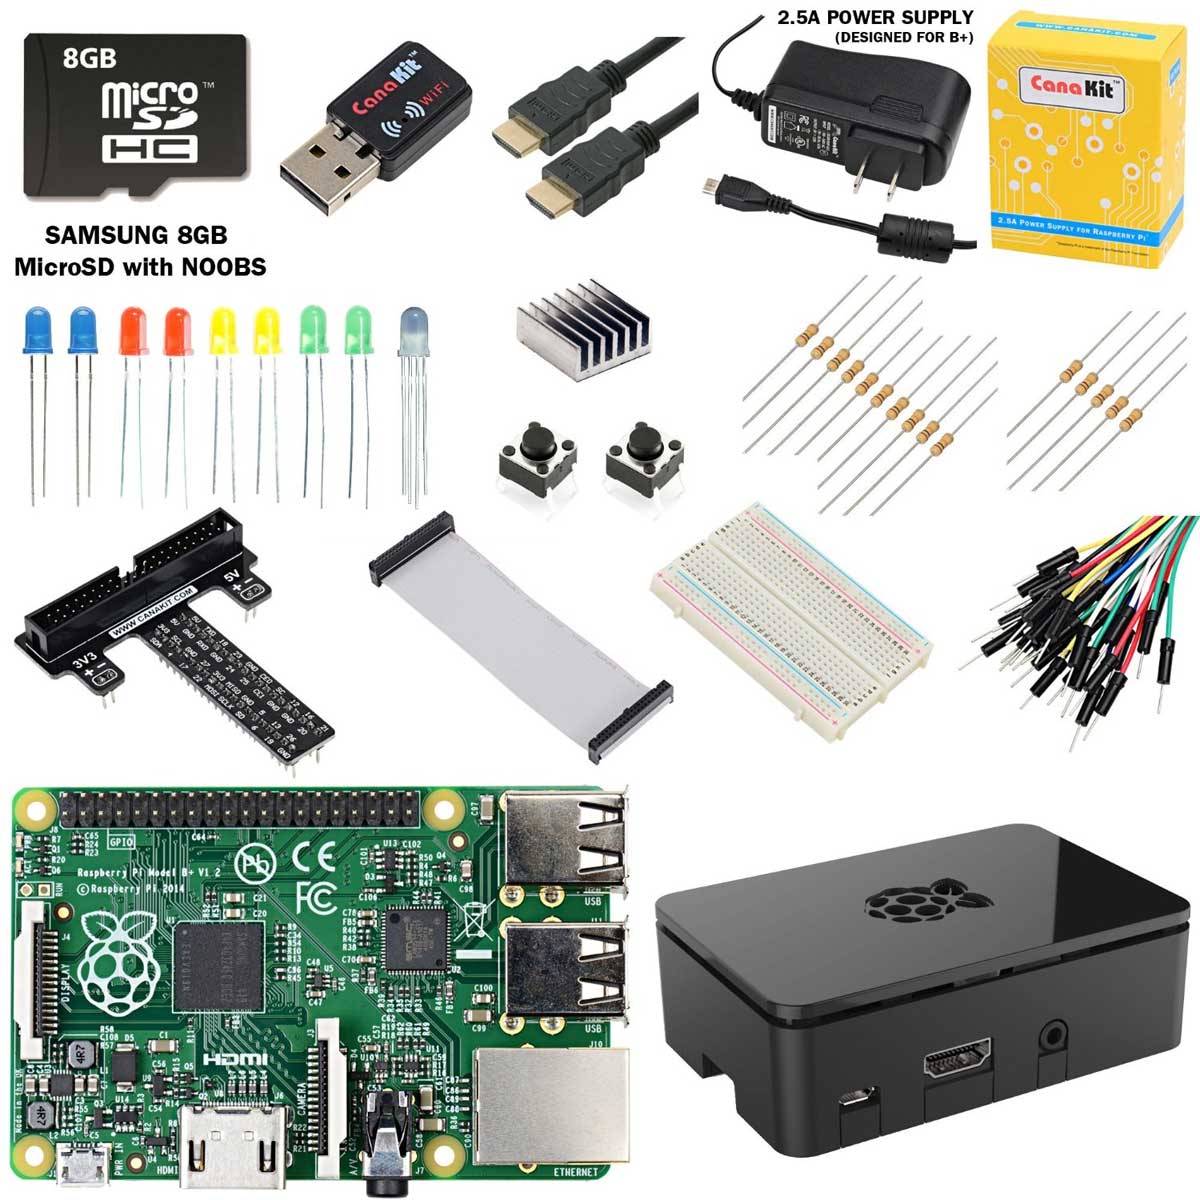 The Canakit arrives in a plain white cardboard box, but inside it has a lot of parts and components in glossy cardboard packaging. The kit comes with a Raspberry Pi 3 B model (the most advanced model) and a fancy black plastic case that is both sleek and solid.
The kit contains a 2.5A power supply, a 150mbps 802.11n USB WiFi adapter, and a high-quality 6-foot HDMI cable. It also contains a breadboard, a variety of LEDs, and other components. The only curious thing about all of this is that there was no manual! There’s a few URLs on the packaging to take the user to an online QuickStart guide. But no manual. How strange!
Vilros
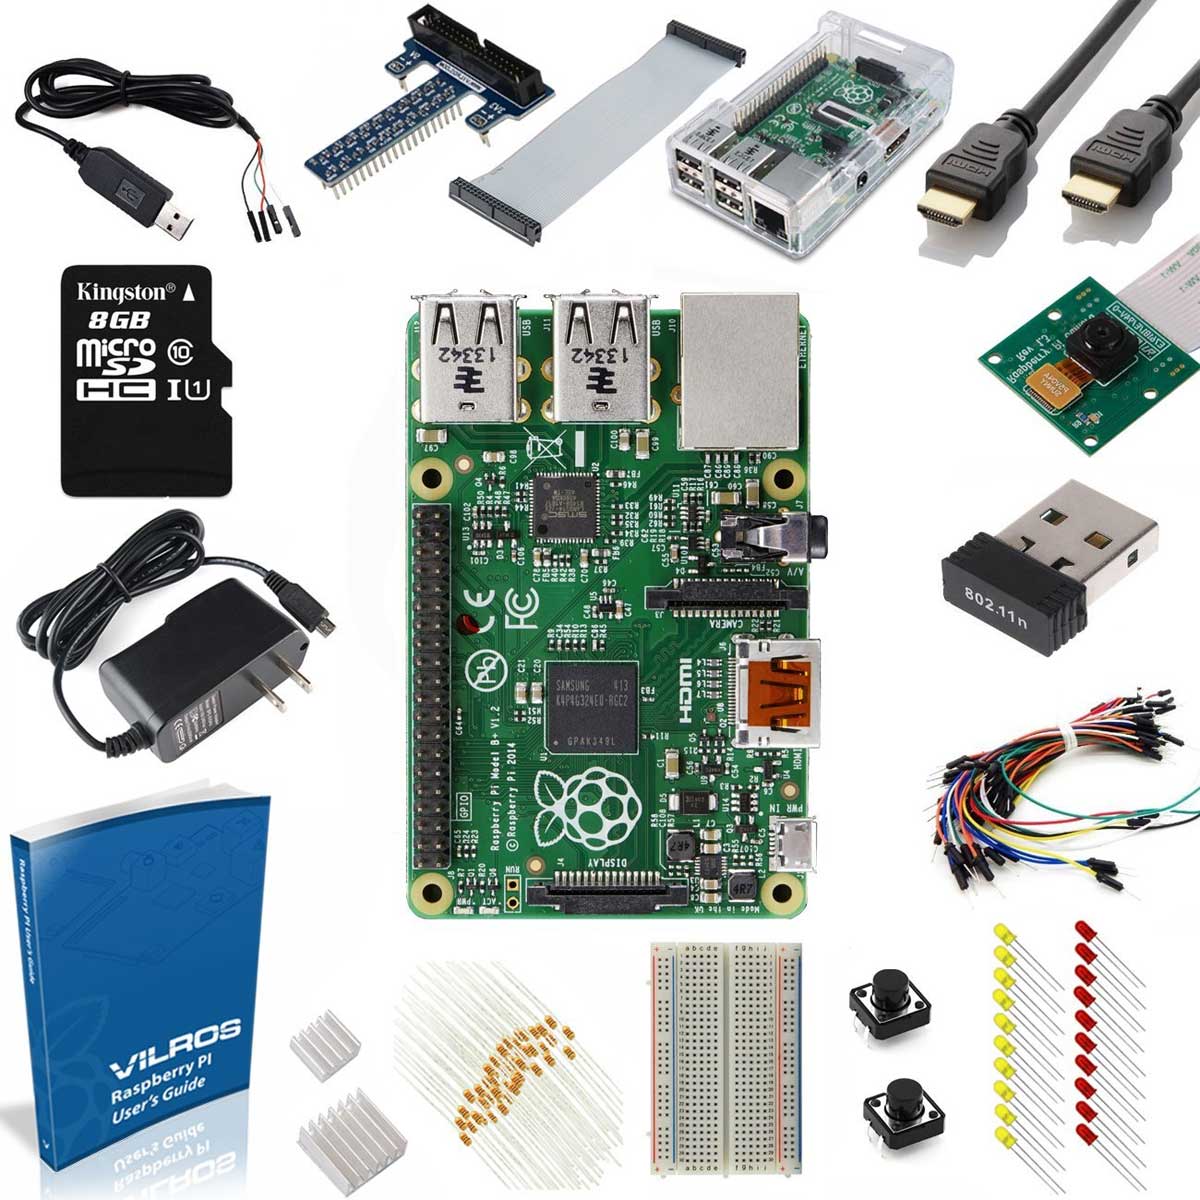 Like the Canakit, the Vilros also arrives in a plain white cardboard box. It also contains a Raspberry Pi 3 B model with a transparent plastic case. Although this case didn’t seem as sleek or special as the case that came with the Canakit, it *is* transparent and allows the user to easily see inside, which is pretty neat.
The kit contains a 2.0A power supply, a 150mbps 802.11n USB WiFi adapter, and an HDMI cable. It also contains a breadboard, GPIO breakout connector, a variety of LEDs and components. And a 208-page manual!
Make:
 It is clear from one glance that the Maker Shed kit is the most physically polished kit of the bunch. The box appears to be printed in full 4-color and has the most flair of the four kits by a wide margin.
It includes a Raspberry Pi model “B” board, a Make “Breakout board”, and a stylish black/red enclosure. Though, surprisingly, it only included a 1A power supply. The kit also contains 60+ components, a deluxe breadboard, HDMI cable, and a 185-page book called “Make: Getting Started with Raspberry Pi. 2nd Ed.”
Sunfounder
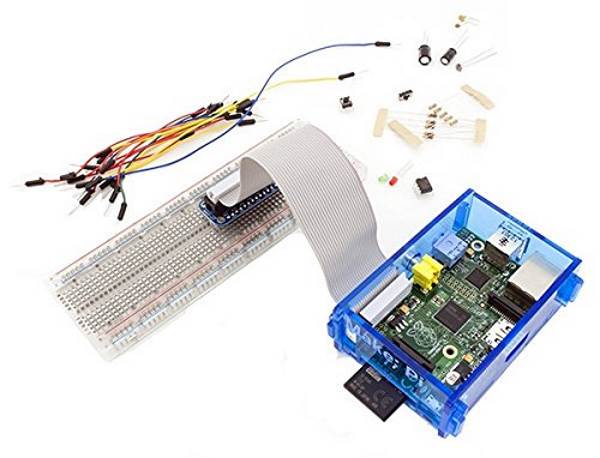
 The Sunfounder kit is a bit different than the other kits in that it does NOT contain a Raspberry Pi. This starter kit more or less presumes that you already have a Raspberry Pi or that you are going to purchase one to go along with it. This is actually a reasonable approach since it allows the user to choose either the (cheaper) Raspberry Pi “A” or “B” models or the (more expensive and more fully featured) “B+” model.
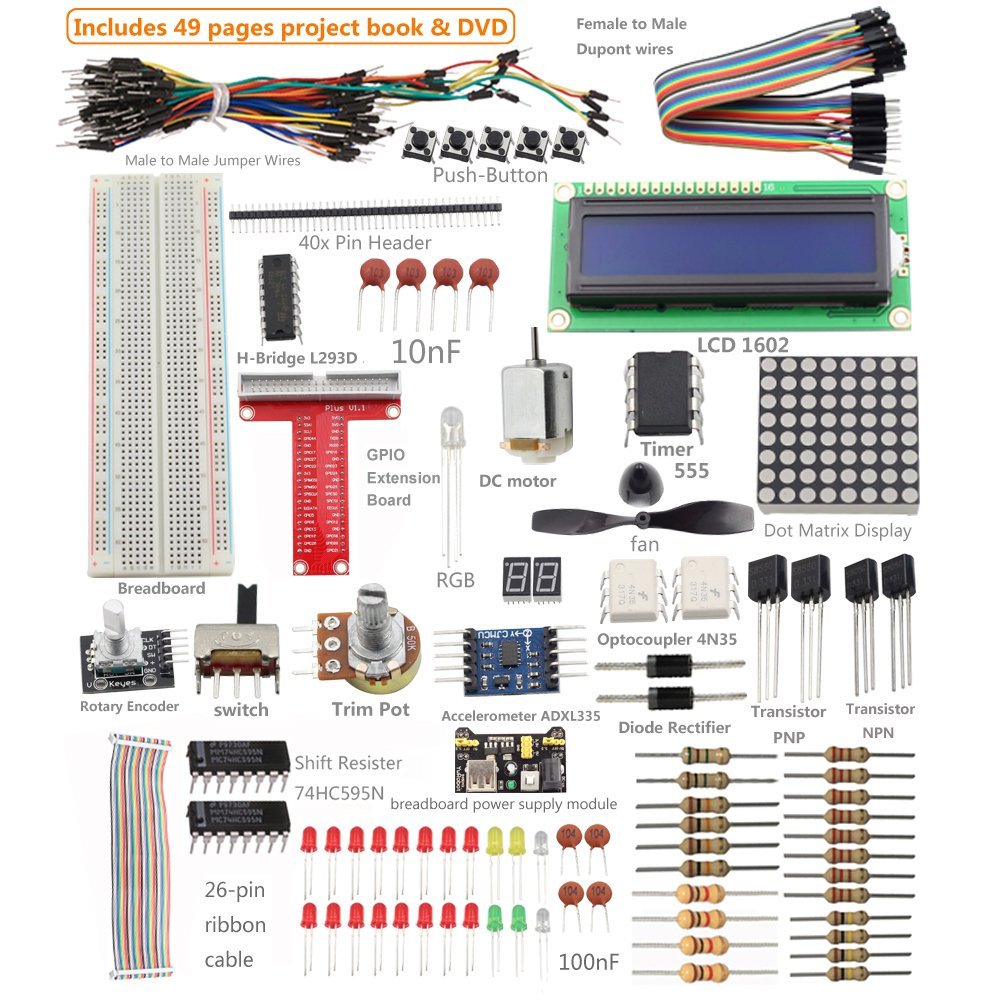
Unlike the other kits which seem to have a small selection of parts, this kit is packed to the gills with all sorts of components. This kit also includes a manual which is 49 pages long. No HDMI cable either.
UPDATE (22-January-2015): By popular demand, many people have pointed out that the Adafruit kit was not included. Originally, I had pre-screened (excluded) it from the review as it seemed too expensive ($100) for something that didn’t include a manual. Various people encouraged me to include it anyway since they had said that the Adafruit website tutorials were so excellent.
Adafruit
 **Full disclosure** This kit was not purchased as it was added late to the review.
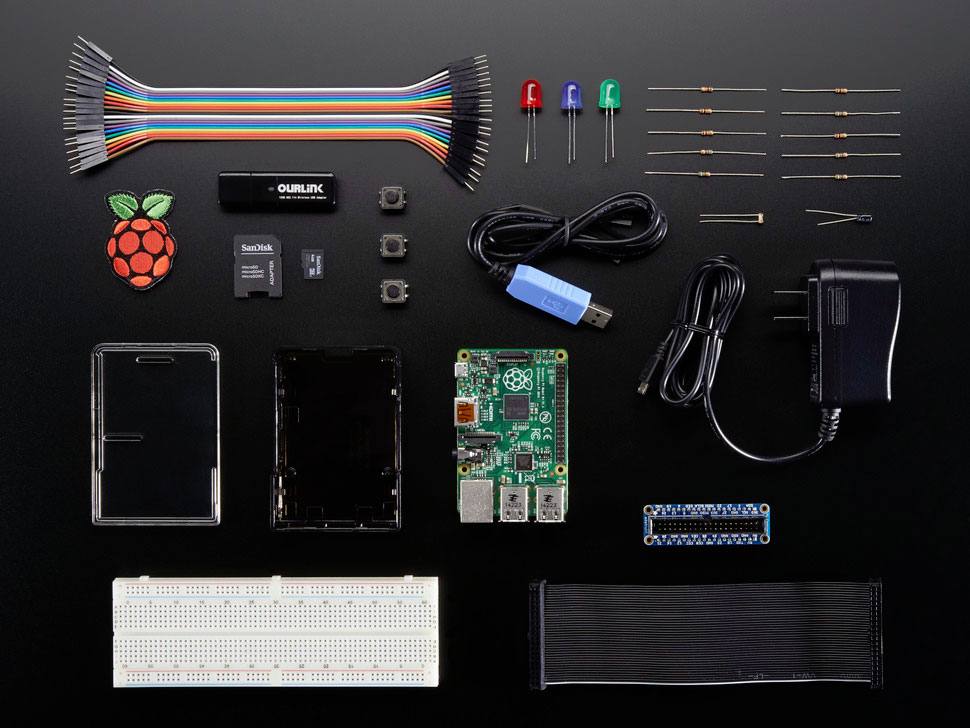
Unlike the Canakit and Vilros, the Adafruit kit does not include a Raspberry Pi, but has a breadboard and a breakout GPIO board called the “Pi Cobbler Plus”. The Adafruit kit includes a 4GB card (instead of an 8GB card) and pre-installs only Rasbian Linux distro. The kit also throws in a 2A power supply and a clear case, like the Vilros. The most popular add-on to this kit is the Raspberry Pi 3.
The curious addition in this kit was the USB to TTL serial cable designed for the Raspberry Pi. None of the other kits contained this cable. This is a great cable for debugging a Raspberry Pi and even logging into the console directly.
“What’s in the Box?”
| Canakit Raspberry Pi 3 Model B Ultimate Starter kit | Vilros Raspberry Pi 3 Model B Ultimate kit | Make: Raspberry Pi Starter Kit | Adafruit Raspberry Pi Starter Pack | Sunfounder Project Super Starter Kit for Raspberry Pi | |
| Price | $85 | $85 | $130 | $60 + $45 | $42 |
| Manual | – | 208 pages | 185 pages | online guide | 49 pages + DVD |
| Chapters | – | 10 | 12 | 13 | 17 |
| Raspberry Pi | 3 Model B | 3 Model B | 2 Model B | 3 Model B option | – |
| Breadboard | 30-row | 30-row | 60-row | 60-row | 60-row |
| GPIO cable | 40-pin | 40-pin | 26-pin | 40-pin | 26-pin |
| Power supply | 2.5A, micro USB | 2.0A, micro USB | 1A, USB | 2.0A, micro USB | ? For breadboard |
| Memory Card | 32GB MicroSD (Samsung) | 16GB MicroSD (Kingston) | 8GB SDHC | 8GB MicroSD (SanDisk) | – |
| HDMI cable | Y | Y | Y | – | – |
| USB to TTL cable | – | – | – | Y | – |
| USB Wifi adapter | 802.11n | 802.11n | – | 802.11n | – |
| LCD | – | – | – | – | 16×2 char |
| LEDs | 2 Blue, 2 Red, 2 Yellow, 2 Green, 1 RGB | 10 Red, 10 Yellow, 1 RGB | 1 Red, 1 Green | 1 Red, 1 Green, 1 Blue | 16 Red, 2 Green, 2 Yellow, 2 White, 1 RGB |
| Pushbuttons | 2 | 2 | 2 | 3 | 5 |
| Optocoupler | – | – | 2 | – | 2 |
| Potentiometers | – | – | 2 | – | 1 |
| Photoresistors | – | – | 2 | 1 | – |
| DC Motor | – | – | – | – | Y |
| H-bridge IC | – | – | – | – | Y |
| Accelerometer | – | – | – | – | Y |
| 7-seg display | – | – | – | – | Y |
| 8×8 Dot Matrix LED | – | – | – | – | Y |
| 555 timer | – | – | – | – | Y |
Comparing the 4 kits is a bit difficult. Between each kit, there was a fair amount of variation such that a “Raspberry Pi starter kit” means different things to different manufacturers. Every kit in this review comes with a breadboard, a General Purpose I/O (GPIO) cable, and a handful of LEDs. And that’s where the similarities end.
There were 3 interesting differences in the four kits:
- The Raspberry Pi itself. The Canakit, the Vilros, and the Adafruit kits include the latest and most full-featured model (ver 3 — Model B), while the Make kit still only includes the simpler model (ver 2 — Model B), while the Sunfounder kit does not include a Raspberry Pi at all.
- The Manual. The Maker kit and the Vilros kit both have extensive manuals over 180 pages long. The Sunfounder kit has a much shorter 50-page manual, but includes a DVD of additional information. The Canakit and the Adafruit have no manual. They are just a bunch of parts in a box. The Adafruit has 13 online chapters on their website.
- The Extras. The Canakit includes a 32GB memory card for use with the Raspberry Pi, while the Vilros includes a 16GB card (32GB option available for $5 more) and the Adafruit includes a 8GB card. The Canakit, the Vilros, and the Adafruit also throw in an 802.11n WiFi USB adapter. And the Vilros also includes a 5MP digital camera module. (With the RPi 2 update, Vilros removed the 5MP camera from the kit.) The Sunfounder kit has none of these, but instead focuses on electronics components, like LCD screens, DC motors, Accelerometers, 8×8 dot matrix displays, and a 555-timer (of all things!)
Comparing the Guides
Vilros Raspberry Pi 3 B Ultimate kit
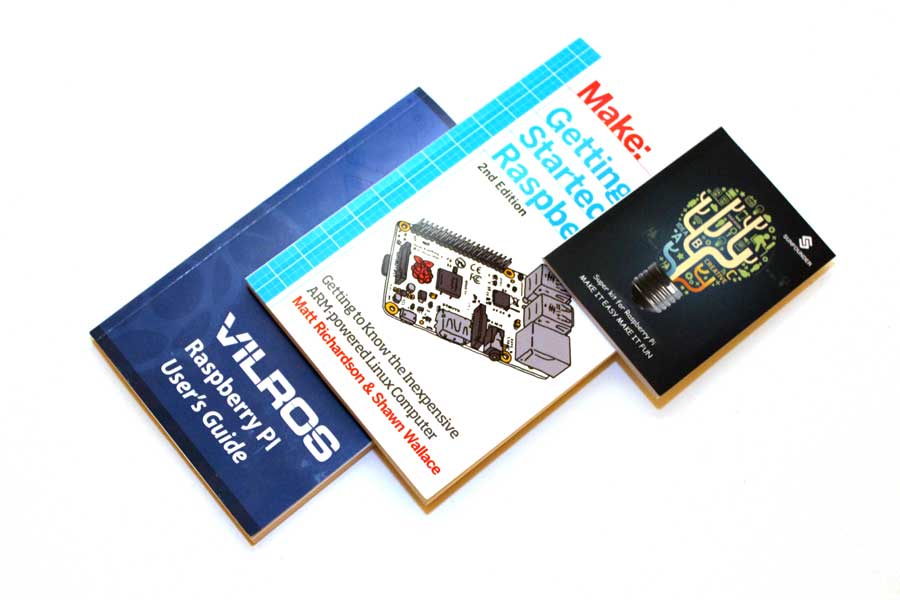
The Vilros Raspberry Pi User’s Guide is a nicely sized full-color manual with a glossy cover. Although not quite as polished as a book you might get at a bookstore, it is of good quality. It’s clear that a fair amount of thought went into creating a full guide that covers all the bases with the Raspberry Pi.
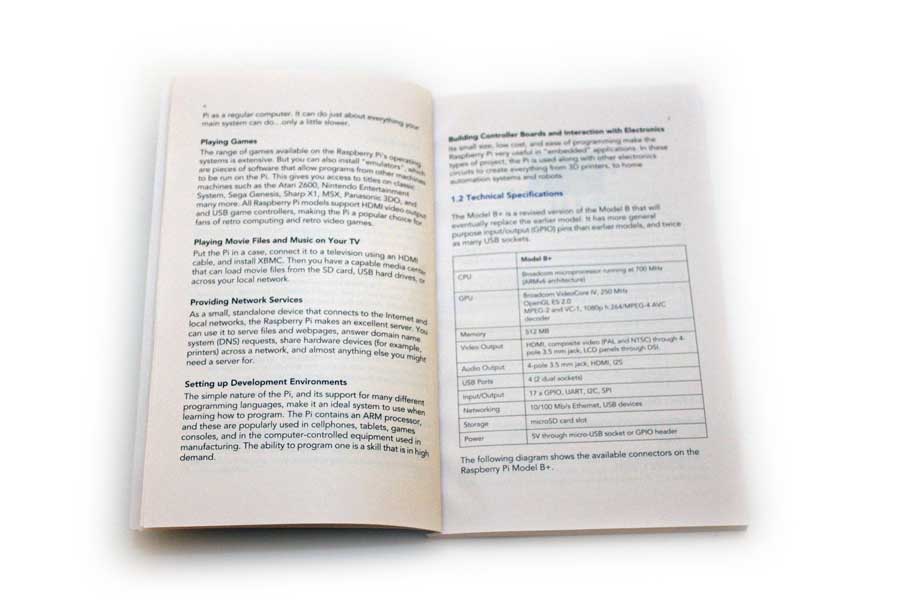 Right off the bat, the Vilros guide talks about what you can do with the Raspberry Pi as well as a chart showing what it is equipped with.
 It walks the user through setup of the Raspberry Pi so that they can quickly get down to business. After setting up the Raspberry Pi, the Vilros guide jumps into 5 or 6 more topics.
The first topic is about building a Media Center out of the Raspberry Pi. The guide walks the reader through installing XBMC (recently renamed “Kodi”) — It lists all the formats that it can play and demonstrates how you can use your Raspberry Pi to play videos from memory cards or over the network.
The 2nd topic spans 3 chapters and talks about Programming. Specifically, it starts off with the visual programming language known as “Scratch” and even helps the reader create a simple version of the side scrolling fighter game “Double Dragon”. After this, it dives into a real programming language: Python.
Unfortunately, this is the part of the book where the content starts to get a little thin. Python *is* a complicated language, so it is somewhat understandable that the guide keeps things short-and-sweet as it is really a build up to the section on controlling and using the General Purpose Input/Output (GPIO) port.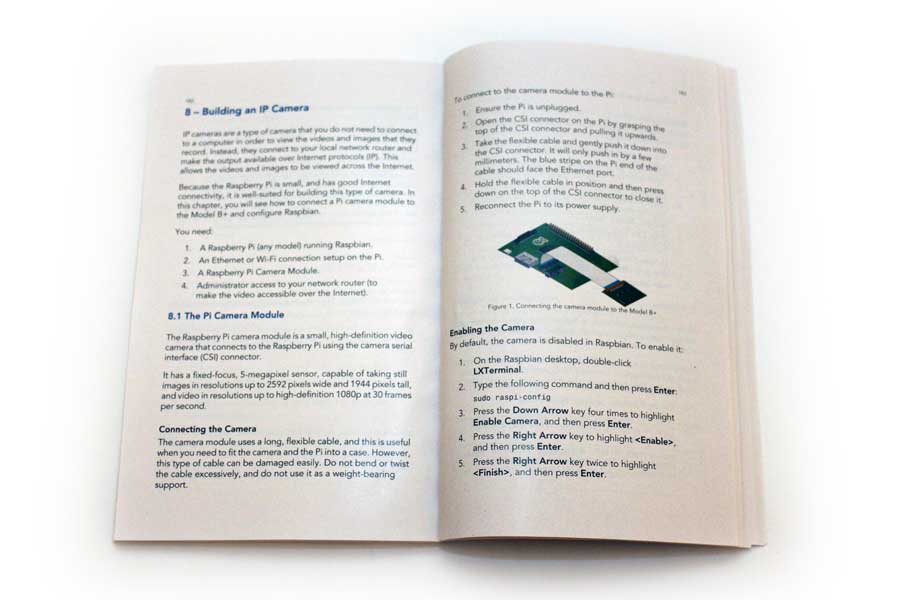
This leads to the building of an Internet Camera (webcam) and then a “smarter doorbell”. The guide wraps up with using the Raspberry Pi to make Internet Phone calls using Google Voice.
Make: Getting Started with Raspberry Pi, 2nd Ed.
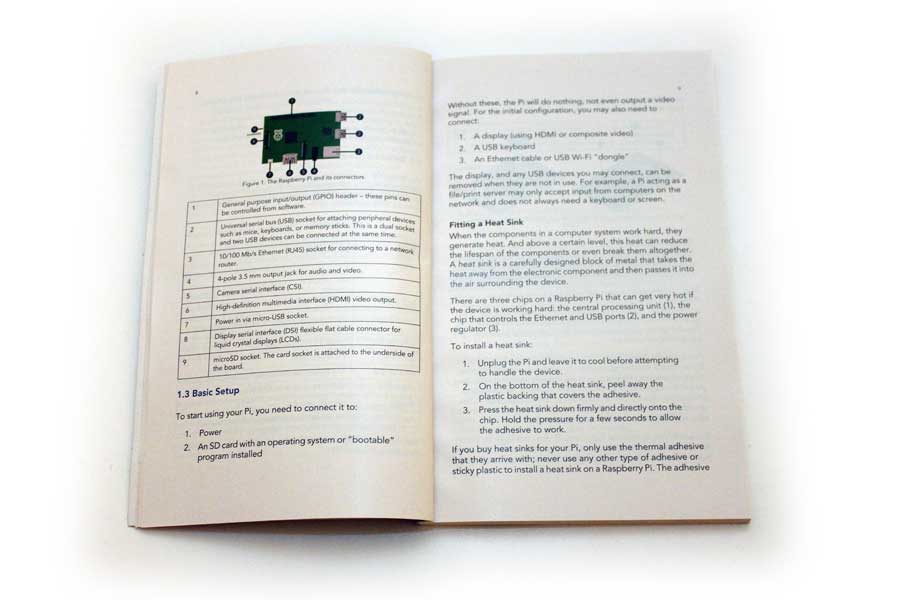
The Make user guide included in the kit is an actual book that is already quite popular and gets good reviews. The book is a paperback and is of good quality. It is *not* printed in full color. The guide opens with a preface about why the Raspberry Pi was created and then lays out what you can do with a Raspberry Pi.

Like the Vilros guide, it walks the user through setup of the Raspberry Pi so that they can start playing quickly. It then jumps into 7 or 8 more topics.
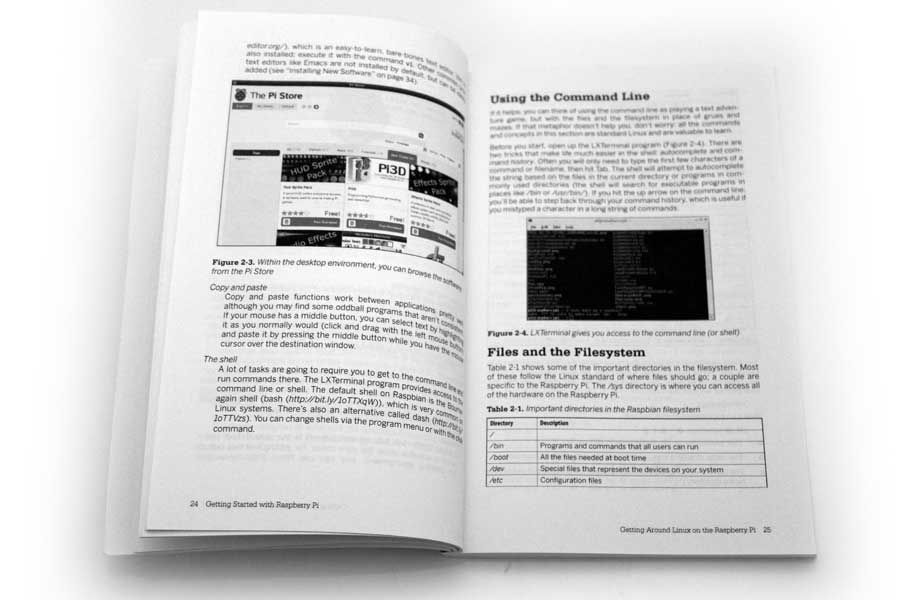
The first topic is about navigating Linux on a Raspberry Pi. This consists of a crash course on the Linux command line, filesystem, and network as well as how to “sudo” and install additional software using “apt-get”.

After introducing the reader to Linux, the book dives into Python and spends 45 pages (~25% of the book) on just learning the language and how to make games using the Pygame library. It takes the time to talk about the Python language for users coming from an Arduino background and the “sketches” that Arduino uses. It talks about importing libraries and other modules as well as where to learn more about Python.
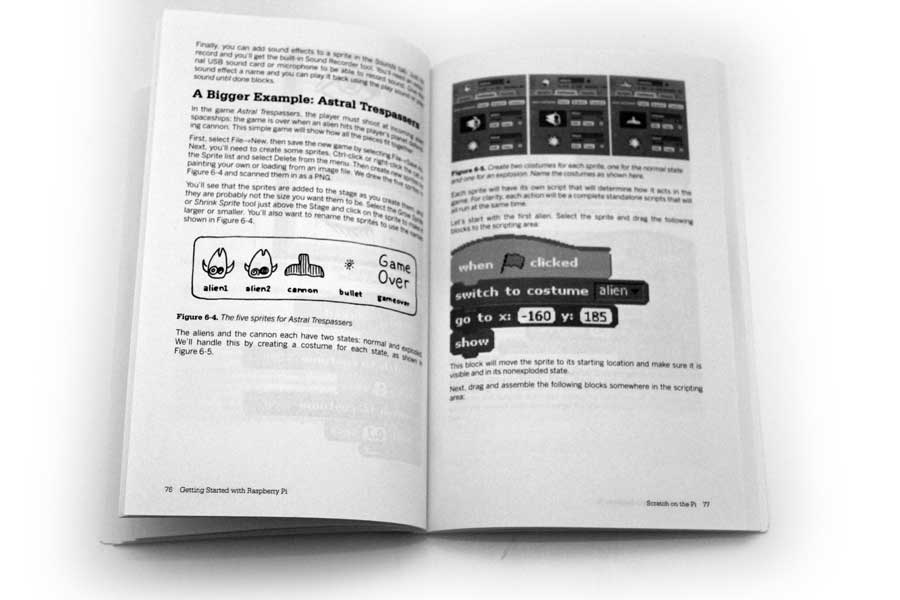
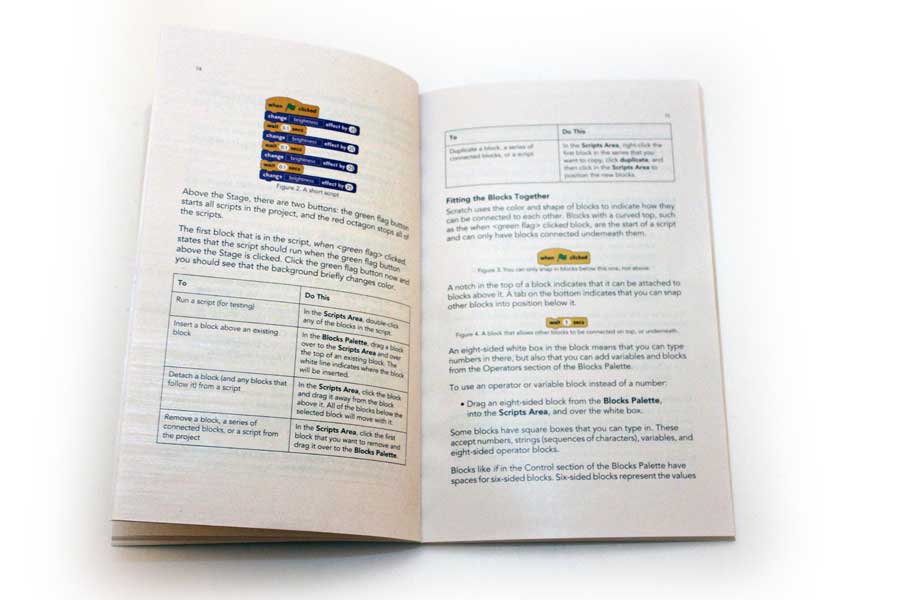
The book then jumps into writing a mini “Space Invaders” clone using the Scratch programming language. It doesn’t spend as much time on Scratch as the Vilros book did. This is probably because the Make book seems to be more focused on using the Raspberry Pi as a Linux computer.
In the last half of the book, the main topic is about using the Raspberry Pi as a microcontroller like the Arduino. (It also touches on how to program the Arduino using the Raspberry Pi — assuming that you have an Arduino already.)
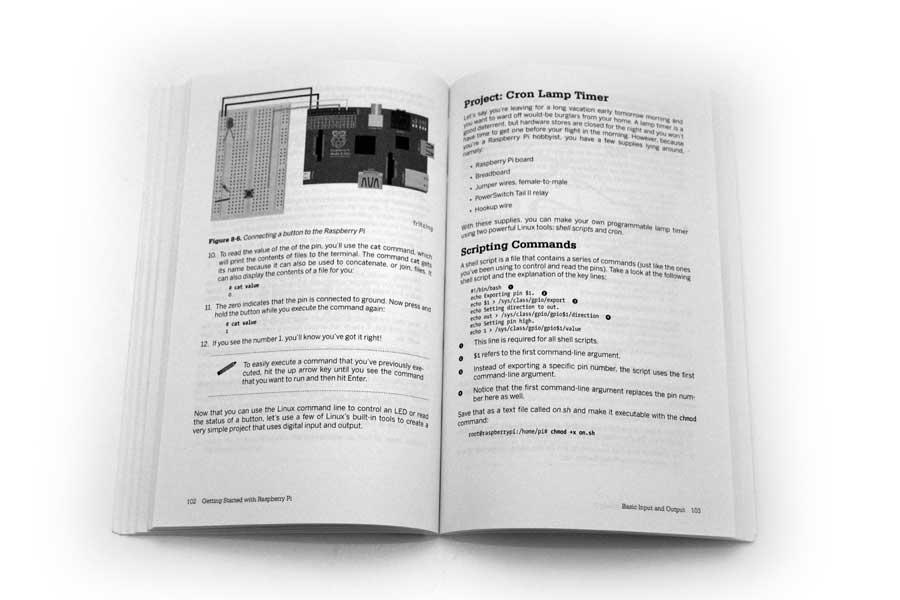
Unfortunately, this is where the lack of color printing becomes a problem. There are parts of the book where the black and white diagrams of the breadboard become hard to follow. There are also no schematics of the circuits either. This is the part of the book that could be better. The Vilros guide is a bit clearer in that it uses both simplified schematics and color wiring diagrams.
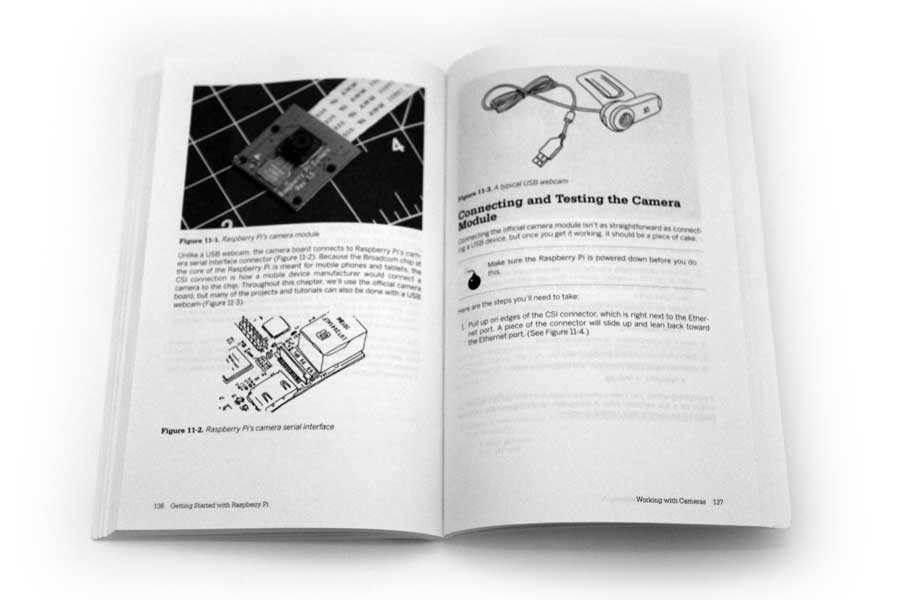 The book rounds out the last couple chapters talking about using a webcam with the Raspberry Pi as well as using the Pi as a webserver.
Sunfounder Super kit for Raspberry Pi guide
The Sunfounder guide for the Raspberry Pi is quite small. It measures a mere 3.5″ x 4.5″ (8.5cm x 11.5cm) and is not very thick. It only has 49 pages, too. So what does it have?
About 17 lessons that are all just a few pages each. There is no introduction or any hand-holding in getting your Raspberry Pi setup. After the table of contents, it just jumps right into the first lesson.
 Yes, the Sunfounder Raspberry Pi guide is that small compared to the other manuals.
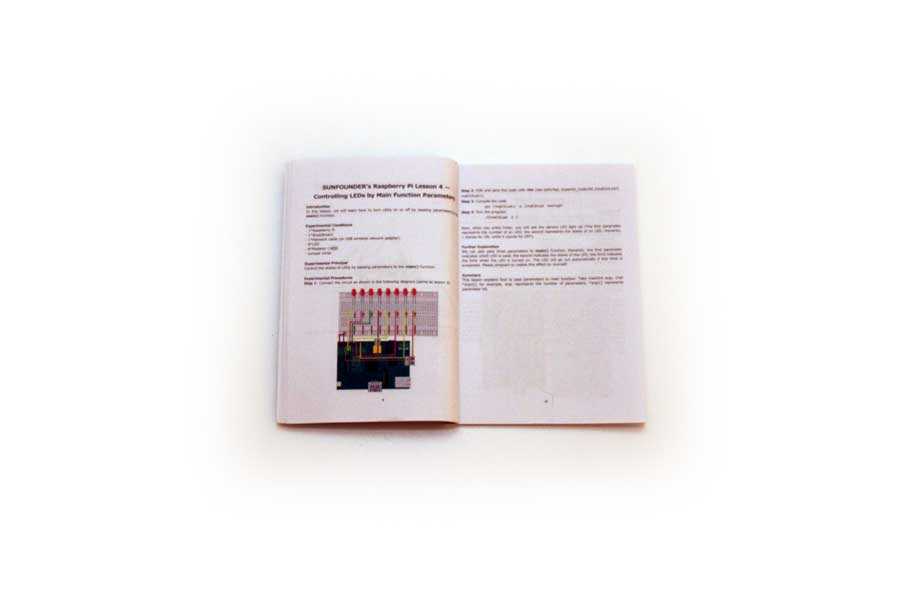
Each lesson talks about an experimental principle which usually has an electronic schematic to go with it.
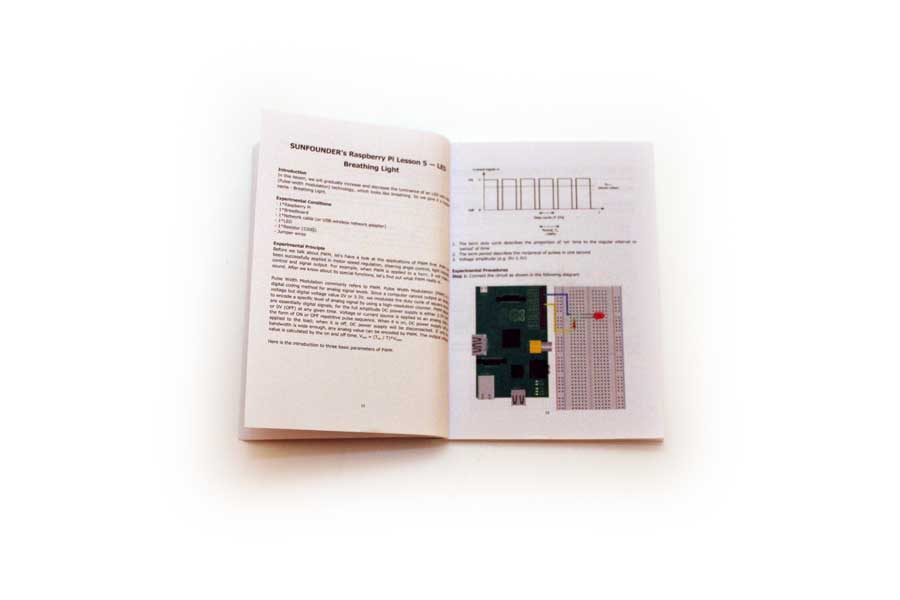 Along side that is the full-color electrical wiring diagram and photo of the finished project.
Zero discussion of code.
The guide just instructs you to copy the source code (written in the C language) to the Raspberry Pi and compile it using the GCC compiler.
It’s abundantly clear that this is NOT a guide for beginners, but rather it is a guide for engineers and people who like to tinker.
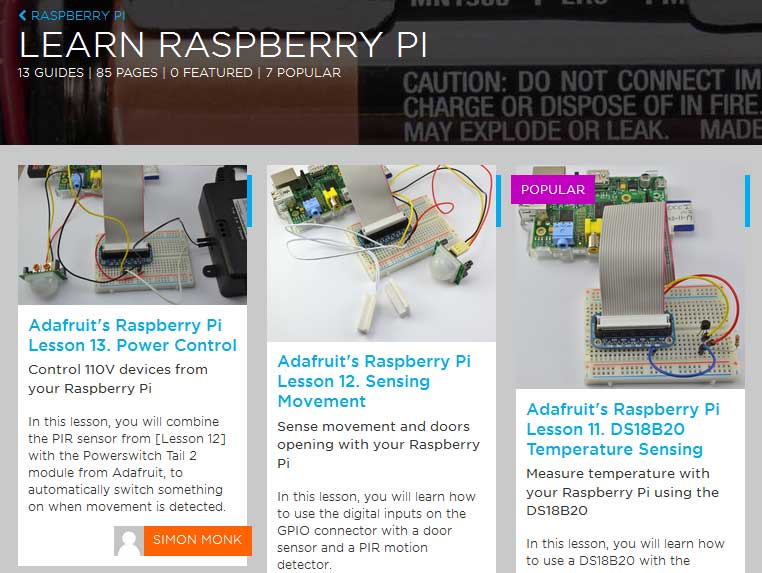
Adafruit Learn Raspberry Pi online guide
The Adafruit user guide included in the kit is online. Yup, there’s no book. The guide has a list of 13 Lessons which are listed out for you.
 The first few Lessons are about configuring the SD card, Installing the Raspberry Pi flavor of Linux known as Raspbian (based on Debian Linux), and setting up your network.
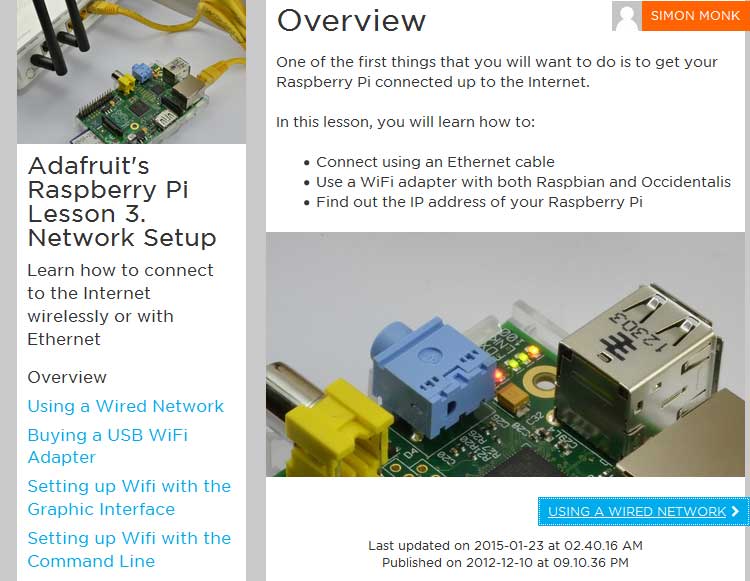 Upon reading the guide on the Networking chapter, there it was at the bottom: The lesson was originally published on Dec 2012, but has been continually updated over the past 2 years. And it became clear that (in some ways), an online guide was perhaps better than having a physical book. There’s nothing worse when learning about a complex subject than the instructional material being out-of-date with errata. So this was a big plus!
As progress was made though the remaining lessons, some of the lessons (about DC and Servo motors) couldn’t be conducted because the Adafruit kit doesn’t contain either of these motors. That was a bummer.
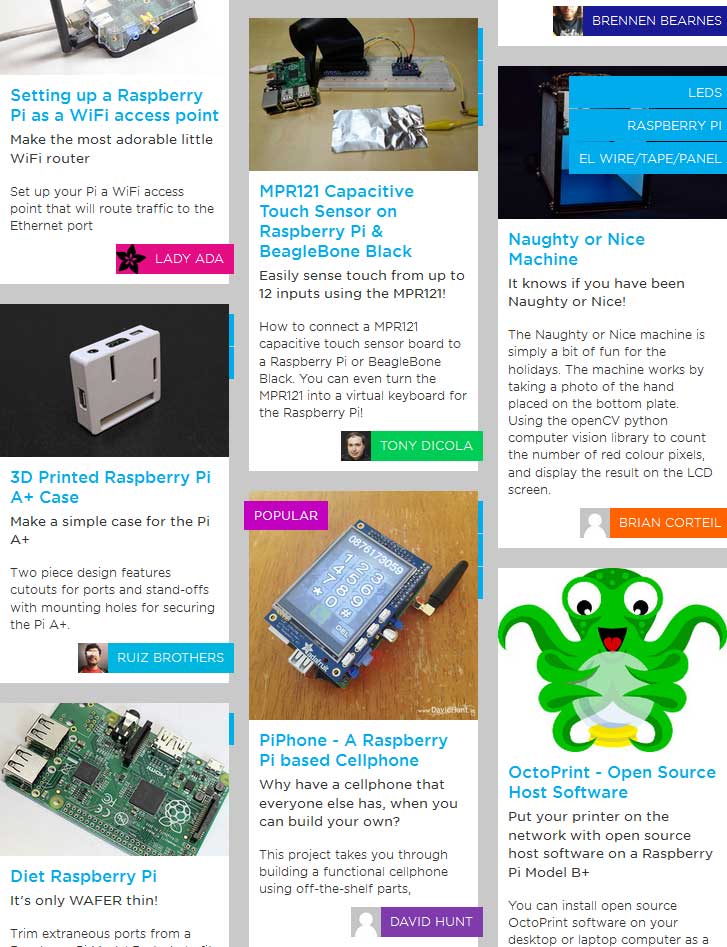
On the plus side, the whole Adafruit Learn Raspberry Pi site is chock-full of amazing projects. Yet the lack of a good starter guide was nagging.
Conclusion
Best all-round Raspberry Pi 3 Starter Kit
The Vilros Raspberry Pi 3 Model B Ultimate kit ($85) is by far the best, most well-rounded kit of the bunch. It included a Model B+ Raspberry Pi, an 8GB microSD card, a 2.0A power supply, a 802.11n USB wifi connector, electronic components, a 5MP camera, HDMI cable, and a well-written manual that was about both learning and fun!
Vilros also has a very similar model for $15 less that the electronics and breadboard called the Vilros Raspberry Pi 3 Model B Complete Starter kit ($70).
Best Raspberry Pi 3 Starter kit for people who “don’t need no stinkin’ manual”
The Canakit Raspberry Pi 3 Model B Ultimate Starter kit ($85) appears to be very similarly equipped in comparison to the Vilros kit with one thing missing: The Manual!
And that’s ok. Maybe you don’t need one!
The parts chosen for the kit appear to be high quality. The black plastic case for the Pi was the best of the bunch and the power supply put out a good 2.5A! Unfortunately, $85 might be $15 too much for some people especially considering that it comes with no manual.
Instead, consider the CanaKit Raspberry Pi 2 Model B Complete Starter Kit with WiFi Adapter ($70) which is a good alternative if you just want a Raspberry Pi with a nice case to hook up and fiddle around with. The pre-loaded NOOBS software on the 8GB microSD card is easy enough for pretty much anyone with a little computer knowledge to be able to figure out without a manual.
A case for the Adafruit kit
In my original review, I had excluded the Adafruit Raspberry Pi Starter Pack ($60) + Raspberry Pi 3 add-on ($45) because it was expensive (compared to the other kits) and contained no physical manual. Despite this, many people mentioned that this kit was unfairly left out.
Looking at it more closely, it is clear that this kit has some value that the others don’t have. Specifically, it has a USB-to-TTL cable designed for the Raspberry Pi. And an embroidered iron-on Raspberry Pi patch.
That’s it. And it costs $105.
It would be grand to be excited about this kit, but it’s really hard to muster.
What about the other kits?
The Make: Raspberry Pi Starter Kit ($100 – $130) is a decent offering in that it was a well-polishing kit that comes with a solid manual. The major drawback with this kit is that it contains the cheaper “Model B” Raspberry Pi, no WiFi adapter, and only a 1A USB power supply. And it costs $100 to $130 which makes it a poor value. (And they haven’t updated their kit to include the Raspberry Pi 3 either.)
Fortunately! The manual that comes with this kit is called Make: Getting Started with Raspberry Pi: Electronic Projects with the Low-Cost Pocket-Sized Computer ($14) and can be purchased separately.
The Sunfounder Project Super Starter Kit for Raspberry Pi ($42) is a lot like the Canakit in that it is just a bunch of parts. Sure, I suppose that technically it has a manual with 17 lessons/projects, but these individual lessons are so thin that there isn’t a whole lot of value in this kit.
21 replies on “The best Raspberry Pi 3 starter kits compared and reviewed”
I’m a little surprised Adafruit’s kit (https://www.adafruit.com/product/2125) was omitted. They have a few different variations that include different model boards/parts, but they are solid kits from a great provider.
What makes the kits all the better is Adafruit’s tutorials (https://learn.adafruit.com/category/raspberry-pi). Admittedly, you don’t need their kit to use the tutorials, but I always think it is nice to buy from them because of this great resource.
Thank you for your feedback.
I agree that Adafruit is a great resource and I do buy from them a lot, but I had excluded them from the review because I didn’t think their kit was a solid value.
Nevertheless, many people have said that I should include them regardless, so I have updated the review to include the Adafruit Raspberry Pi starter kit.
Cheers! 🙂
Adafruit wasn’t included because it isn’t sold on amazon, and they have no affiliate program. You’re looking at advertising.
Aww, don’t be so cynical. 🙂 That wasn’t the reason why it wasn’t included. In fact, I’m a big fan of Adafruit. It’s one of the first stores I go to when I buy electronics parts and stuff. In fact, this USB Charger Doctor (inline Voltage/Current meter) is a huge favorite of mine.
The reason why the Adafruit was not included was two-fold:
1) It didn’t come with a manual — That’s the primary focus of this kind of review. The manual. The guide. It’s what makes the kit fun! It’s what makes it not just a box of parts.
2) The cost of the kit was rather high — This would have put me in the position of having to be hard on Adafruit, so I decided to leave them out.
Sure, the Canakit has no manual, but the quality and value of the Canakit is strong. I tried to source all the parts by myself for less and found that I couldn’t.
Sure, the cost of the Maker kit is high, and as such, I called them out on it. Fortunately, I thought their manual was very good.
Anyway, I’ve updated the guide to include the Adafruit Raspberry Pi kit. It’s expensive, IMHO, but maybe that’s okay with you. Adafruit is a good company and a great resource.
I just looked at every article on the first page of your blog, and each article had multiple affiliate Amazon links.
Your reasoning for excluding Adafruit is so laughably flimsy. Yes, this is just advertising.
Yes, affiliate links are how I make some side cash to pay for the site and the products I review. You don’t have to click on any of the referral links if you don’t want to, but it does help keep this site running.
Everything I’ve reviewed so far, I have purchased with my own money. No one has paid me to review anything and nor would I ever do that. It’s good that you suspect this, though. There are definitely a lot of shills out there.
Any money I make goes right back into funding the next thing that I’m reviewing.
Well, believe what you like. I’ve included the Adafruit kit in my review. It’s a mediocre value, but has a couple cool things that the other kits don’t have. Anyway, I love reviewing things and this is just a fun hobby for me. 🙂
Thanks for the critical feedback.
I’m interested in the sunfounder as there is no pi included so I can get the new pi 2 with it. Only worry is that it seems to require you to do the programming on an ubuntu virtual machine linked to the pi because sunfounders youtube videos suggest that. I would much rather program on the pi itself if possible? Also if I got raspberry pi for dummies would that be sufficient help for setup and non gpio projects?
Hi David. I don’t have good answers for you on this yet as I am waiting on my own Raspberry Pi 2 to arrive. When I get in (soon, hopefully), I will review it and will be sure to mention whether you can program the Pi 2 this way.
As for the Raspberry Pi for dummies book, I’ve never liked the “dummies” series, but that’s my own personal bias. I suspect it’s probably a fine book.
Definitely don’t discount your own ability either. The RPi is actually pretty easy to setup with the NOOBS software. You should be able to get up and running pretty quickly on your own.
Almost a year later, I imagine that this response is useless to you by now, but for those who happen to stumble upon it in the future maybe my comment can help them out. The reason the Sunfounder videos have you do work in an Ubuntu virtual machine is because they ssh into the Raspberry Pi. Let me explain what this means and why they would do such a thing.
Let me start by spoiling the answer to your main concern. Yes, you can absolutely do all the work you’d like to do directly on the Raspberry Pi. Just plug in a keyboard and plug in a monitor, and load your SD card with the requisite software. That’s really how you begin controlling the RPi, and for setting it up that’s probably what you’d want to do. If that’s all you want to know, you could stop reading here.
So what’s all this ‘ssh’ business in their videos? Ssh, or Secure Shell, is what you can use to access *nix (e.g. Linux) computers remotely in a safe way where people can’t snoop on your connection to see the content of the data going back and forth between the two computers. This is wildly useful for people who know how to use the terminal and need to log into other computers that they physically might not have access to, but still have login accounts for.
The reason this is useful with the RPi is you don’t need to have an extra monitor and keyboard poking out of it. Once you have it set up, you can connect to it as a “headless” computer, or in other words, as a computer which you cannot directly interact with, but one you can still connect to and use over the network, so long as you have a USB WiFi dongle or an ethernet cable plugged in.
You’ll also notice that in the Sunfounder videos they also use Vim as the text editor, since the editor exists in the terminal (i.e. the command line interface, as opposed to the graphical user interface). This editor is very powerful and is generally not meant for beginners, though I would say there is definitely great value in learning how to use it if you want to do programming, specifically for the fact that you can use it over ssh.
So then why Ubuntu? Because Ubuntu is a Linux operating system, and it already has the tools built in to communicate easily with other Linux operating systems. Believe it or not, Raspian, the operating system recommended for installation on the RPi, is also a Linux OS. Raspian and Ubuntu are both derivations from Debian. And why use Ubuntu in a virtual machine? Because that means you can install Ubuntu onto your current computer without having to wipe the hard drive or create separate partitions for it. So you could run Ubuntu within Windows (or Macintosh, but just so you know, Mac is based on BSD, which we could call a cousin to Linux, and it has ssh and a terminal built in already) without reinstalling the operating system.
I hope that answers any questions one may have! If not, just search online and you will assuredly find more answers. Just one last thing to say about the Sunfounder kit: it looks like the one that comes with the most interesting variety of components. You might not get HDMI cables or WiFi dongles, but if your goal is to do interesting projects with all the various components that their kit includes, it looks like a great deal. You might have to get your hands a little dirty and figure things out to make everything work right, but honestly that’s the best way to learn!
Thanks Pretz for the reviews. I’m about to get a kit or parts for the first time and it’s nice to see the manuals reviewed and the detailed parts list, some from places I hadn’t heard of (like Vilros).
Now to reread this post and compare again.
Thanks!
I have not found a Vilros with a camera in the kit.
Your link goes back to the std starter kit.
Might you have a better link?
Good point. When they updated the kits to include the RPi 2, they must have mixed up the camera links on me. I’ll get right on that.
I just bought a Vilros “Ultimate” kit (two actually)… and curiously, you have in your picture for the kit… what looks just like the “USB to TTL” cable for the Adafruit (minus the blue coloring). Yet, you said no other kit had it except the Adafruit.
Well, my kits had that cable. Too bad it didn’t have the camera.
When I originally wrote the review, they didn’t include the USB to TTL cable. Then the RPi2 came out and the kits were upgraded, and I guess they threw in a TTL cable. I’ll update the review to reflect this. Thanks.
Great review, exactly what I was looking for, thanks for putting the time into this.
Hey Thanks! Glad you liked it. Don’t forget to check out the new RPi 2 Cases review as well: https://www.pretzellogix.net/2015/09/02/the-best-raspberry-pi-2-cases-compared-and-reviewed/
Thank you for this post. My son is begging me for a “computer kit” for Christmas. He is 8 and is tech savy, but has no experience in programming. Last year I bought him a Snap Circuits kit and he has spent many hours over the year following instructions in the manual and completing projects. Would all of these kits be too advanced? I cannot help him with this type of stuff, because he understands much more than I do. I was looking at the Kano, but was hoping to find something that I could afford. Thanks for any feedback.
Just found this article and I had already bought the Canakit, it DOES come with a manual now. Not a huge manual but enough to get you up and running with the RPi. I appreciate all the comments especially from @Ali about running the RPi headless.
does the 7 seg display in the sunfounder kit work for the canakit? because i need the accelerometer.
Can I use the sunfounder kit in cana kit? I need the accelerometer
Yes, they both should work fine. They’re just standard electronic components. There’s nothing special about them that ties them to that one kit that they are a part of.