In my last post on the Cisco CCNA, it was mentioned that an order for two used Cisco Catalyst 2950 switches had been placed. Well, the two switches arrived a few days later. So I plugged them in, but that was all I could do because there were no Console cables (aka. Rollover cables) to be found in the box. Granted, I wasn’t really expecting any since the seller had not mentioned any, but to connect to a switch that I knew nothing about, the smart bet was to connect via the RJ-45 jack (which is actually a 9600 bps serial port.)
If you already know how to physically connect to your 2950 switch, click here to jump to the Catalyst 2950 password recovery procedure.
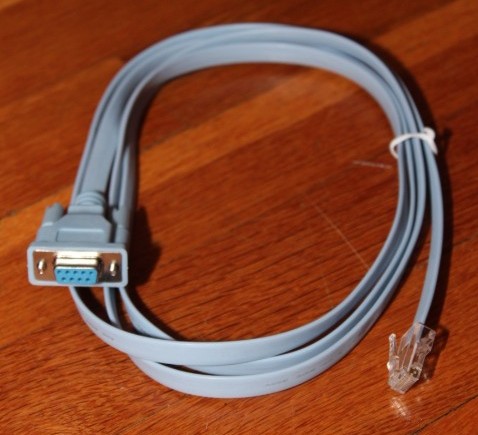
If you don’t have the appropriate tools yet, this means that 3 things will be needed to get started: a Rollover Cable, a USB-to-Serial adapter, and some Terminal software. This is what I picked:
- A 6ft Rollover Console Cable (DB-9 to RJ-45) — I ordered 2.
-or- Cisco Console Cable RJ45-to-DB9 (which is cheaper, but only available as an Amazon “add-on” — read: you must have $25 in your cart already…) - Some USB to RS-232 Serial Converter (DB-9) — I got two, so that I could connect to both switches simultaneously and not have to manually unplug and re-plug adapters in order to alternate between the two.
- RealTerm terminal software (Windows; free; open source)
Connecting the PC to the Cisco Switch
With the USB-to-Serial dongle out of the package, the first step is to install the device drivers. Chances are your machine does not have the USB-to-Serial drivers installed already, so pop in the CD-ROM or download the drivers from the Interwebs and get the USB-to-Serial dongle working.
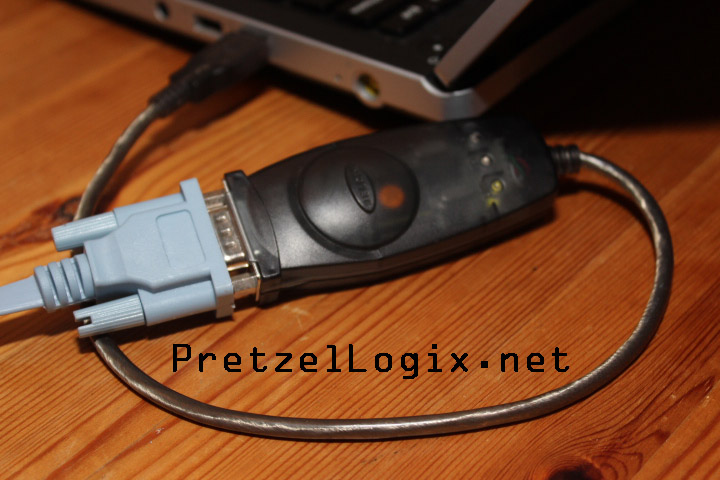
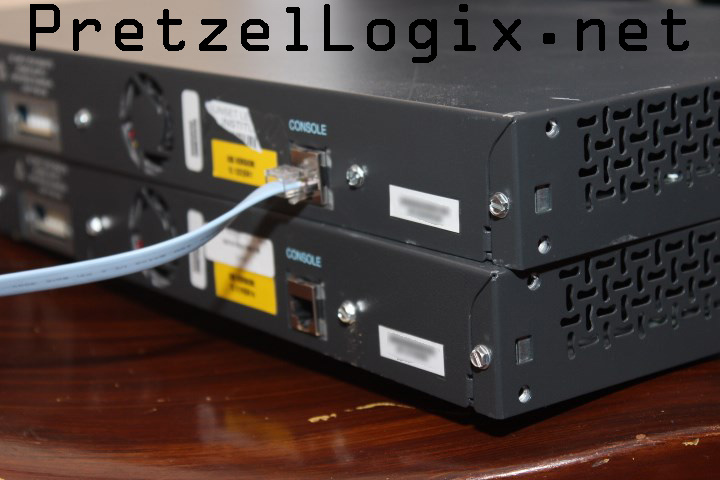
After getting the dongle working, plug the DB-9 connector of the baby-blue Rollover cable to the dongle and connect the RJ-45 end of the cable into the “Console” port on the back of the Cisco switch.
Next, install and run your favorite terminal software. The RealTerm software is used here. To make things a little easier to access RealTerm with the appropriate configuration settings, I made a shortcut to RealTerm on my desktop and used the following “Target” (found in the shortcut -> Properties)
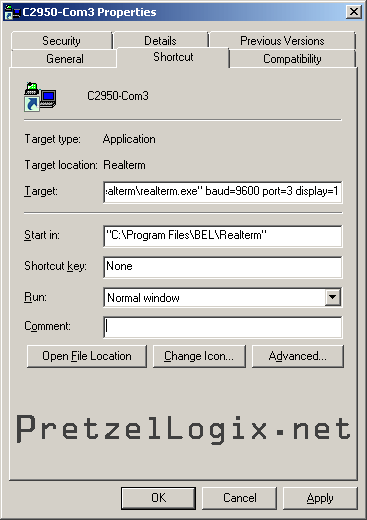
"C:\Program Files\BEL\Realterm\realterm.exe" baud=9600 port=3 display=1 rows=37 cols=80
“baud=9600” sets the Bits per second to 9600, “port=3” sets the COM port to COM3 (you may need to check in your Device Manager to find out what port your USB-to-serial dongle is set to), “display=1” sets the display to ANSI, “rows=xx” and “cols=yy” is how many Rows and Columns of text you want your display preset to. 37 rows and 80 columns were optimal for taking up exactly 1/2 of the 1366×768 display of my screen. This way I can have two RealTerm sessions going side by side in Windows 7 or 8 by dragging the application to either the left or right side of the screen.
Once RealTerm was started and connected to the switch via the Console port, I pressed the ENTER key and was immediately presented with a “User Access Verification” screen and a “Password:” prompt. This means that whomever sold me this switch did not restore it back to factory default settings. A pessimist might grouse at such a chore, but the optimist will see it as an opportunity to learn and practice how to perform password recovery and reset a Cisco switch back to factory defaults.
Password Recovery Procedure
Not surprisingly, the instructions for Cisco Password Recovery Procedure are found readily on the internet via any search engine. On this page, one merely needs to scroll down to the particular product series and click the respective link. We are interesting in the documentation for Password Recovery of the Cisco Catalyst Layer 2 fixed configuration switches 2900XL/3500XL, 2940, 2950/2955, 2960, and 2970 Series, as well as the Cisco Catalyst Layer 3 fixed configuration switches 3550, 3560, and 3750 Series.
To start the password recovery procedure for the Catalyst 2950, just follow the instructions in the link above. Or the abbreviated version here:
- Unplug the switch
- Press and hold the “Mode” button while plugging in the switch
- Release the “Mode” button once the “Stat” stops blinking green (~5 sec)
- At this point the terminal display should yield the following prompt:
switch:
- Enter the command:
flash_init
- The switch will say “Initializing Flash…” and run for a bit. At the prompt, type:
load_helper
- The command prompt will return immediately, then type:
dir flash:
(yes, you need to enter the colon (:) after the word “flash”)
- This will give you a directory listing of the flash storage. Type:
rename flash:config.text flash:config.old
- The “config.text” file in the “flash:” storage contains the password information. By renaming the “config.text” file to “config.old”, we are effectively removing the switch configuration file and making a backup of it. (In case we need it for later.)
- Once this is done, Restart the switch. Type:
boot
- The switch will reboot and a bunch of start-up text will scroll by and eventually show:
Would you like to enter the initial configuration dialog? [yes/no]
- Enter “n” at the prompt to abort the initial configuration dialog.
- Then press the Enter or Return key on your keyboard to get started.
- Your system now has NO password protecting it.
Reset a switch running Cisco IOS Software to factory defaults
Now that we have unfettered access to the switch console, we can reset the switch to factory defaults. There is a document for this on Cisco’s website called Resetting Catalyst Switches to Factory Defaults. The short version of this is as follows:
- Enter “enable” mode by typing:
enable
- The console prompt should change from “switch>” to “switch#” to signify this.
- To reset the switch to factory default, issue the erase startup-config or write erase command. The document’s example shows it using the following command:
write erase
- The switch may prompt for confirmation, type “y” (no Enter key needed, oddly)
- After erasing the NVRAM file system, reload the system:
reload
- Again, the system may prompt for confirmation, type “y” (Enter key needed this time)
- The system will reload and prompt to “enter the initial configuration dialog?” again. type “n” (Enter key needed)
- Back at the command prompt, enter “enable” mode again.
- Show the VLAN config, by typing:
show vlan
- After showing the VLAN configuration, we can delete the “vlan.dat” file from flash:
delete flash:vlan.dat
Alternatively, you can backup the vlan.dat file by renaming it to vlan.old, like we did with the config.text file.
- Once the deletion of the “vlan.dat” file has been confirmed, “reload” the system.
And that’s it!
Your Cisco Catalyst 2950 switch is now restored to factory defaults.
What? You don’t have a Cisco Catalyst 2950 switch?
Well, go get one (or two, preferably) — They’re cheap and easy to obtain from Amazon. Last I checked, this Cisco WS-C2950T-24 Catalyst 2950 24 Port Switch was going for around $50 or so (get “Used”, of course. “New” is still crazy expensive.) It’s a great switch to practice on for your CCNA exams. 🙂
10 replies on “Resetting two Cisco Catalyst 2950 switches to factory defaults”
When I power on the switch while holding the mode button I get the output you say (the system has been interrupted… etc) Then the list and “Switch:” but I cannot type anything in. Any ideas?
I had a bad console cable. Please ignore.
Thank you.
Hey. No worries. Glad you were able to figure it out!
nice program……using this code i reset the switch………thanks
You ROCK! Thanks for the help!
After some struggling: DONE!
Now on to learning how to config it.
What a great how-to! Thanks a lot!
For all of you who want to access the device from a Linux shell:
$ su (or “sudo -i” if you are on Ubuntu or one of its derivates)
# screen /dev/ttyS0 (or “/dev/ttyUSB0” if you have an USB adapter for your console cable)
That’s it. You are on the device.
There are many terminal tools on Linux (e. g. “minicom”), however I prefer “screen” as it is the simplest. As you can see, accessing the device works without giving any additional parameters. If the tool “screen” is not installed by default, you should find it inside your package manager.
I use Manjaro and absolutely every single terminal failed except for Cutecom, so just a tip for all you Linux users out there if you experiance bad switch reactions.
Awesome and saved bookmark on this page. Worked first time, although, yes I missed the colon at the end of flash the first time. Once I saw the omission and your comment, “Yes, the : is necessary,” I laughed at myself and correctly sent the command. Thank you for writing this tutorial up!!
using Nexus lately, had to redo a c2950 today, many thanks for your instructions!!