FreeNAS is a pretty great (and free!) Network Attached Storage system. Recently, it was updated to version 9.3 which contained a lot of great improvements including automatic updates over the network. (Previously, the upgrade process was manual and kind of a pain in the neck.)
![]()
Unfortunately, FreeNAS isn’t very good at the power-saving thing. (read: spinning down your hard drives when they’re not being used.) And prior to FreeNAS 9.x, it was pretty easy to get the drives to go into Standby mode using a few commands. But again, FreeNAS has changed the default install to put the system log (which it writes somewhat regularly to) on the very drives you’re trying to spin down.
Fortunately, there is a fix.
Looking around the Internet, I came up with a page about the inability to spin down drives on the FreeNAS forums as it seems some other people were having the same problem. Yet only vague answers were given. Some of the posts were generally dismissive of the idea of saving 15 watts per hour by spinning down the 4 hard drives in somebody’s array. Fortunately, someone alluded to a fix for the problem by noting that the .system file/folder could be relocated to an SSD or a USB flash drive and that this would allow the drives to fully go idle and allow the spin down commands to work.
After much tinkering, I came up with a method for getting my drives to go spin down after being idle for a few minutes. Here is is:
Attach a USB Flash drive or an SSD
When I originally wrote this, my choice was a SanDisk Ultra Fit 16GB drive which I had laying around after the review I wrote on it a few months ago.
 My logic being was that my FreeNAS box gets very light usage. As such, the
 .system dataset would be written to rather lightly. On the order of 2 to 3 GBs per week.
After talking with a Freenas forum member who had a FreeNAS box that was used more heavily, they informed me that their FreeNAS .system dataset gets 2GB of writes per hour! That’s ~100x more writes!
Naturally, moving the .system dataset off to a USB flash drive would be a bad idea as it would quickly wear out the drive in, say, a month’s time. In the same breath, it should also be noted that if your FreeNAS box is getting that much use, you really shouldn’t bother trying to spin down your hard drives at all.
Which to pick: a USB Flash drive? or an SSD?
Both use a form of wear-leveling to prolong the life of the drive by spreading out the writes evenly across the NAND flash memory. But to me, it comes down to your use case:
Is this going to be a light-duty home NAS box? (read: holds your MP3s and Movies and maybe some backups or other files) and will generally stay idle most of the time?
If Yes, it is going to be a home NAS, then a USB flash drive will probably be fine. The larger, the better. (More space to spread out the writes. I chose 16GB, though 32GB might be better.)
If No, it is going to be a small office NAS (or you just want a better guarantee of reliability), then pick up a small 32GB or 64GB SSD. It should be robust enough to handle the repeated writes of the .System dataset.
Add the drive via the Volume Manager
In the FreeNAS web console, click on: Storage -> Volume Manager
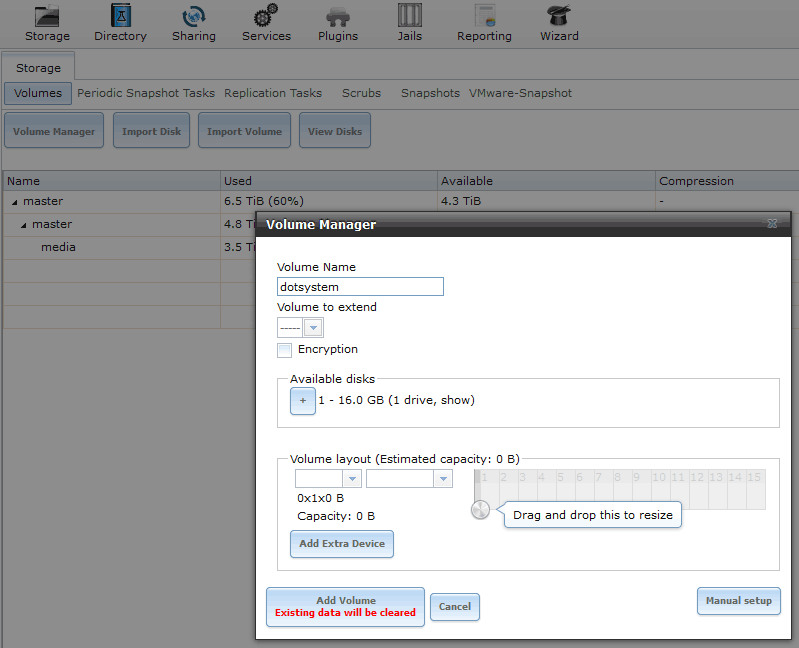
Call it whatever you want. I figured a name like “dotsystem” would be a good one since that’s where we’re moving the “.system” data.
Click on the [+] icon under Available disks
Add Encryption if you wish. I figure it may slow down the system a bit, though. So I kept it simple and left it disabled.
Also, we’re not extending any volumes, so leave the “Volume to Extend” option as “—–“.
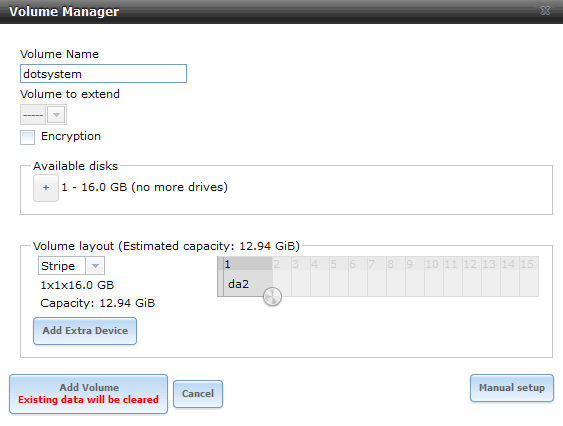 After clicking the plus icon (
+), the window will change and show that the proposed addition. You can drag the little circular handle/knob thing back and forth, but there’s likely only 1 size when using a 16GB drive.
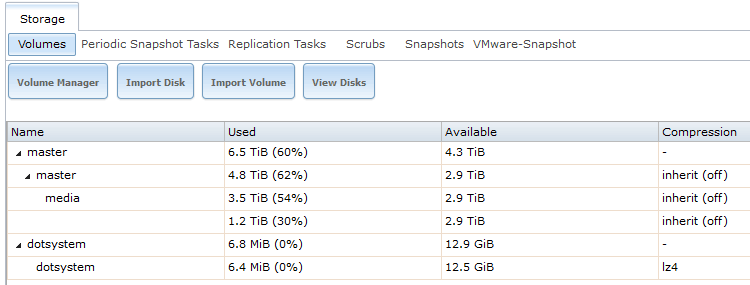
Then click, Add Volume. The Volumes tab should look something like this:
Change your System Dataset Pool location
Next, click on System -> System Dataset
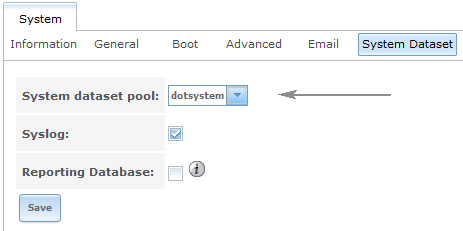
Then click on the “System dataset pool” drop down and change it to our newly created pool. In this example, we chose the name “dotsystem“.
And then click the Save button.
Set the “ataidle” command to run at Startup
The ataidle command can get your hard drive to spin down immediately or after the drive has been idle for a certain period of time.
Go to the Tasks -> Init/Shutdown Scripts section of FreeNAS and add the following commands as tasks and select the “postinit” option:
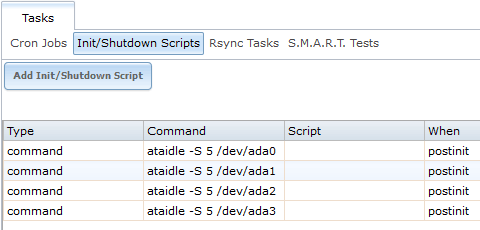 This command instructs device ada0 (your 1st hard drive) to go into standby (spin down) after being idle for 5 minutes. Adjust this delay number to your wishes. Many people choose 5, 15, 30, or 60 minutes. (Note: the switch is a capital “S” and not a lowercase “s”.)
/usr/local/sbin/ataidle -S 5 /dev/ada0
In the screenshot above, the ZFS storage array has 4 disks: ada0 through ada3.
Adjust your configuration accordingly by adding or subtracting commands and changing adaX to reflect which drive number (ada0, ada1, ada2, etc.) depending on how many disks are in your array.
Test that the drives actually go into Standby
To make sure that the drives are capable of spinning down when idle, we need to start by disconnecting the FreeNAS from the network so that nothing attempts to use the NAS.
Then we launch the Shell and issue the following command:
camcontrol cmd ada0 -a "E5 00 00 00 00 00 00 00 00 00 00 00" -r -
This command tests drive ada0 to see if it is in Standby mode or not. If you receive the following response where the second to last group is a “00”:
50 00 00 78 00 00 00 00 00 00 00
Then that single drive is in Standby.
If the response is where the second to last group is “FF”:
50 00 00 78 00 00 00 00 00 FF 00
Then the drive is still spinning.
To instruct a drive to immediately go into Standby mode, issue the following command:
ataidle -s /dev/ada0
(note the lowercase “s”)
This instructs the drive ada0 to immediately attempt to go into Standby mode. After waiting a few seconds, you can re-issue the “camcontrol” command above and you should see that the 2nd to last group is now “00” indicating that it is in Standby.
Another way to verify the spin down of the drives
If you don’t have one already, you should consider getting yourself a Kill-A-Watt power measurement device ($19). Instead of issuing those convoluted commands, if you have a Kill-A-Watt, you can hook-up your FreeNAS box and watch in real-time as the ataidle command causes your box to draw less power.
In my experimentation, I found that my FreeNAS box uses approximately 50 watts when idle and all 4 of the disks are spinning. But when the 4 drives in the array are in Standby mode, the FreeNAS box uses only 35 watts! (A savings of 15 watts per hour.)
Assuming that I only use the NAS for 1 hour per day, that’s a savings of around 345 watts per day. That’s a savings of 125kWh per year (or about $20 in electricity costs.) Naturally, your results may vary, but I think it is a worthwhile effort to save a little extra electricity.
Will the USB Flash drive wear out prematurely?
Possibly. And if it does, you might be a sad camper unless you’re backing up your `.System` data. Which, I should add, is only semi-important.
Yes, apparently, there is little risk of losing your data, but if the USB flash drive dies, it could hose your Domain Controller if you’re using Active Directory. If you’re using SMB file sharing, it will lose all of your Samba settings. So fair warning here before you try this procedure.
The general consensus (from all the reading I’ve done) is that if the USB flash drive dies, you will not lose your data. It will just force you to re-install FreeNAS from scratch. Not a tragedy, but certainly a waste of time.
If you’re wondering how to backup your .system dataset? Good question. I’m currently looking into using rsync as well as ZFS send/receive. I’ll update this section when I have a good way of doing it.
Anyway…
There seems to be some concern in the FreeNAS forum about this procedure that a USB flash drive will wear out quickly. Personally, I’m not convinced this will happen for light-duty use cases. Here’s why:
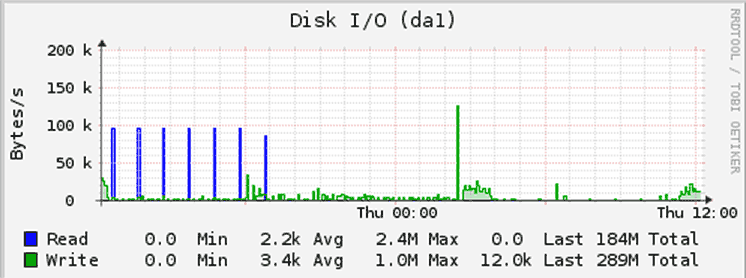
From my observations so far, the files in .System take up about 90MB and the Reporting Tool in FreeNAS web interface indicate that the “dotsystem” volume gets about 289MB of writes over a 2-day period meaning that in 1 year, the volume will get around 54GB of writes. That’s not a whole lot of writes for a 16GB drive.
(Your mileage may vary, of course. If your NAS gets a ton of traffic, then there will be a lot more writes to the system log. This leads to the question: If your NAS is constantly busy, should you really bother trying to spin down the disks?)
Most USB Flash drives have dynamic wear-leveling algorithms built in. Although dynamic wear-leveling isn’t typically as robust as static wear-leveling (often found in SSDs), a large USB Flash drive should be good enough to evenly wear the drive’s flash cells over the lifetime of the NAS since the .System data takes up so little space. (See this Wikipedia entry on Dynamic Wear-leveling if you’re curious about how this works.)
In order to safeguard against pre-mature failure of a USB flash drive, the larger the drive used in this procedure, the better off you’ll be as there is more space on the drive to spread out the writes for the wear-leveling. In this post, I decided that a 16GB flash drive (many of which can be had for $15 or less) would be more than enough. Definitely don’t use an old 512MB flash drive; that will be a bad candidate for this procedure.
Unfortunately, I don’t know where the “sweet spot” or what the minimum size is for a USB Flash drive in this procedure. Anyway, I will certainly be keeping an eye on this flash drive and will definitely update this post if anything changes. 🙂
34 replies on “How to get FreeNAS 9.3 to spin down your idle hard drives to Standby mode”
Thanks for your great guide!
I think this will help a lot of people as FreeNAS built-in spindown doesn’t work so well.
However I think I found a small mistake:
When running a command via “Tasks” the full path must always be given, meaning the command should look like this:
/usr/local/sbin/ataidle -S 5 /dev/adaX
Really? The abbreviated path worked fine for me.
Well, regardless, I think your suggestion to use a full path is a sound one, so I’ll update the post to reflect that.
Cheers! 🙂
Thanks a lot for this well-written guide. It helped me a lot! Now I run FreeNAS off a USB stick, have my system dataset and syslog on a SSD and finally got rid of all the log writes to my HDD. Great tip with ataidle, for a noob like me this was really valuable info 🙂
A quick question regarding “/usr/local/sbin/ataidle -S 5 /dev/ada0”, I setup the postinit commands as instructed but for some reasons the HDD won’t go into standby. I can force them into standby (ataidle -s /dev/ada0) and they stay in standby until I access them, but the 5 minutes standby does not work. I setup SMART, but set it to leave the HDD alone when in standby. My setup is as follows: HP Proliant N54L, Freenas boots (now 🙂 off a USB stick, system dataset is on SSD (modded bios, installed in the ODD bay) plus 2x2TB WD Green, 2x3TB WD Green. I checked in the reporting that the HDD have no reads/writes but no luck with automatic standby. Any ideas, maybe I am missing something? Your help is much appreciated!
I noticed when I originally setup my drives that the 5 minute wait time would sometimes be more like 7 or 8 minutes. I don’t know why it takes so long. You could try setting the switch to 1 minute so that you don’t have to wait as long to find out if it is working or not.
This thread on the FreeNAS forums seems to have some answers which you could try: https://forums.freenas.org/index.php?threads/ata-idle-wd-red-drives.11773/
Specifically, it looks like one user had to set APM to false. There’s more in that thread which may be helpful, tho.
Just in case anyone else comes here from Google, I had to also set the SMART check interval (Services > S.M.A.R.T. > Check interval) to be strictly greater than the HDD Standby time (set under Storage > Volumes > View Disks).
What I had before was both the check interval and standby time set to 30 mins. So what would happen is SMART would run right before the disks can go into standby, which resets the timer… and so the disks never spun down.
Awesome tip, thanks for the write up! I had a lot of grief trying to spin down my disks when idle. I was getting fed up with people saying FreeNAS was like that “by design”.
You might need to move your jail root so the jails don’t keep waking up the disks. I keep mine in a low power USB hard disk that I keep always on (much lower power consumption than 3.5 inch HDDs), along with the system dataset.
In case you need to move the jail root, here’s a how-to that worked fine for me:
https://forums.freenas.org/index.php?threads/move-jail-directory.18690/#post-103055
One other thing, you don’t really need the ataidle command. Just go to Storage -> View Disks and set each disk Advanced Power Management to 127 (about 10 mins before spinning down). For testing you can set it to 1 (5 seconds to spin down). Leave HDD Standby as “On”, that is an older method of power saving, and it conflicts with APM.
Oh, another useful tip is going to Services -> S.M.A.R.T and set power mode to “stand by”, so SMART doesn’t wake up the disks.
Cheers.
How does this tie in with the builtin settings of the freenas GUI => Storage => View Disks => HDD Standby, Advanced Power Management? Looks like you can handle this through the GUI, the only missing bit of info is the advice to move your .System to another drive, right?
Btw. where exactly do I find this .System file to check its size?
Thanks so much for this guide, been struggling to figure out why my drives aren’t spinning down for a while now. The FreeNAS forums are filled with pessimism and Linux elitism that makes it hard to find an easy answer to anything! I know changing an incandescent light bulb to an energy saving one will save more energy, but that doesn’t answer my question now does it…
Just thought I’d update, all went well. I set my .system dataset to my SSD Volume and moved my jail dataset to the SSD as well following the guide Eduardo linked to above. I tried setting “Advanced Power Management” to 127 and “HDD Standby” to “Always On” under Storage > View Disks > Edit as I had been playing around with these settings before, but unfortunately this didn’t work. After reading up in the FreeNAS forum I looks like WD Reds need “HDD Standby” set to a time (in my case 60) and “Advanced Power Management” Disabled, and this worked after a reboot. I didn’t try the ataidle commands as I wanted to see if I could achieve it all through the GUI first, looks like you can. For reference, my system went from 48 Watts Idle to 32 Watts (measured with a kill-a-watt style energy meter) with 4 x 4Tb WD Reds spinning down.
Thanks Again!
Excellent job, Jimzor. Thanks for trying this out. I figured it probably worked, but I was used to doing it the “old way” (eg. the ataidle commands) that I never tried thru the GUI. Good to know!
“It looks like WD Reds need “HDD Standby” set to a time (in my case 60) and “Advanced Power Management” Disabled, and this worked after a reboot.”
I am currently using WD NAS Reds HDD for my FREENAS . I followed above instruction, after rebooting my system and tried launching the Shell and issue the following command:
camcontrol cmd ada0 -a “E5 00 00 00 00 00 00 00 00 00 00 00” -r – , and the responses was:
50 00 00 78 00 00 00 00 00 FF 00.
So, It appears “FF” did not change to “00” meaning the drive still spinning.
I even instructed hard drive to immediately go into Standby mode, by issuing the following command:
ataidle -s /dev/ada0, but same results.
Just to let you know but you can make this even easier now if you have a large boot USB stick. Per the http://download.freenas.org/9.3/STABLE/201506040752/ChangeLog #9353 Bug Expected Allow freenas-boot to be used as system dataset
You can now select to use your USB boot pool for this instead of your HD. If you’ve got a pair of large USB sticks for your bootpool this can make it a bit easier to setup and conserve some ports.
According to Freenas users who’s having the same issues that these WD Red NAS HDDs are commercial grade hard drives they never really go to sleep which is compare to desktop HDDs do not have this kind of issue.
I am a new Freenas user (have used windows home server for about 4 years) and I must say a lot of the things I took for granted on WHS are (very) hard to implement on Freenas. One of those things is a decent way to control energy use. So this article is a god sent. One thing tough: If there is some concern about the wear of the USB stick why not put 2 of them in a mirror? I have bought a USB 3 pin header (eur 9,95) on my mobo that can hold 2 usb sticks and at todays prices you won’t cause a panick in your wallet with a second USB stick. That way if you get nervous about reported errors it should not be to hard of a job to replace them for fresh ones. By the way: I had also free USB2 headers on the mobo but I think the USB3 header is a bit more sturdy. I downclocked USB 3 to USB 2 in my BIOS.
How about using a class 10 extreme SD card? These cards won’t wear out in the next 10 years 🙂
Actually, the rate that the rolling log files write to the cards, the fear is that they WILL wear out faster than their rated lifetime of 10 years.
I did the above and had the problem that my drives kept spinning up for no aparent reason, since lsof listed no process access on my shares. Found out you have to set your S.M.A.R.T.-settings under ‘services’ to ‘standby’. Otherwise smart will spin up your drives every 30 minuts for a small test. This puts 48 spin-up cycles a day on your harddrives, wich is the most likely thing to kill them after some time.
Yup, this is correct (in my experience.) I’ll update my post to reflect this. Thanks for catching that. 🙂
Based on your blog post I wrote a simple bash script to check the status of a drive:
“`
#!/bin/bash
dev=${1:-“ada0”}
code=$(camcontrol cmd $dev -a “E5 00 00 00 00 00 00 00 00 00 00 00” -r – | awk ‘{ print $10 }’)
if [ $code == “FF” ]; then
status=”spinning”
else
status=”sleeping”
fi
echo “Drive $dev is $status”
“`
Alternatively if this is a new setup of freeNAS, the location the .sys file saves to is the first drive pool you create. As such, just create the first pool on the drive you wish freeNAS to save the .sys to. All that is left is to put in your spin down commands.
Thanks for the write-up on this potic, and all the contributions from the interested members. I have a FREENAS running as a home file server for over a year. One of the ideas for setting this NAS is to dump all my small ‘outdated’ hard drives at the sizes of less than 2T into this NAS (which I have a total of 10). Saving energy has becomes a more important issue over times. To thump up the discussions, it seems all come down to the following 3 steps:
1) direct ‘systemdataset’ to FREENAS-boot, which in my case is an 8G USB jump drive, from the ‘system’ menu’
2) configure each hard drive to a stand-by schedule via the menu of Storag, ViewDisks, and the Edit window. I set all of them to level-1 (minimal power usage)
3) configure S.M.A.R.T service on much longer schedule, such as 60 minutes or even longer, and check only when HDs are not in Stand-by mode
All this can be done in less than 5 minutes, and then a reboot. I have yet to test/confirm if the HDs do really go to stand-by mode after 5 minutes of my setting. I will also check how much electricity this may save, if Stand-by is achieved. Thanks for the tips.
Good post, but “savings of 15 watts per hour” should be “15 watt-hours per hour” and “savings of around 345 watts per day” should be “345 watt-hours per day”. You got it right for your savings per year though.
Watt-hour: a measure of electrical energy equivalent to a power consumption of one watt for one hour. Same as “watt per hour”.
Anyway, yes, I suppose I should have written “watt-hours”, but I feel that confuses some of my audience. The rest understand that “watts” should be read as “watt-hours”. I try not to be pedantic in my writing considering my audience is not as technical or precise as you are… In short, you’re correct. Thanks for the feedback. I’ll consider changing this in the future.
So, if I use my bathroom for 2 hours a day and have a three 60watt bulb fixture, and unscrew one bulb I save 60 watt-hours/hour so for each day I save 60 watt-hour/hour * 2 hours/day =120 watt hours/day. 120 watt hours/day * 365days/year*1kW/1000W = 43.8KWH/yr
Of course 60 watt-hour/hour = 60 watts but okay.
Looks like no encryption possible, at least in 9.3. Here is the doc line from http://doc.freenas.org/9.3/freenas_system.html
> Note encrypted volumes will not be displayed in the “System dataset pool” drop-down menu.
Assuming you mirror will the electricity savings offset the cost of the USB?
Some places pay a lot for electricity. It also drastically cuts down on wear and tear on the drive. And sometimes it’s not about saving money, but saving electricity. Some people just like to know that they’re using less electricity than before. Many people have many reasons. It’s just an option. Take your pick.
Thank you, that was simple and worked perfectly. The noise from my home freenas was driving me crazy. Now they only spin up when I watch movies and I can’t hear them with the movie audio going anyway. You’re a life saver 🙂
Nobody has commented here in about a year but thanks for this great write up. I can confirm it works with 11.1-U4. This is a surprisingly common problem and not just with FreeNAS. Any NAS OS, including the commercial ones from Qnap and Synology, that keep the OS and/or system files on a data volume often have issues with the drives not staying in standby due to system activity.
It’s frustrating the NAS gurus argue you don’t want your drives to spin down anyway instead of addressing this issue. Even a brand new Qnap right out of the box won’t let the drives sleep. I don’t know why they even let you configure the option if it doesn’t work? Qnap’s response is to point you to a FAQ that basically lists 1001 reasons why the drives won’t sleep. Especially for a media server only used in the evenings and on weekends it makes total sense to have the drives sleep the rest of the time.
It’s really helpful to find guides that leverage the GUI instead of the command line. It worked perfectly using a small Sandisk Cruzer USB2 SSD which are reported to have decent lifespans. I recommended against the USB3 version of the Cruzer however as they run extremely hot and frequently die just from the heat.
It’s also worth noting for occasional NAS use your drives will likely last much longer if they’re not spinning 24/7. There are a lot of people who say otherwise but they have no objective data supporting their argument. Most drives fail from mechanical issues and spinning them down saves a lot of wear and tear. It also lets the entire NAS run cooler which is a good thing.
The main real downside to spinning the drives down is the delay in waiting for them to spin back up when you need to access the volume(s). You also don’t want them excessively spinning up and down.
Ideally the drives should only spin up a few times a day and you can set the spindown time accordingly. If the NAS will be used semi-frequently throughout the day you might choose 120 to 300 minutes for the standby timer. That way the drives won’t usually sleep during the day but still can spin down at night.
I can confirm similar write activity to what you report–around 50 to 150 MB/day or around 40GB/year. If the Cruzer flash drive fails I may switch to a USB3 portable SSD but I don’t really like the idea of having an external cabled drive being essential to the system (my hardware has no free SATA ports). For those who do have a spare SATA port/M.2 slot, space, power cabling, etc. a small internal low power SSD is an ideal solution.
Finally I assume if there is a failure of the drive with the system dataset, you can re-install FreeNAS, restore your configuration backup, and you should be good to go (assuming your data volume(s) were not corrupted).
If that $15 USB stick fails within 1 year, you are losing more money than you are saving.
Granted, sleeping might increase HDDs lifespan, but I would recommend 2 USB in mirror, or 2 SSD in mirror for this. I prefer the second option, as it’s more robust.
Mihai, this write-up about FreeNAS 9.3 is about 5 years old at this point, so I’m not even sure if this is worth debating…
That said, a good $15 USB stick has a capacity of about 64GB these days. There’s no way that FreeNAS will write to such a USB stick so much as to cause it to fail. There’s so much free space on a 64GB stick that the wear-leveling algorithm on the USB drive prevents this from happening.
Hypothetically speaking, if the USB stick *did* somehow fail, you have *not* (repeat *not*) lost your data. All the files stored on the USB stick located in the .system file/folder merely need to be rebuilt onto a new USB stick. (basically, replace the USB stick and restart the server, from my understanding.)
Sure, it would cause downtime on your FreeNAS box, ostensibly, but if you’re the type who wants to spin down the drives on your FreeNAS box, then are you really worried about downtime? And the answer is: No, no you’re not.
FWIW, I ran that FreeNAS 9.3 box for nearly 3 years (24/7) on a 16GB USB stick and everything ran just fine during that time.
As for mirroring USB or SSD? Eh, yeah, you can do that, but I figure that if you’re gonna spend all that extra coin, you might as well get a Synology box and be done with it. 🙂
Hope this helps.
Long time reader, first time commenter! This guide is great! But I recently upgraded to FreeNAS-11.3-U1. It seems that the ataidle command no longer works?
When I type ataidle command in shell, I get a “zsh: command not found: ataidle”..
Am I doing something wrong?
Unfortunately, I haven’t played with FreeNAS in a while. As you can see, this post was written in 2015 for FreeNAS 9.3.
If you find a solution, please write back and let us know? Thanks.