If you’ve ever had to encode or transcode a video, then you know that it is both time consuming and difficult to get right. And if you have a lot of videos to re-encode, then it can be a massive pain in the neck.
In the A/V community, there are a bunch of popular tools that can do this for you, but the two that stand out the most are Handbrake and RipBot264. Both programs are free, but each offer something the other doesn’t. This article is meant to be a quick “compare and contrast” of the two programs.
The way this article works should be pretty obvious. On one side will be Handbrake and on the other side will be RipBot. Each major piece of functionality will be covered step-by-step and any nuance that is worth talking about will be covered.
ProTip: If you’re using Firefox, the Thumbnail Zoom Plus add-on will allow you to mouse-over each image so that you can easily view the images full-size without leaving the article. Chrome has a similar plugin called BetterZoom.
Ready? Ok, let’s go!
| Handbrake | RipBot264 |
 |
 |
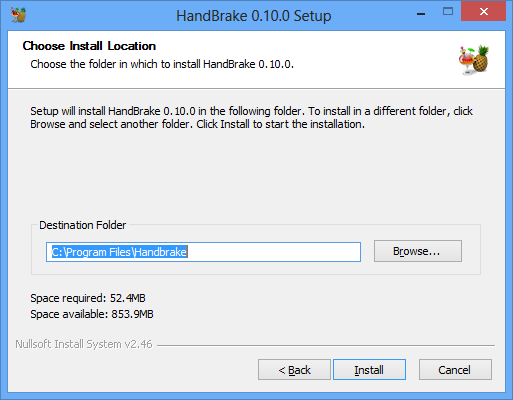
Installation: Of the two, Handbrake is far easier to install. It has a standard auto-installer that we’ve all used at some point in our computing lives.
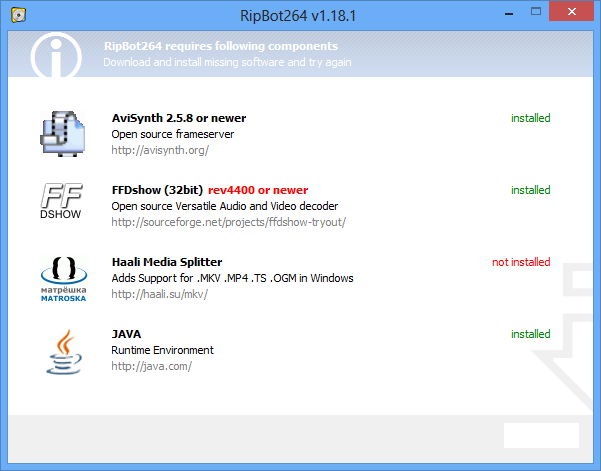
RipBot comes in a compressed file which you must un-compress and drop into a folder somewhere (say your desktop). Then when you run the application for the first time, it will tell you if you are missing any software. RipBot depends on some free software: AviSynth, FFDshow, Haali Media Splitter, and the Java run-time environment. Thankfully, it has links to all the software, so it’s pretty easy to just download, install, and restart.
 |
 |
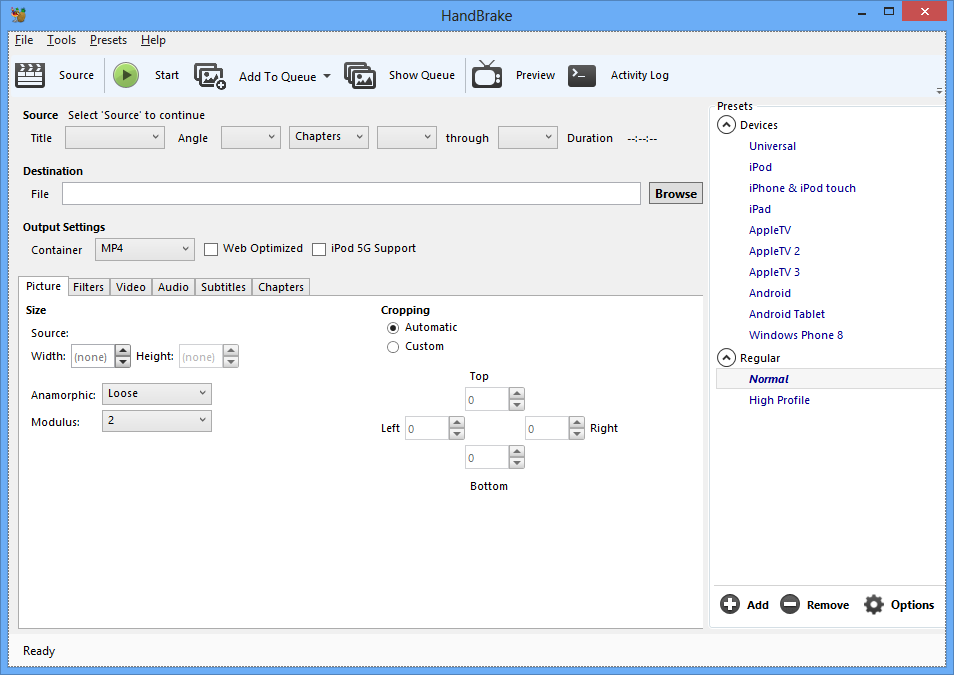
Main: The two programs take different approaches on the main screen. Handbrake starts the user off with a screen that represents “job configuration”, while RipBot displays the “job queue” as the main screen. From a programmer’s perspective, it makes sense to have the queue be the master controller, but from a user’s perspective it probably makes more sense for the job configuration to be the central aspect of the program. As such, Handbrake makes the queue a non-modal window that can be opened and closed and moved around.
  |
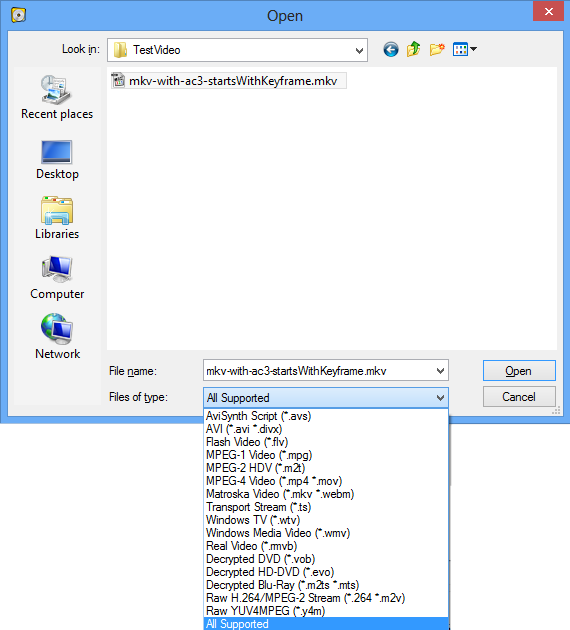 |
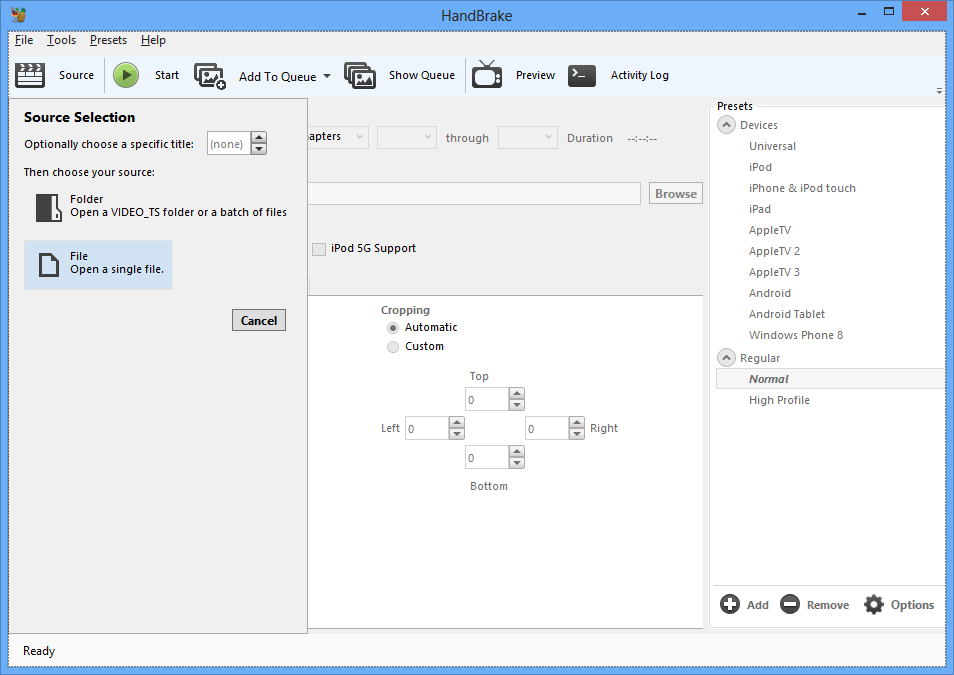
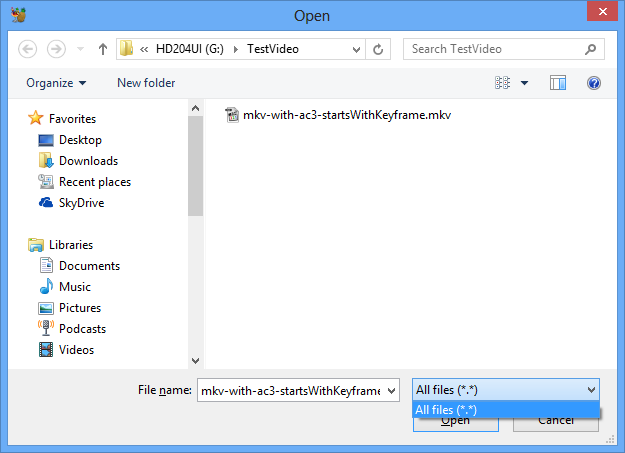
Opening a Source file: For Handbrake, it’s relatively obvious how to open a file. Just press the Source button and select File, then choose a file from the “Open” modal dialog box. For RipBot, it’s fairly obvious that with an empty queue, one needs to click Add and select a file. And to RipBot’s credit, there are a variety of file extensions that one can filter by (which Handbrake leaves out for some reason.)
 |
 |
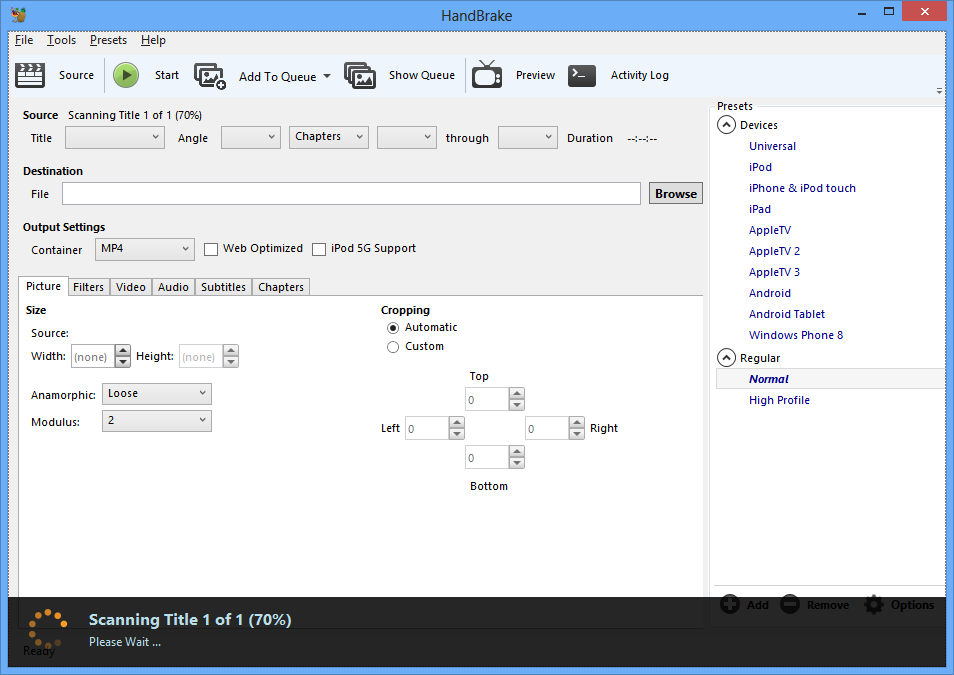
Scanning the File and Gathering Info: When Handbrake opens the file, it appears to scan the file for basic meta data about the file like audio and video codecs, bitrate, frames per sec, etc.
RipBot does the same, yet takes the time to also demux the file into separate audio and video files in a “temp” folder. This takes a little longer (depending on the size of the file) and requires a little more hard disk space. Not necessarily a bad thing since demuxing will have to take place at some point in the process, but demuxing up-front sometimes can slow down the process of setting up a job.
(Incidentally, the temp file location for RipBot is set in the “RipBot264.ini” file.)
 |
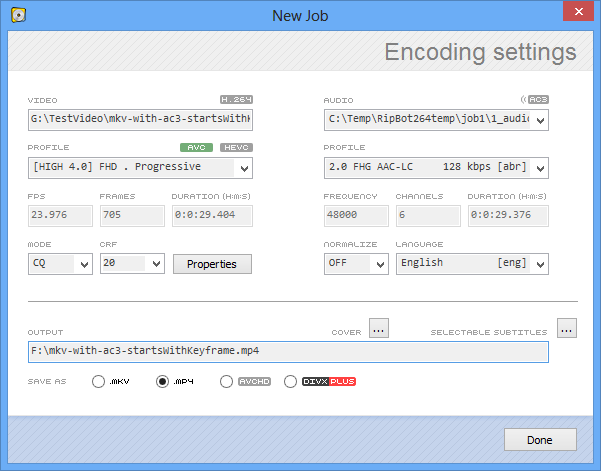 |
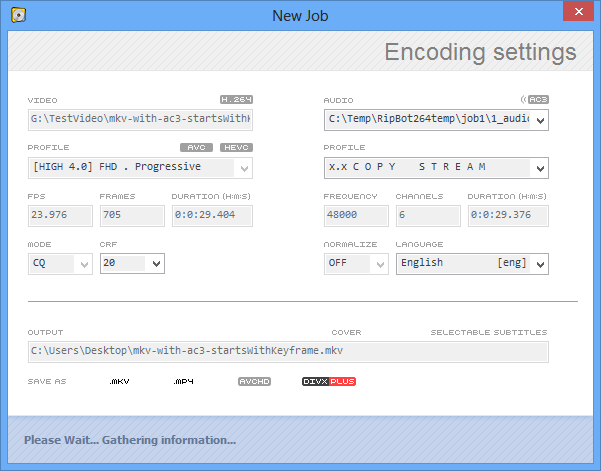
Setting the Output file: Shown above are the main job configuration screens. Handbrake has two options for output: MKV and MP4, while RipBot has 4 output options: MKV, MP4, AVCHD, and DivxPlus, the latter two are highly useful for burning to DVD+R discs for playback in Blu-ray and DVD players that have such support.
 |
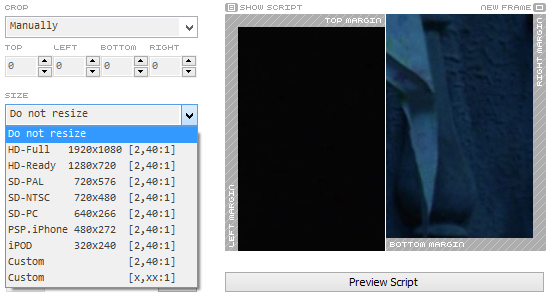 |
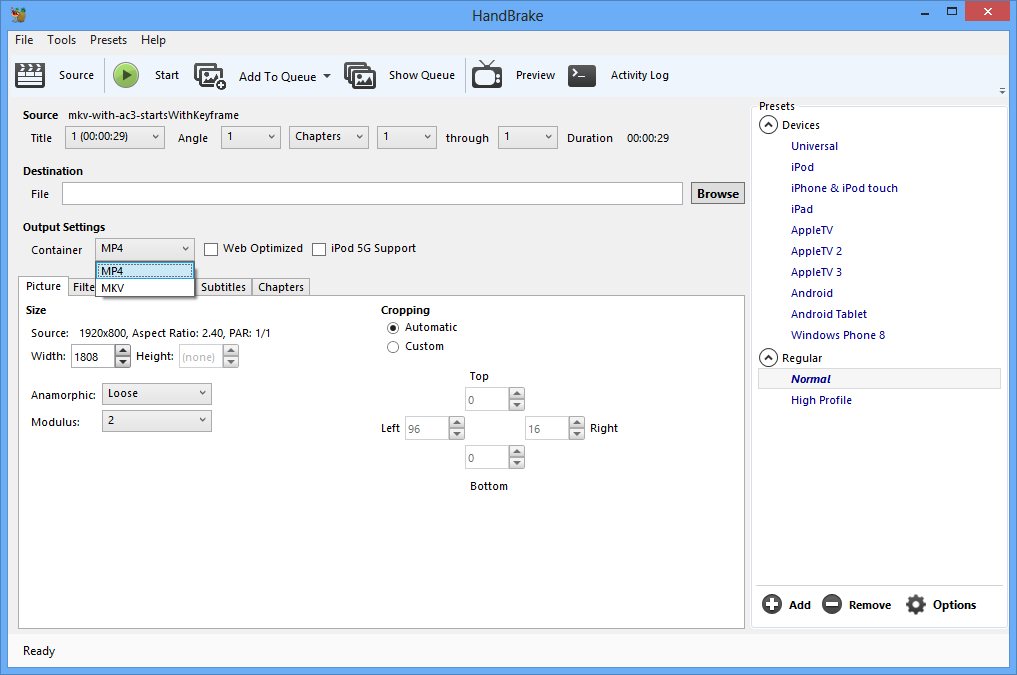
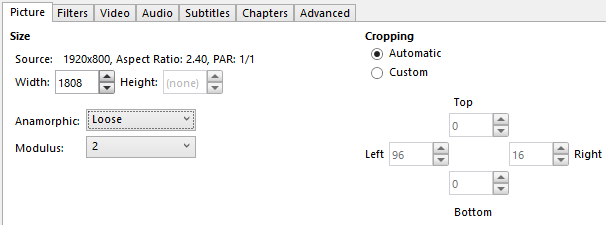
Cropping and Adjusting Size: Handbrake and Ripbot both have the ability to crop and adjust video frame size. Handbrake has it available right on the first tab, while RipBot has it hidden via the Properties button (which is a confusing placement for a button since it is right next to Mode and CRF which are encoding options, not frame size information.) On the other hand, Handbrake seemed to needlessly want to crop the frame down from 1920×800 to 1800×800. Ripbot correctly detected that the frame was fine the way it already was.
Handbrake has a set of Anamorphic options as well which is defaulted to “Loose”. For most encodings, it seems that “None” would be a smarter option which is exactly how RipBot behaves. There’s also a drop down selection of sizes in RipBot that have all the popular sizes pre-defined as well as a couple “custom” options.
(For those curious, this sample MKV file was used as a demo file for re-encoding purposes throughout much of this article.)
 |
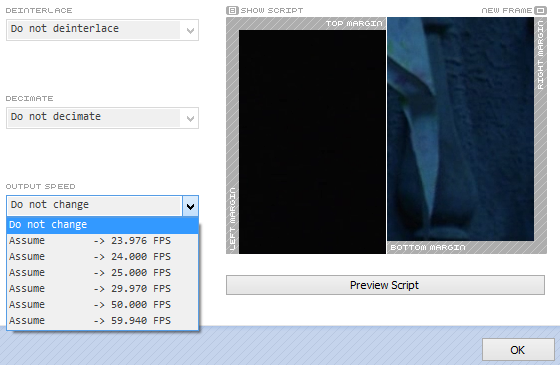 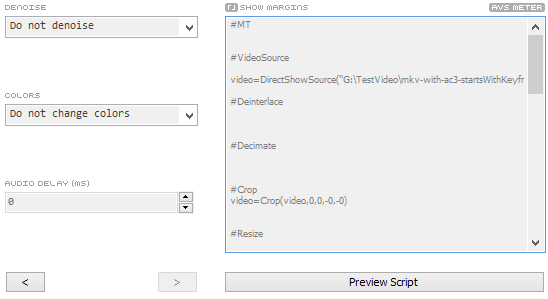 |
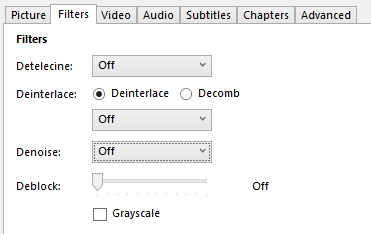
Filtering: Both Handbrake and RipBot have filtering mechanisms to de-interlace/de-telecine as well as deblock and denoise. In this example shot, RipBot is cleverly able to detect that the job is already a progressive video and disables the “deinterlace/decimate” options. Another thing that RipBot has that HandBrake does not is the ability to view/edit the auto-composed script. RipBot uses AviSynth to do a lot of its work and for those of you with experience in AviSynth, this is quite a boon to be able to hand tweak the script.
This is actually an important distinction. For example, when running inverse telecine to remove the combing/interlacing visual effects, RipBot has a preview button which picks a single random frame and shows the user the effects instantly and allows the user to video the effect in real time.
Handbrake also has a preview button, but it must pre-render a 30 second clip at a chosen spot before the user can determine if the de-interlace/de-telecine options are working correctly. This can slow down testing and checking while setting up a job. With RipBot, it’s much clearer than Handbrake how to setup Inverse Telecine. On the the plus side, Handbrake appears to offer more Deinterlace options than RipBot.
Handbrake also offers two de-noisers: hqdn3d and NLMeans. The hqdn3d filter is a temporal de-noiser that is also found in RipBot. Hqdn3d is apparently a decent filter, but the new “Non-Local Means” (NLMeans) is a slower, but better de-noising filter.
For the most part, de-noising is something that isn’t typically needed when transcoding/encoding with clean video sources.
 |
 |
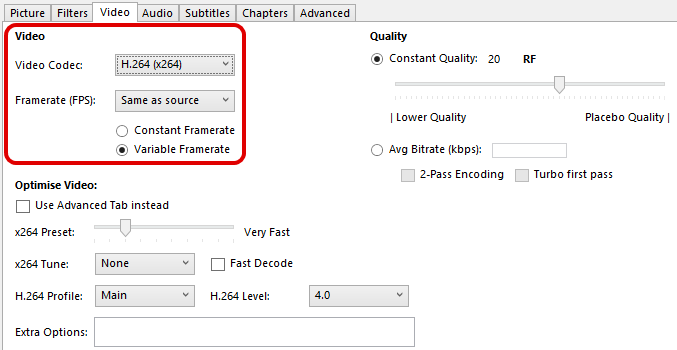
Video Codecs: On the “Video” tab in Handbrake, 3 sets of options are given: the codec, the tunings for the codec, and the quality/bitrate setting. Handbrake will do the current H.264 codec and the up-and-coming H.265 codec, as well as the older MPEG-2 and MPEG-4 ASP codecs. In contrast, RipBot264 can do H.264 (shown as “AVC” in the screenshot) as well as H.265 (aka. “HEVC”). The lack of MPEG-2 and MPEG-4 ASP support isn’t really much of a drawback since there is very little real need to encode in MPEG-2 or MPEG-4 ASP these days.
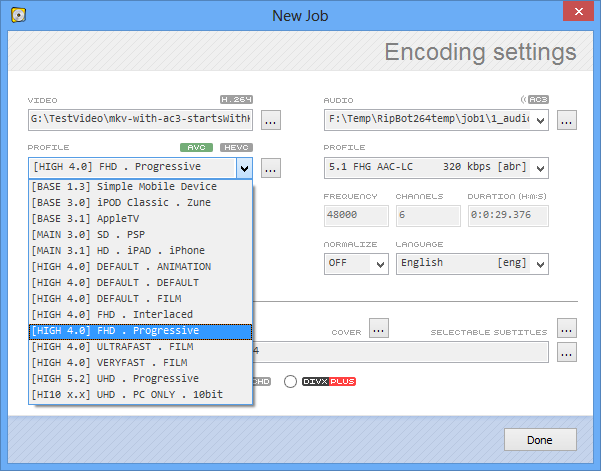
RipBot largely relies on a pre-programmed set of “profiles” which display which H.264 Profile and H.264 Level is optimal for the target playback device. Handbrake also has these same “presets” on the right side of the job window, but the presets don’t indicate what settings they consist of until you click on them.
 |
 |
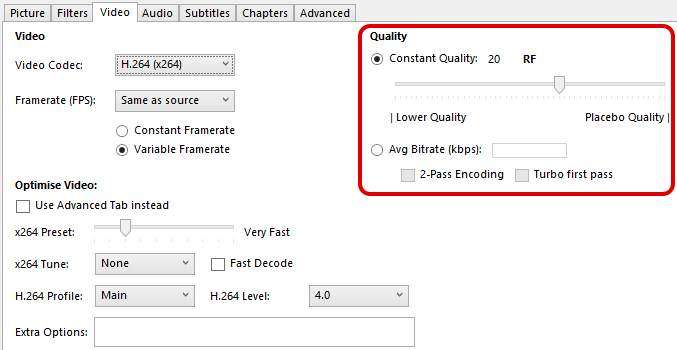
VideoQuality/Bitrate: Handbrake does a good job of making it clear what the Constant Quality (CQ) factor does. Moving the slider to higher numbers results in lower quality (and lower file size), while sliding towards the lower numbers indicates that the user is approaching undetectable (placebo) quality. Default setting is wisely set at a safe choice of 20. There is also a choice to set the quality based on average bitrate with options for 2-pass encoding and turbo first pass.
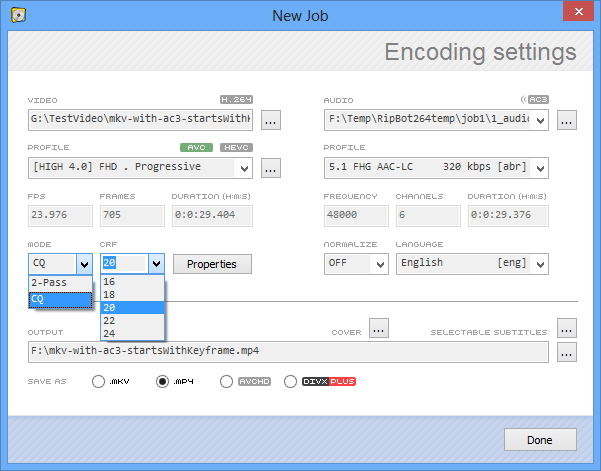
RipBot also has similar features. Instead of a slider, the CQ factor is available in a drop-down box. It is also wisely set to a safe choice of 20 by default, but it isn’t clear which way gives better results or better space saving. The choices give a useful range from 16 to 24 which is seemingly restrictive, but in actuality is pretty smart. The user can still type in values outside of this range if needed. The Average bitrate option in Ripbot isn’t quite as flexible as with Handbrake. The only method is 2-pass (there is no 1-pass option) and turbo first pass is turned on by default (in the “RipBot264.ini” file.) On the plus side, RipBot has a method to target file size when using 2-pass (not shown above) and will adjust the average bitrate automatically to match this.
Despite the lesser flexibility in RipBot, these are probably the smart choices if the user is not going to use CQ. (No harm, no foul.)
 |
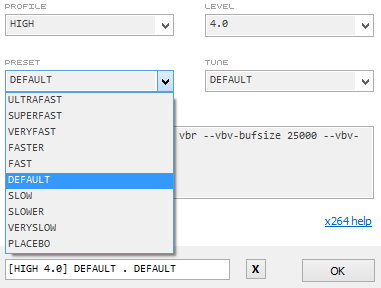 |
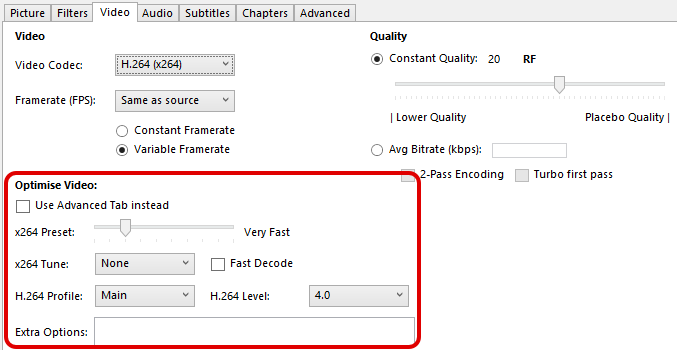
Optimize Video: Handbrake has a slider for x264 Preset which offers a range of speeds defaulting to “Very Fast”. RipBot has the same range of speeds, but changing the speed must be managed by clicking the […] button and entering the Profile manager. As shown, there is a drop-down for x264 Preset where the default is typically “Default” (which is the same as “Medium” in Handbrake.)This choice actually makes RipBot appear to run slower compared to Handbrake. The trade-off is that files produced with RipBot are usually 1 or 2% smaller (because of the extra time used.)
Since both Handbrake and RipBot use the same x264 encoder, both have access to the same options and can both encode at the same speeds. Also available in both are the “extra options” (aka. command line switches.) As the profile options are changed in RipBot, the command-line switches are changed on the user’s screen so that it is apparent what will happen when the job is actually queued and run. Handbrake does not show command-line switches associated with settings… (at least, not in the “Video” tab…)
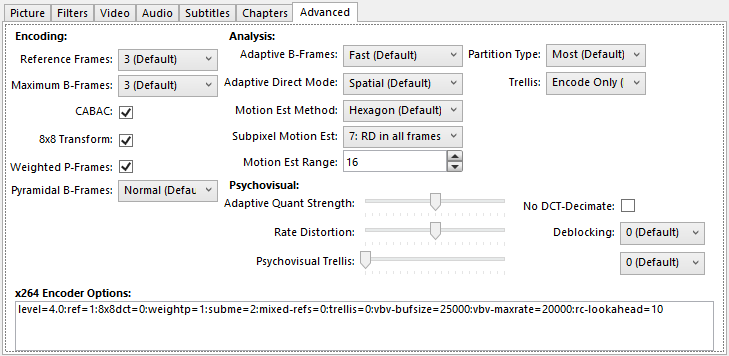
Advanced Video: Handbrake has an advanced tab which needs to be enabled both in the Tools -> Options menu as well as clicking on the Use Advanced Tab checkbox in the “Video” tab (which disables the Optimize Video options.) When clicking on the Advanced tab, the user gets the above menu. It’s a cornucopia of various x264 encoder options all made easily available as drop-down, slider, and checkbox options. It also has an “encoder options” window to add custom command-line switches like RipBot. The average user has pretty much zero need to mess with this screen, but if you like to fiddle, then this is the screen for you.
RipBot has no such screen and understandably so. Unless you’re chasing some edge case in video compression, then there’s probably little reason to make such adjustments. RipBot does have an “encoder options” window such that if you truly need to tweak the encoder, you can do so via command-line switch. Naturally, this presumes that the user knows what he/she is doing.
 |
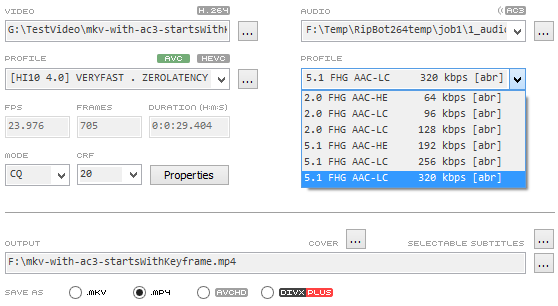 |
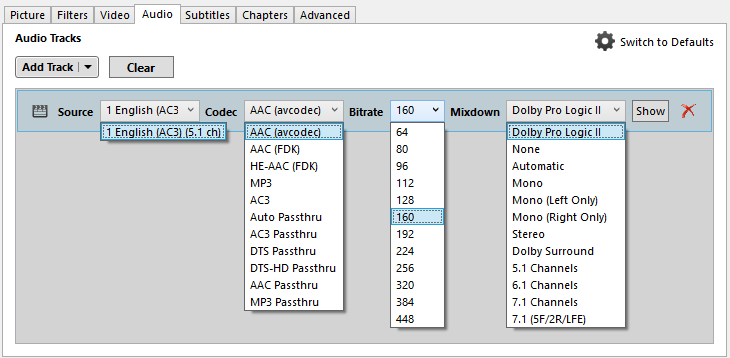
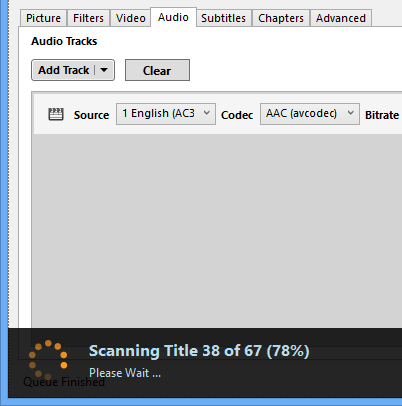
Audio settings: Handbrake has a myriad of settings. As shown here, it can re-encode to AAC, MP3, AC3, or do a number of direct stream copy options (which it calls “passthru”.)
RipBot knows that the user has selected MP4 and intelligently restricts the user to the smartest of options. In this case, AAC 2.0 or AAC 5.1 with varying bitrates from 96 to 320 kbps.
In the case of MKV, RipBot enables broader options like “Copy Stream” which keeps the audio exactly as it is. It also gives options for AAC, AC3, and the new and very excellent Opus audio codec. Handbrake is not capable of Opus in MKV, but it can do both FLAC and Vorbis.
  |
   |
Transcoding DVD and Blu-ray: Both Handbrake and Ripbot have their own special ways of handling the re-encoding of DVD and Blu-ray data.
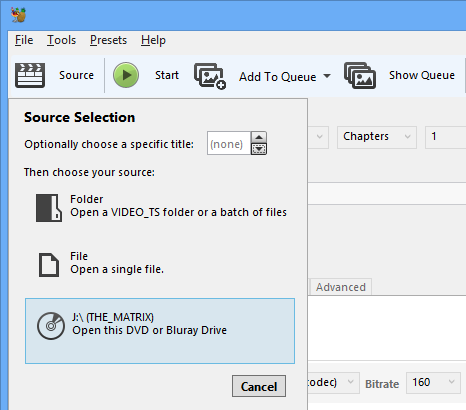
Handbrake has one or two options. It asks the user to either choose a VIDEO_TS folder of a DVD or the STREAM folder of an extracted Blu-ray disc. Or alternatively, it can directly access an unencrypted disc either via drive or drive emulation (through a 3rd party program.) From there it automatically scans all the Titles found on the disc.
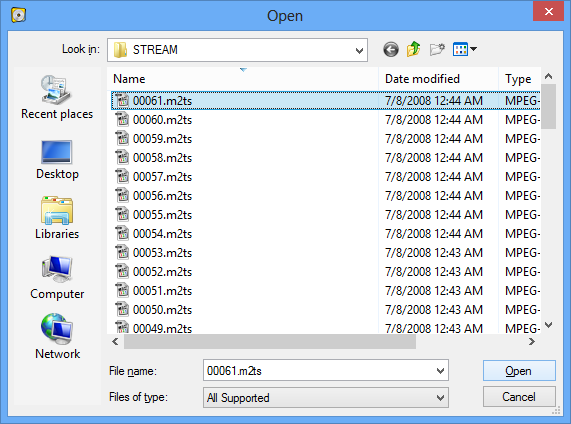
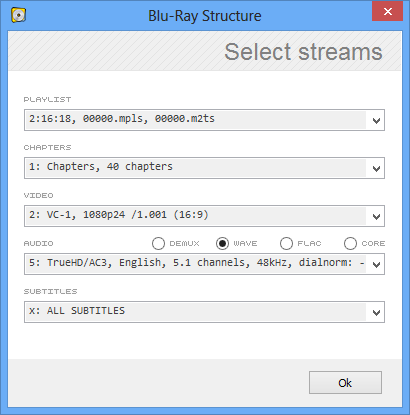
RipBot asks the user to browse for the VIDEO_TS folder as well (for DVDs) or a single M2TS file in the Blu-ray disc. In the case of Blu-ray, once the single file is selected, it scans the remainder of the disc and displays a Blu-ray Structure screen (shown above.)
Here, the user must select which playlist, chapters, video and audio stream, and subtitles desired. It also gives the option to the user to convert the video to WAV, FLAC, just extract the lossy Core (if there is one), or just plain Demux the audio from the video. Oddly, the default is “Wave” when it should probably be “Demux” since that gives the greatest options and flexibility without altering the audio at all.
From there, Ripbot proceeds to demux the audio. This often takes anywhere from 1 to 10 minutes.
 |
 |
Batch Encoding: If you have a bunch of files that you would like encoded all the same way, Handbrake and RipBot can do this for you as well.
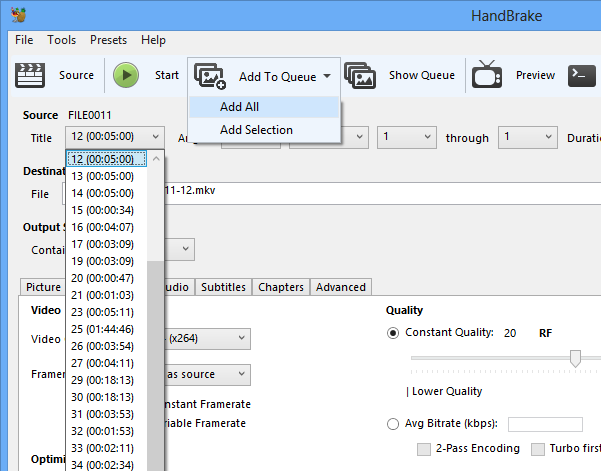
In Handbrake, you must select a source folder and then Handbrake brings in all files to the Job Scheduler screen. Then when all settings are configured, select Add ALL in the Add to Queue drop-down. The first time this is done, an error window may pop up and ask the user to configure a few output folder settings. After that, the jobs can be started in the queue.
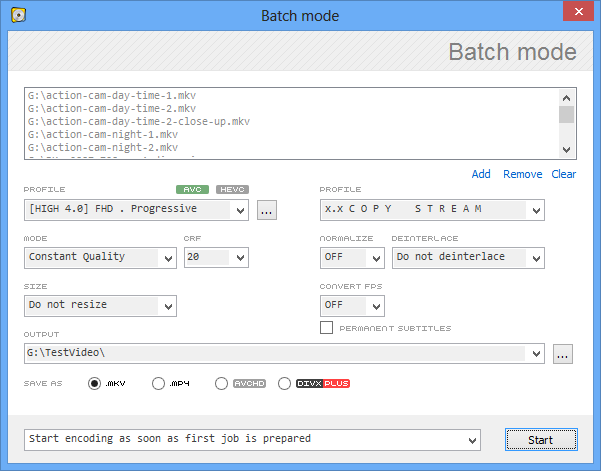
In RipBot, Batch is click on and a dialog window appears. At this point, the user selects all the files desired. Then RipBot brings these files into a new window known as Batch Mode, which looks a lot like the regular job configuration window, yet is somehow a bit different. As shown above, all the input files are listed in a window and all the major settings (video profile, mode, CRF, size, audio profile, deinterlace, and the save as option) are there. When you click the Start button, the jobs are dumped back into the queue and (optionally) started.
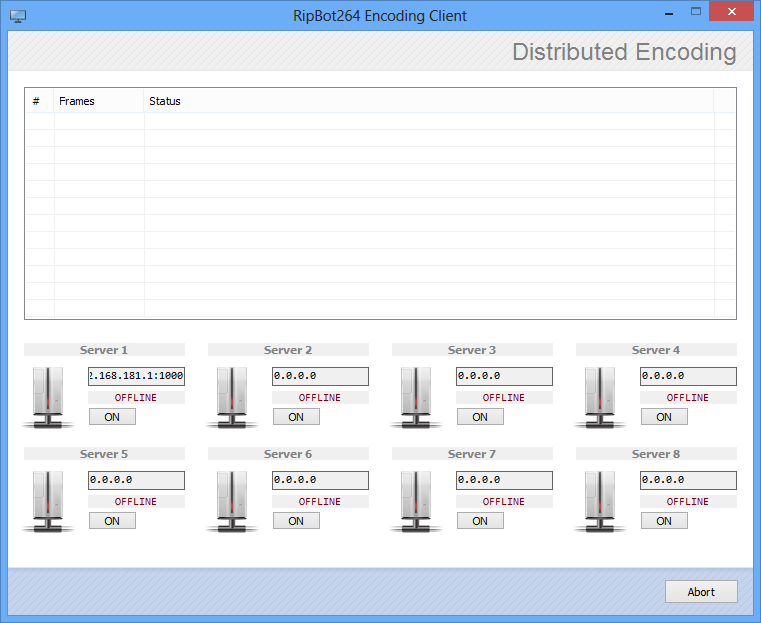 |
Parallel processing: Handbrake and RipBot both can perform multi-threaded video encoding and can take advantage of multi-core and multi-processor machines. But RipBot has 1 more trick up its sleeve:
Multi-computer Distributed Encoding!
That’s right. RipBot can employ up to 8 computers to process a video! RipBot does this over a Local Area Network (LAN) by handing out approximately 1500 frames at a time. Each computer (running its own copy of RipBot) crunches away on these 1500 frames and then sends the final results back to the master RipBot machine. All chunks of compressed video glory are then stitched together into the final product.
The result is quite linear and when using 2 computers simultaneously, the result is a 2-fold increase in encoding speed! 4 computers? 4x increase! 8 computers? 8 times faster (presuming that all computers being used have equivalent computing power.)
Naturally, one must have extra computers at his or her disposal to try this, but it really does work! Instead of waiting 2 hours for a video to encode when using a single computer, with 8 computers working together, it can be done in 15 minutes!
| Handbrake Pros: |
RipBot264 Pros: |
|
|
| Handbrake Cons: |
RipBot264 Cons: |
|
|
Conclusion
Handbrake is your everyday encoder. It works on all major platforms: Windows (32 & 64-bit), Mac OS X 10.6+, and even Ubuntu! Software install is easy and job setup (for the most part) is a breeze. When you want to get technical, Handbrake also has an Advanced tab for every video nerd that wants to tweak the heck of the encoding settings.
RipBot264, in contrast, is a heavy lifter. While it is possibly to use it for everyday purposes, its strengths lie in intelligently steering the user to safe settings that would be good for processing lots of files in a batch mode. And when doing lots of encoding, it helps to have the ability to press into service up to 8 other computers for speeding along the process using distributed encoding. RipBot also is ideal for targeting physical media where capacity limitations sometimes must be considered.
16 replies on “Handbrake -vs- RipBot264 — FIGHT!”
I do agree that Ripbot264 is a great software. Its Parallel encoding is something that is not really found in any of the other popular encoding software but, when it comes to flexibility. There is no doubt that Handbrake takes the win.
Until the developers of Ripbot264 step up their game, and provide more support for what can be encoded to (x265+HE-AAC, etc.) with more adjustments then it would be… The most popular encoding software.
For the Multi-computer Distributed Encoding in ripbot, is there any fault tolerance?
As in, if the main server stays running can one of the nodes go down?
And come back?
Or does this halt all the other working computers once they finish their chunk?
Or do you just end up with a bad section of your video?
Regarding the distributed encoding fault tolerance, if a node goes down, it is detected and the block goes to another node to be processed.
I been using handbrake for years without a problem. I’ll stick with it. From this article it sounds like if someone got acquainted with ripbot it would be the better option for best quality and smallest file size. That comes with a price with encode speed tho. It already takes about 24 hours or more to encode on handbrake at placebo settings if you want the best picture and smallest file size.
I’ve gotten bitrate calculated just right on Handbrake that the file size ends up being a perfect 4075 which is 15 less than 4090. I believe the ps3 file size limit for movies is 4090. So 15 megs short isn’t too bad since I probably wouldn’t get much better quality even hitting the 4090 limit. What I would love if someone that coded these software would make a bitrate calucator inside it so we can estimate about the right file size. I’m sure it can be done because I do math with handbrake and most of the time I make the file size slightly under 4090 limit.
I got all excited until I saw that RipBot264 is only for the Windows platform, which has been fading fast in popularity. Where’s the Mac version? Linux slaves? That it runs only on Windoze is regrettable.
As a writer who is interested in journalistic integrity, I can say that I’m a fairly platform agnostic computer user. I regularly use Windows, Mac OS, and Linux on a day-to-day basis. They’re all great operating systems. They all have their strengths and weaknesses.
Windows platform, which has been fading fast in popularity
As the saying goes, I think the imminent demise of Windows has been greatly exaggerated. 😉
You can never find one of these little cute things that can to the job properly. Each one has something really stupid.
Handbrake: loses colours, the output is often with significantly less contrast. There is no way for fix it.
Ripbot264: no control over the sound level (like raising/lowering with a number of dB). There is something basic like Normalize (to 100%) which doesn’t work.
Why can’t today’s young programmers do something right?
I don’t think any generation’s young programmers have ever been able to do anything right. Programming well is a real talent/craft. Also, in some ways, systems are much more complex than they were compared to 10 years ago.
Anyway, I think both have problems with their default configurations. I was under the impression that the default for Handbrake was to favor speed over quality, but that it was adjustable.
i love ripbot264, fact is Target file size ability i love it it’s easier and more clear to use i think handbrake (it’s faster, yes it is) but it is a mess of a program, not clear not for beginners at all
Thank you very much. This was very helpful. I’ve been searching for a updated tutorial on Handbrake and this is exactly what I wanted. Thanks again!
Thanks for the great and detailed comparison… the only thing that saddens me (and gets me quite irate when using the software and it does not work logically) is that for both programs the user interface seems to not have been thought out into detail, or tested with different types of users. Combinations of actions in different sequences do not necessarily have the same result.
Programmers software with illogical interfaces sadly.
Yeah, I agree. Both interfaces could use a streamlining. That said, when you realize how much they’re trying to do (how many different pieces of different software they’re integrating), you might want to give the makers some slack. There are so many moving parts that its remarkable how easy it is to use. Could it be easier? Yeah, but it might require a full from-scratch re-write. And who wants to do that?
For some reason the AAC encoder on Handbrake results in a shitty quality audio, even at high bitrates. I’ll give Ripbot a try…
RipBot is a good mini player ripper like Sony NW-X1060, Zune HD etc. The drawback is, it can not use gpu, nor double processor systems, so it is really slow. (Uses second processor nearly %10) Distributed encoding is the most silly part, depends upon ethernet speed, but main system waits for other encoders to transfer data over ethernet at that time by stopping it’s work. There is nearly no difference at all, but slower if your ethernet connection is 100 mbps or slower! Audio options, does not give all encoding options, there is very limited enhancing options over 160 kbps. A good plus is that, it can combine BD disk m2ts content to a single file. It has currently nearly the same filters, and plus like handbrake. (It can combine up to 3 filters at a time.)
Interesting observations. I’ll have to do an all new review of them sometime to see how they’ve changed since I originally reviewed them in 2015. 🙂
There seems to be a permanent bug in Handbrake. If you have 10 files and you change the audio settings, only the first will have the new audio settings when you add them to the queue. The only way around this is to make a profile with the new audio settings and then all your files will apply your new default settings. The same goes for removing subtitles.