So you’ve got your Raspberry Pi 1 B+ or Raspberry Pi 2 or 3 B model, but you haven’t got a case for it yet. Or maybe you’ve got a case, but you want to “level up” to a nicer one. But which one to get? There are so many!
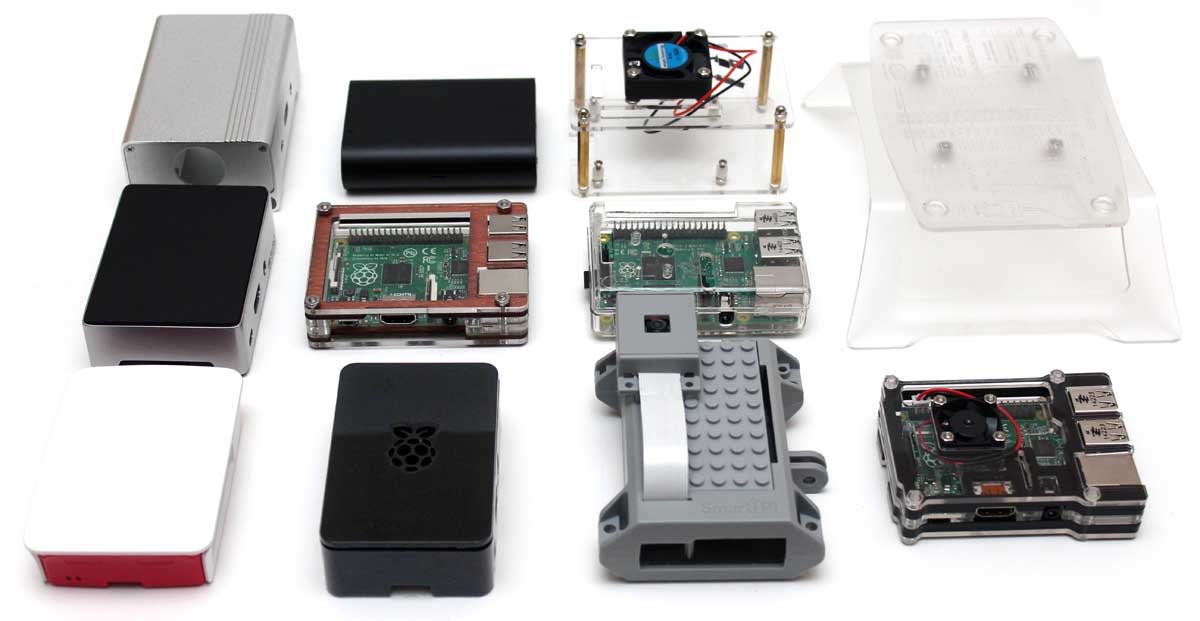
And it’s true. There are a lot of RPi cases out there. We tried to get our hands on as many Raspberry Pi cases as possible. And here’s our review of 12 cases.
Before diving into the cases, let’s outline what a case can do for you:
- Aesthetics
- Basic Protection
- Port accessibility
- Mounting options
- Active/Passive Cooling
This last one is especially important if you’re going to be pushing your Raspberry Pi to its limits through overclocking and/or placing it in harsh conditions. For this review, we tested each case with both a Raspberry Pi 1 model B+ and Raspberry Pi 2 and 3 model B. If the case included (or had an option for) a fan, we tested both with and without the fans.
Now let’s take a closer look at these babies.
Basic Cases
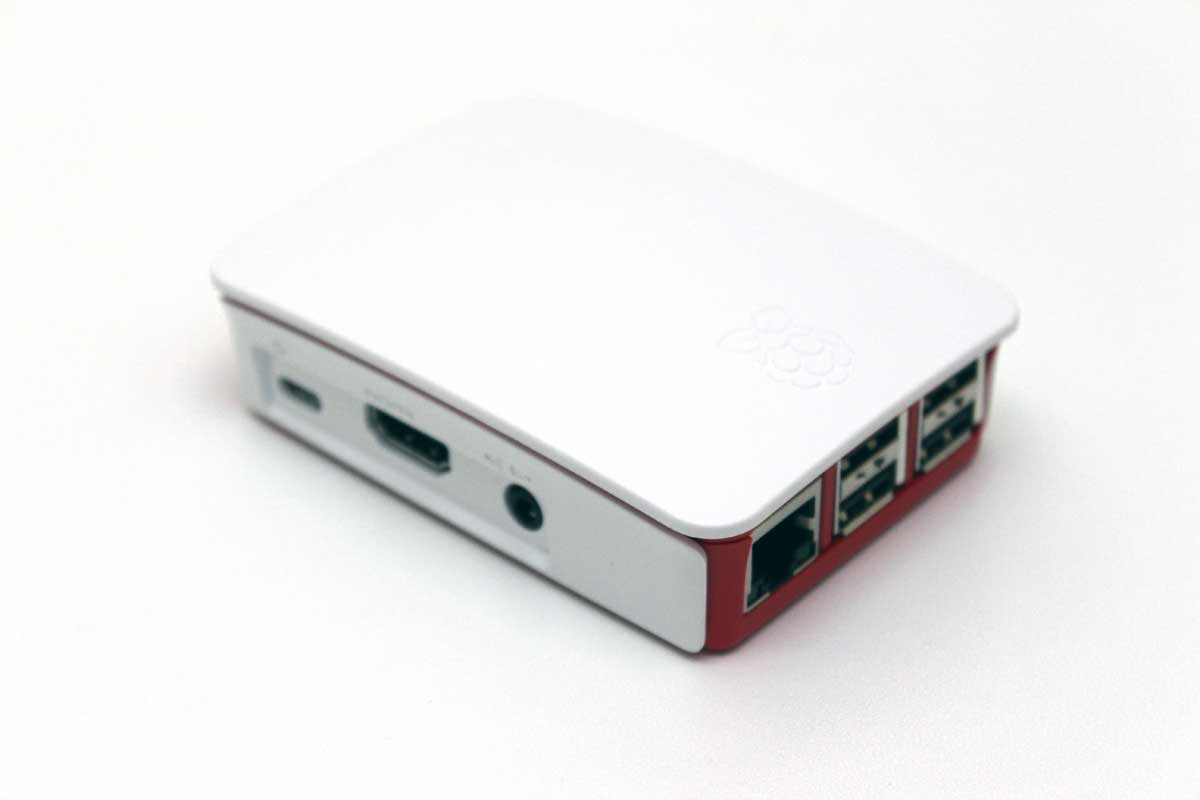
The Official Raspberry Pi case
[slideshow_deploy id=’1329′]
To start off this review, we thought we should be begin with the “official” case for the Raspberry Pi to set the bar. This is a relatively affordable case at $13. It is made out of white and raspberry colored plastic and has decent enough aesthetics. Nothing to “write home about”, mind you, but not ugly either. It is easily assembled by dropping your Raspberry Pi into the case and snapping it together.
Regarding port accessibility, the white top cover unsnaps from the frame to reveal easy access to all the internal ports and headers. This case has no mounting options nor does it come with any fasteners, though it does come with 4 little rubber feet for the bottom of the case.
JBtek Jet Black case
[slideshow_deploy id=’1333′]
The JBtek is a no-nonsense case and costs only $8. It is made out of matte black plastic and is held together by 4 screws. As cases go, the black look with the rounded corners is a nice touch, especially for something so low-cost. Yet, somehow it fails to “wow”.
Port accessibility is limited to external ports only. The grill on the side of the case does remove and theoretically you can snake your ribbon cables out the side, but it isn’t ideal. If you were thinking of using your Raspberry Pi to experiment with the camera, video, or general I/O headers, you’ll want to look for a different case. This case also has no mounting options nor does it have any rubber feet.
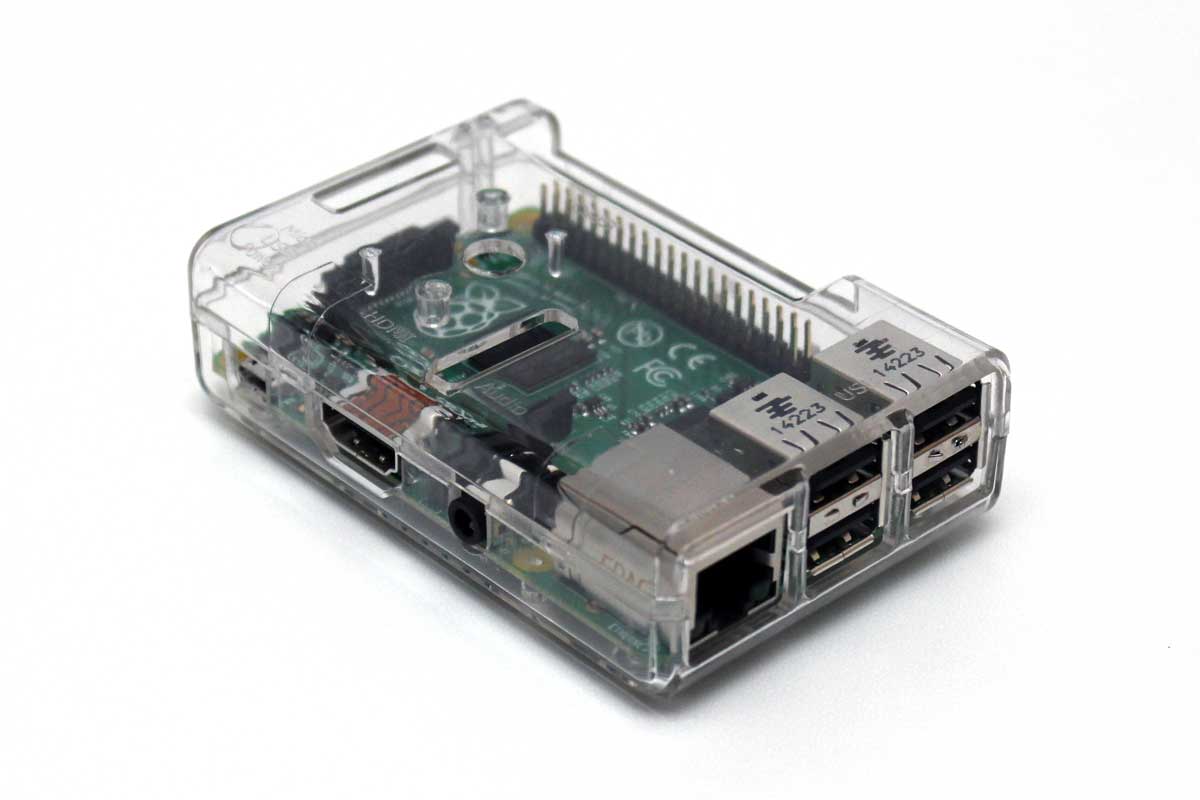
SB Components Premium Clear case
[slideshow_deploy id=’1339′]
The Premium Clear case is another entry-level case and costs only $9. Its material is a clear plastic and snaps together easily without any fasteners. The aesthetics of the case are simple: you can see everything. All major internal and external ports are accessible and almost all of them are labeled as well. This case is ideal for the RPi enthusiast who loves building various RPi projects.
Although it has no included fasteners or rubber feet, it does have two (2) screw mount holes. One of the most thoughtful features of this case is that it has 2 small plastic columns that sit over the ACT and PWR LEDs on the board. These columns transmit the light from the LEDs up to the top of the case so it is easier to see what’s happening with your RPi. This is a nice touch for such a low-cost case!
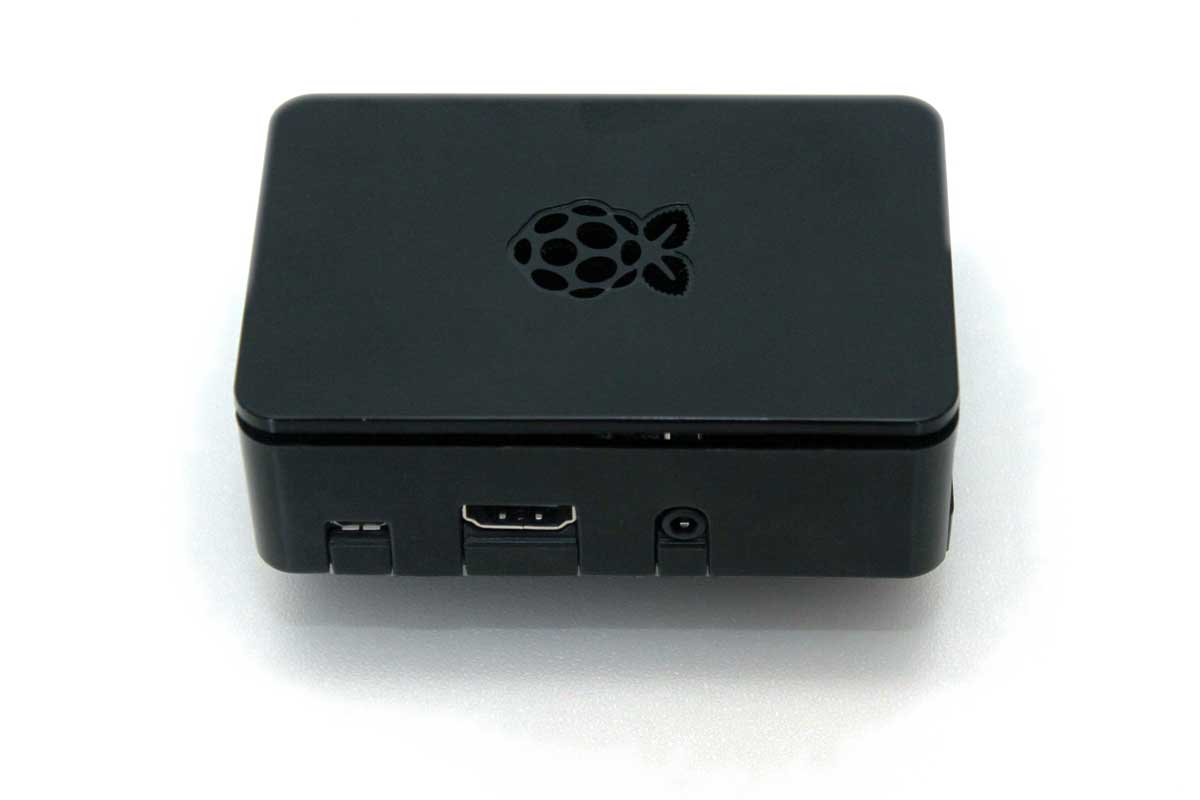
OneNineDesign Raspberry Pi case
[slideshow_deploy id=’1346′]
The OneNineDesign Raspberry Pi case is also low-cost, but is one of the nicest ones for the price: $10. It is made of high-gloss black plastic and snaps together easily without any fasteners. The case has a high-class design with the nice rounded corners and the lovely Raspberry logo punched out of the lid (which also allows heat to escape better.)
All the major internal and external ports are easily accessible. All the internal ports are labeled and there are two small holes for the ACT and PWR lights to shine through. The lid is easily removable, yet holds on firmly with a friction fit. There is a slot to hold a RPi camera and there is a 2mm gap between the lid and the case to cleverly sneak ribbon cables out the sides. This case has 2 mounting holes on the bottom as well 4 rubber feet.
Specialty Cases
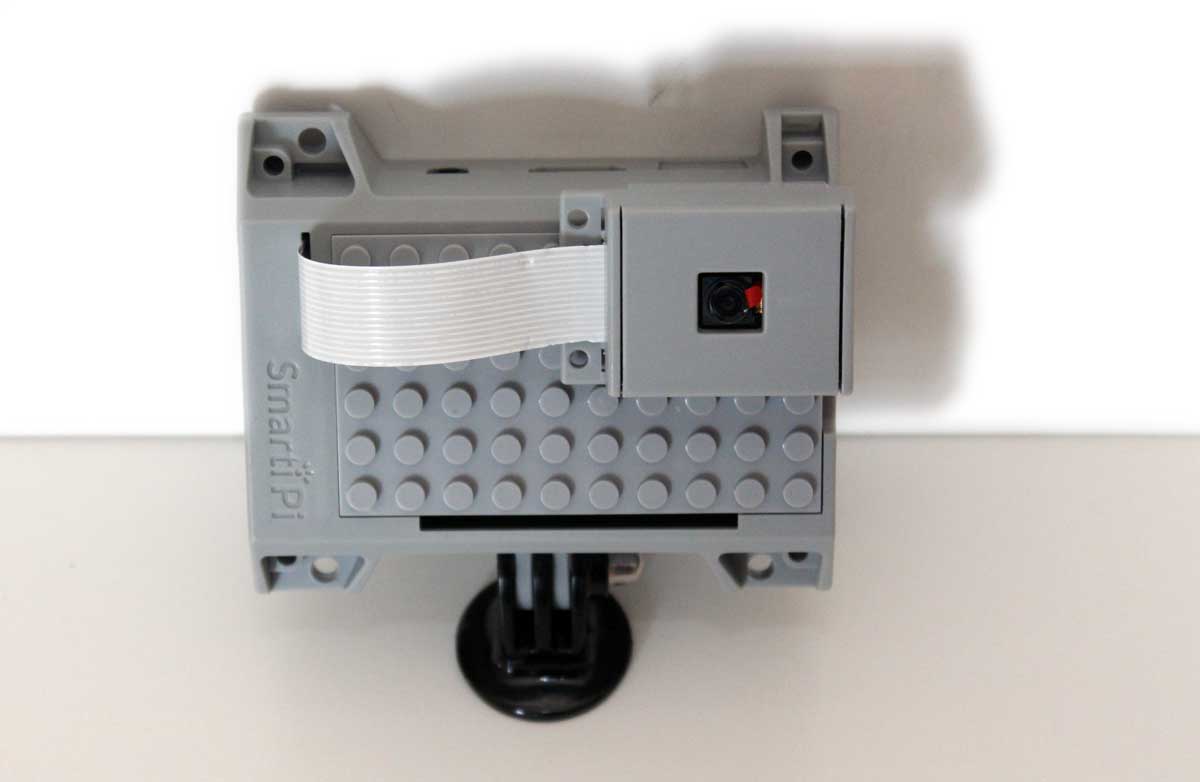
SmartiPi (LEGO compatible) case
[slideshow_deploy id=’1352′]
Although not officially endorsed by LEGO, the SmartiPi specialty case is designed to work smoothly with your latest LEGO-based project. The case comes with a LEGO like cover, a LEGO-compatible case for your RPi camera, and a GoPro compatible mount. This kit costs $25. (The one without the GoPro mount is only $20.)
When the grey cover is applied to the case, the GPIO and the Camera slots give access to the internal ports. The TFT/Video port is not accessible, but there is a hole in the side of the case to expose the ACT and PWR lights. There are 2 screw mount holes as well as 4 raised areas on the bottom which allow stacking of multiple units. Unfortunately, they don’t fit snugly like a LEGO mount should; they merely stack. This was a missed opportunity. Fortunately, this case has 100mm VESA mount points for attaching to the back of a monitor. Very cool.
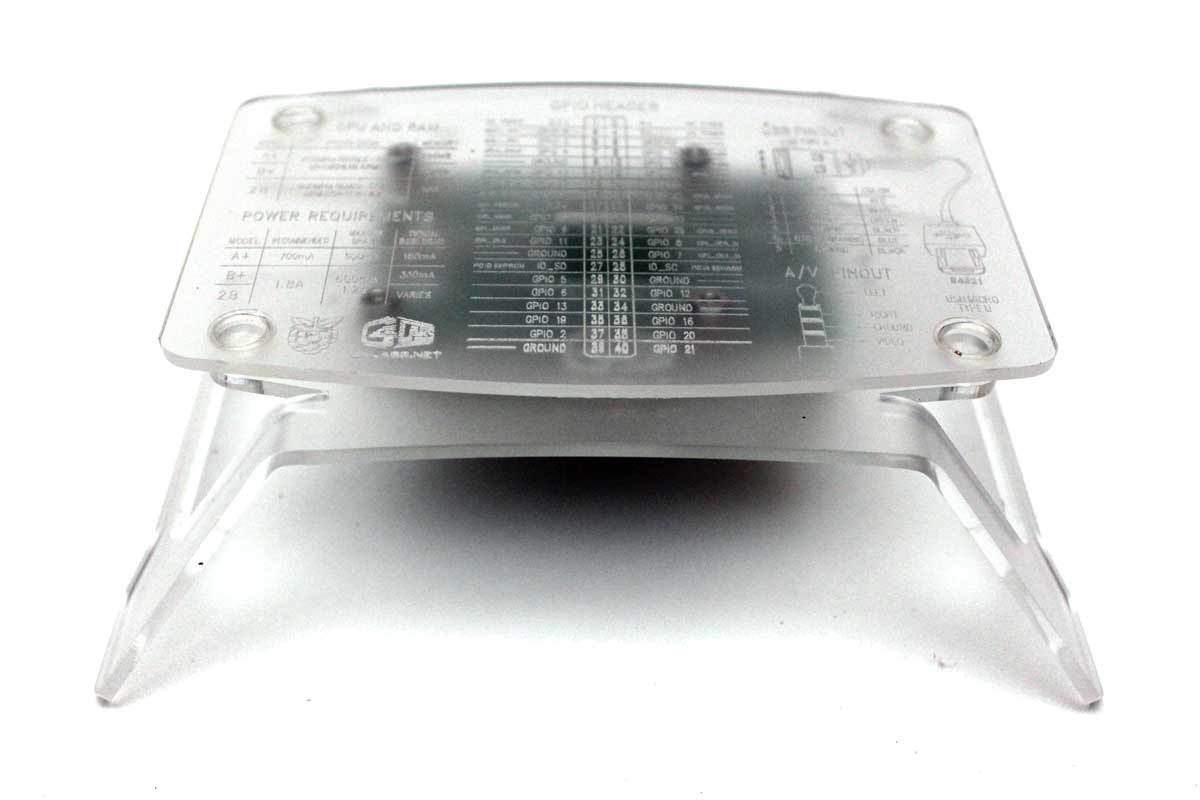
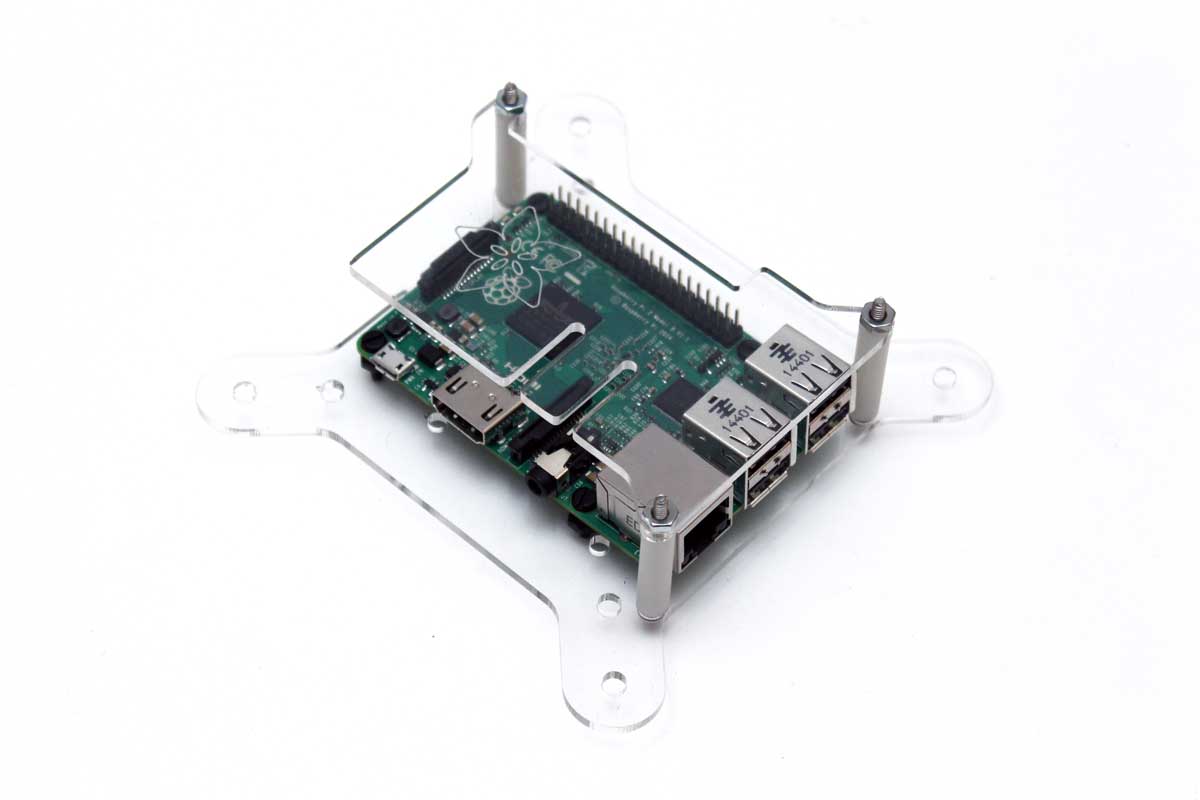
C4Labs Rebel case
[slideshow_deploy id=’1364′]
The Rebel case made by C4 Labs isn’t so much a case as it is a stand on which to mount your Raspberry Pi. By design, it is clearly most helpful to the Raspberry Pi hacker/tinkerer. And at $19, it is a twice as much as the basic cases, yet looks so much cooler.
The stand is made out of translucent plastic and has all the port labels laser-etched into the plastic. The Raspberry Pi is then mounted underneath the stand using the included nuts and bolts. It also has a removable placard that sits on top of the stand which lists the specs, power requirements, USB pinouts, A/V pinouts, and the GPIO header information on it. This kit also comes equipped with passive heat-sinks to help dissipate heat from the RPi better.
Adafruit VESA case
[slideshow_deploy id=’1396′]
The Adafruit case is a VESA compliant case with mount holes for both 75mm and 100mm. It’s an open-air design (lacking side-walls) and costs $18. The case is made out of 2 sheets of acrylic and 3 plastic stand-offs with nuts and bolts holding it together. This case lacks instructions as well, but has a small legend etched into the bottom acrylic panel showing which holes are for which model Raspberry Pi.
With a little observation, it was relatively easy to figure out how to put it together. When assembled, we had a good looking clear plastic case with the Adafruit flower logo adorning the top of it. As shown in the pictures above, there is plenty of room for heatsinks, if so desired.
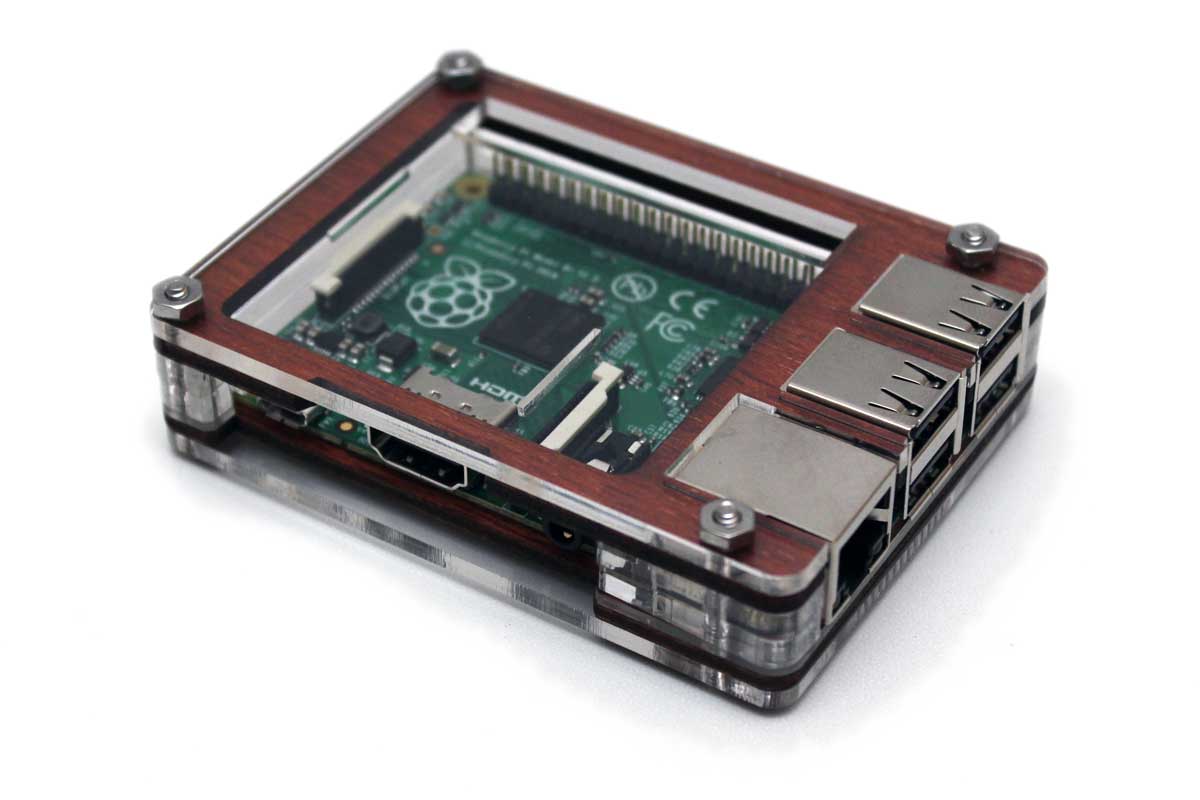
C4Labs Zebra case
[slideshow_deploy id=’1358′]
C4Labs makes a bunch of other Raspberry Pi cases and the C4Labs Zebra case is one of the smartest looking ones as well. At $15, it’s a pretty good value, too. The case is made out of sheets of acrylic and wood and are assembled by the user around the RPi. The case comes with a simple, yet abundantly clear set of instructions on a single business card.
Assembly was kind of fun and only took about 10 minutes. When completed, we had a sharp looking wood and plastic case for our RPi. There are 2 screw mount holes on the bottom as well. Like the official RPi case, there is a cut-out on top for a small 2″ TFT display screen to sit behind the clear plastic cover. A thoughtful touch.
Active and Passive Cooling cases
It’s no secret that the Raspberry Pi can be overclocked and pushed harder than the chip is designed to be run. Many people have already proven that they can eek out more performance by upping the clock-speed and the voltage of the processor. With this action comes more heat from the chip which naturally needs to be dissipated adequately. Here are a few cases that are designed to move heat away from the processor and out of the case.
Eleduino Acrylic case with 25mm fan
[slideshow_deploy id=’1371′]
The Eleduino case looks an awful lot like the C4Labs Zebra case. Both are made of layered acrylic and are held together with nuts and bolts. The cost is a mere $13. Upon closer examination, it is easy to see how the two cases diverge a little bit.
Unlike the C4Lab Zebra which has no fan, the Eleduino case comes with a 25mm fan (which is rated to run at 12v.) This is a bit strange since the Raspberry Pi has no GPIO pin-outs which carry 12v. Only 3.3v and 5v. Nevertheless, the fan runs fine at 5v, just a bit slower and quieter — nearly silent, in fact. The case has no mount points or rubber feet. The case is made of transparent plastic, as such, the PWR and ACT lights are also clearly visible. Generally it looks quite nice sitting on a desk.
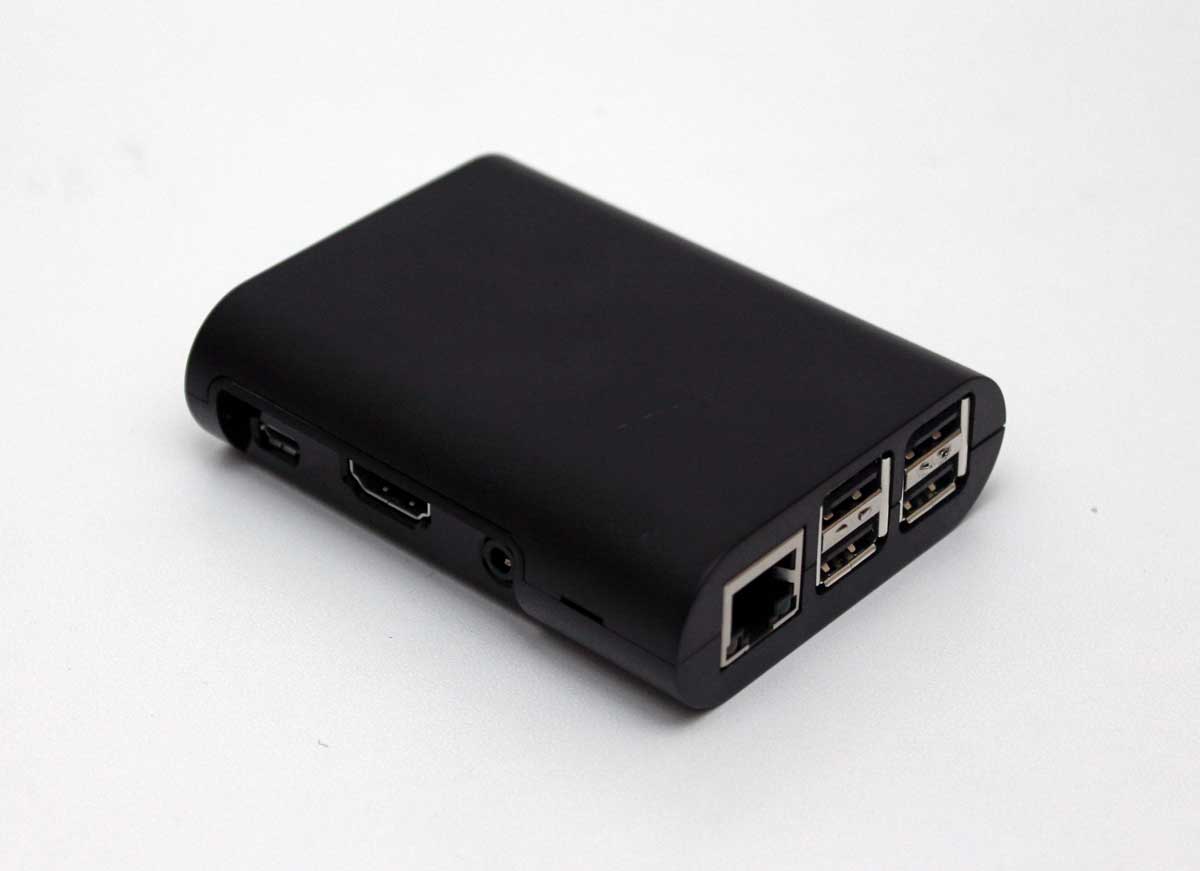
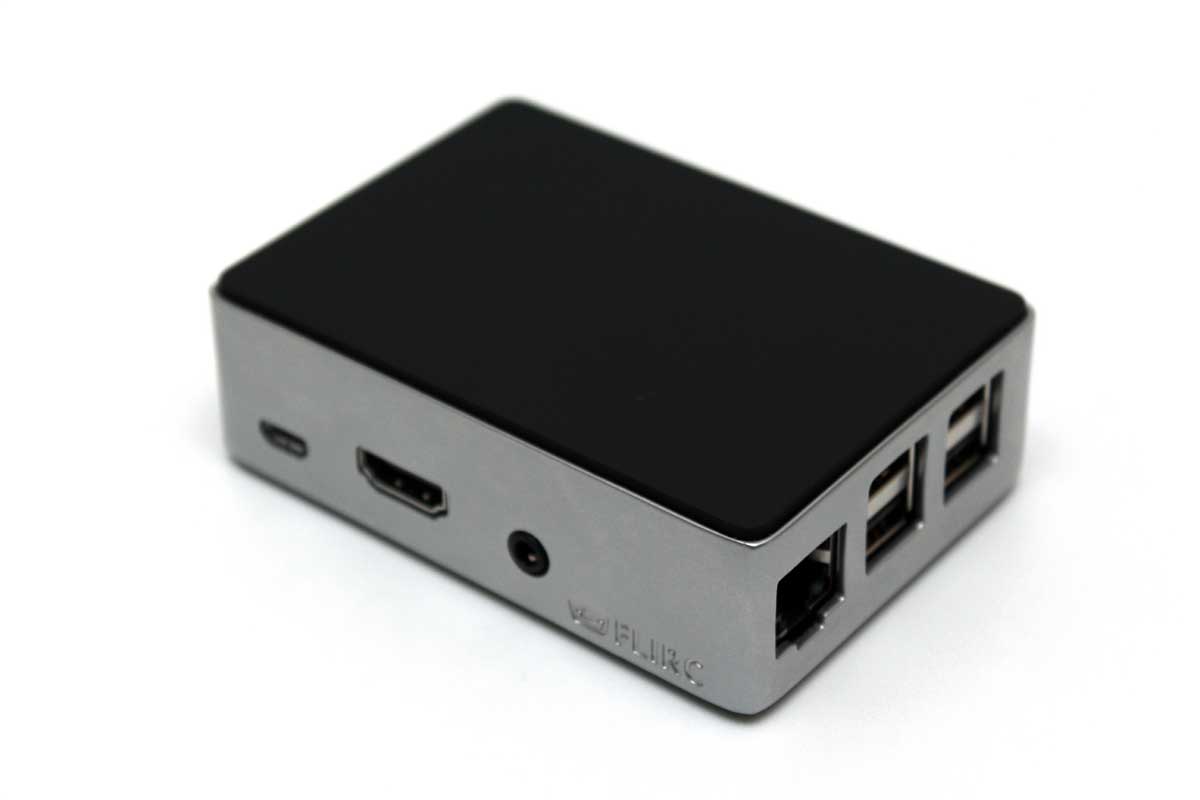
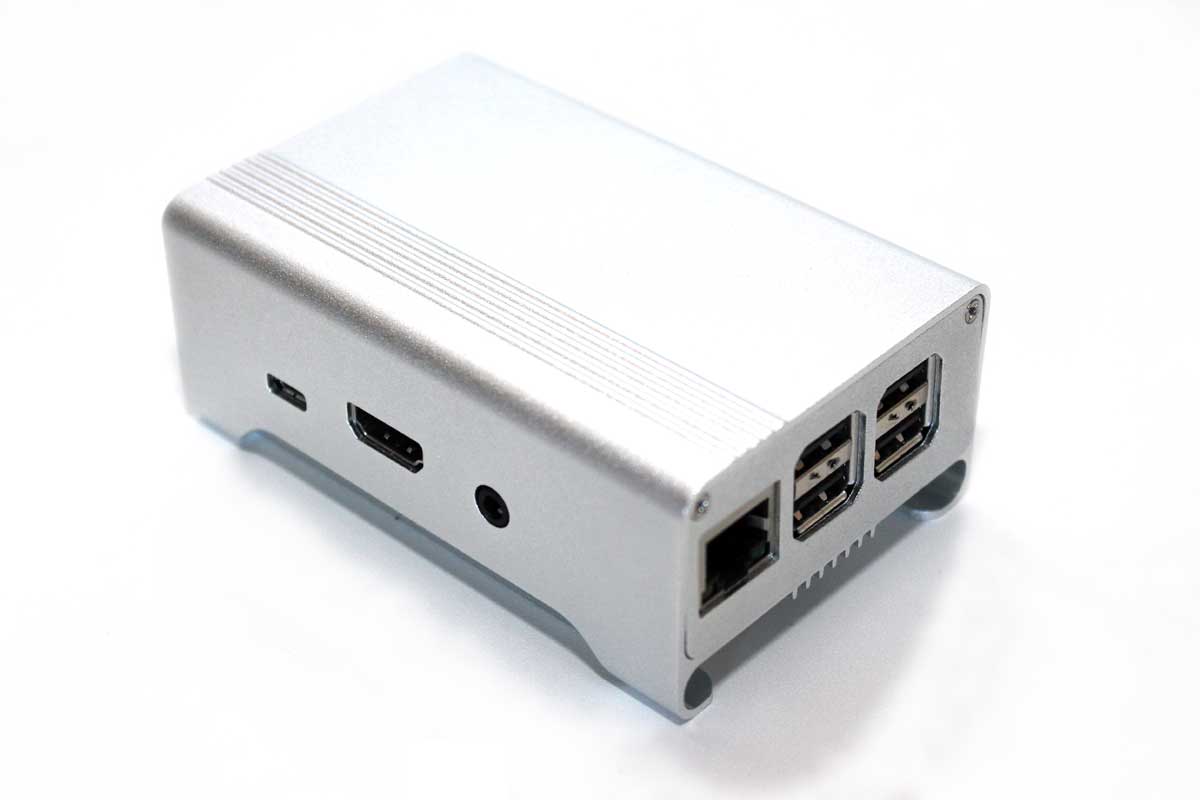
FLIRC Raspberry Pi case
[slideshow_deploy id=’1378′]
The FLIRC Raspberry Pi case is a bit different than the rest as it is made almost entirely out of aluminum. As consequence, it has a really solid feel in the hand. Yet surprisingly, it doesn’t cost much more at $15. The base and the cosmetic black top are both made of plastic. The base has 4 rubber feet and a slot to allow the GPIO ribbon cable to snake out the bottom. (No access to the display or camera headers, though.)
The really neat thing about this case is that it uses the case as a passive cooler. When installing the Raspberry Pi, the RPi is placed face down on the metal case such that the CPU is in direct contact with an extruded square aluminum block that is part of the case. The base is positioned on the bottom and screwed in place. This firmly holds the CPU against the case using the entire case as a heat sink.
As mentioned previously, the plastic top is mostly cosmetic. When removed it becomes clear that the aluminum block is not solid, but hollow. This is a little disappointing as it would probably have helped better with heat dissipation, but regardless this is still an impressive design. All in all, this is a slick looking case. Clearly this fits in nicely with a home entertainment system.
One thing to note is that this case was originally designed for the Raspberry Pi 1 B+ and not the RPi 2. Even though they have the same form factors, the location of the CPU has shifted slightly with the RPi 2. As such, the heat-sink doesn’t align perfectly with the CPU. It appears to still cover 70% of the CPU, which should still be highly effective. Also, the PWR light (but not the ACT light) is visible through a tiny gap in the case.
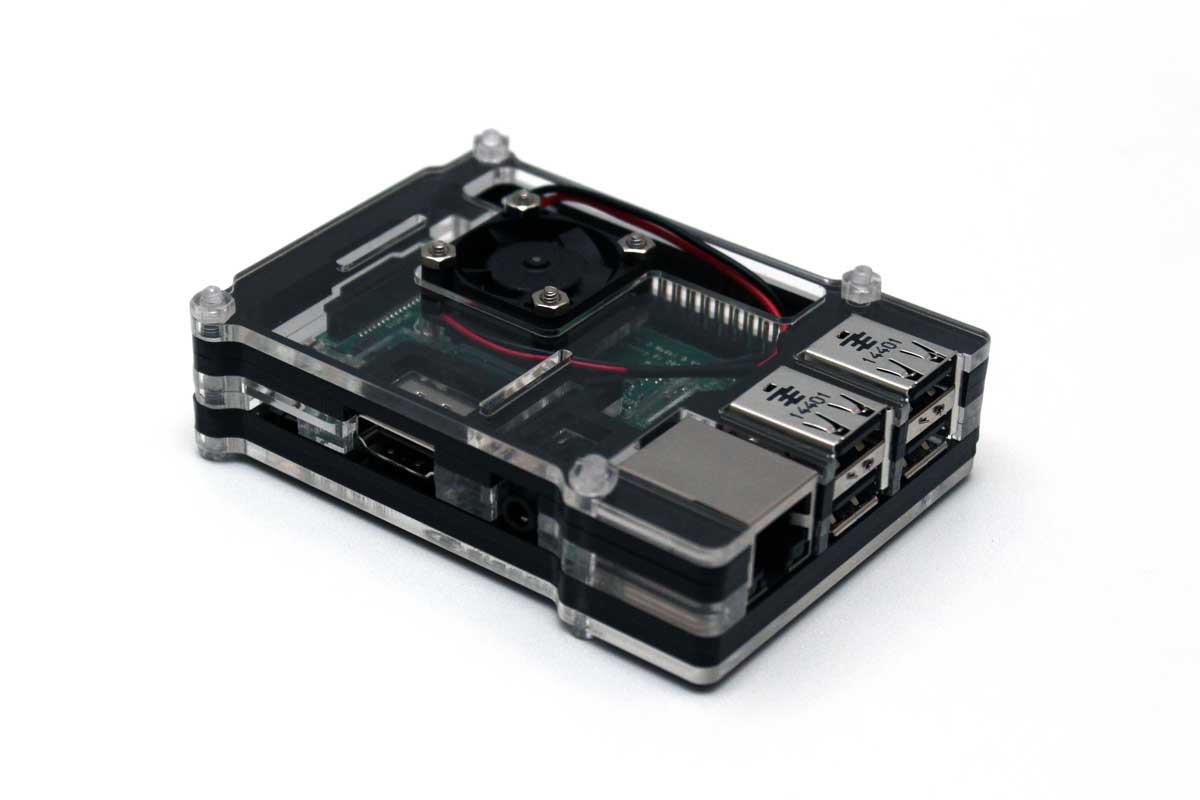
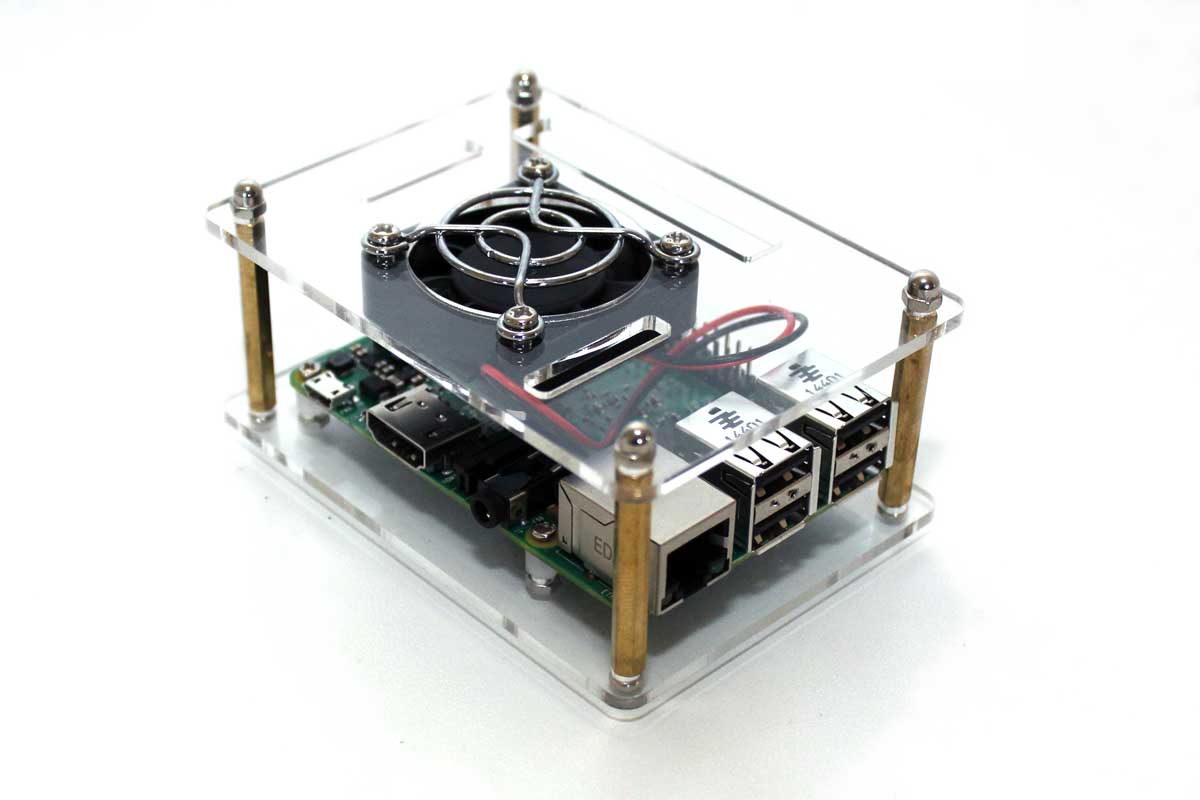
JBtek Acrylic case with 40mm fan
[slideshow_deploy id=’1384′]
The JBtek Acrylic case is a bit like the Adafruit VESA mount case in that it is “open air” (no side walls) — Just a bunch of stand-offs and some nuts and bolts. Unlike the Adafruit case, this one has a 40mm fan for active cooling. It costs a mere $9. Like many other cases here, this one requires some assembly from the user. Unfortunately, this one lacks instructions as well. Bummer. Nevertheless, after fiddling with all the parts for 5 minutes or so, it became pretty apparent how to put it together.
The case has full access to all internal ports as there are no side walls. The 40mm fan is rated for 5v and comes with grill to protect the fan blades (and little fingers.) The fan has a quiet hum to it when connected to the 5v header. If that’s too loud, there is the option of connecting it to the 3.3v header instead and running it slower. Although not included, there is room for heat-sinks to be added to the CPU and other components to make the fan more effective.
Aluminum Alloy case
[slideshow_deploy id=’1390′]
It seems that some company makes this aluminum alloy case and perhaps a few companies resell it. Tontec sells it in black and includes a 25mm fan, while HST sells it in black, silver, or red, but does NOT include the cooling fan. Weird. Both sell for around $20. Despite this, it seemed prudent to take a look at this because it was made of an aluminum alloy.
Overall, the case seems strong. The two end caps are held on with 2 screws each and are made of thinner pieces of aluminum. This part of the case doesn’t seem as strong, but this is less important. There is a gap in the bottom of the case to allow the GPIO ribbon cable to snake its way out. Oddly enough, there are no holes for mounting the 25mm fan. The instructions indicate adhering the fan with 4 tiny triangles of double-sided tape to hold the fan in place. Not the most optimal solution, but it seems to work. The ACT and PWR lights are blocked by the side wall of the case. The camera and display headers are also inaccessible.
Cooling Tests
For this part of the review, we took the Raspberry Pi 2 and placed it in each of the 4 cases which have some sort of heat dissipation system. We then checked the temperature of each RPi2 while idle using the command:
vcgencmd measure_tempWe then tried pushing the RPi2 by maxing out 1 full core and then again using all 4 cores using the “sysbench” command:
sysbench --test=cpu --cpu-max-prime=20000 runWe measured the temperatures for when both the fan was on and off in a 25C (77F) room.
Here are the results:
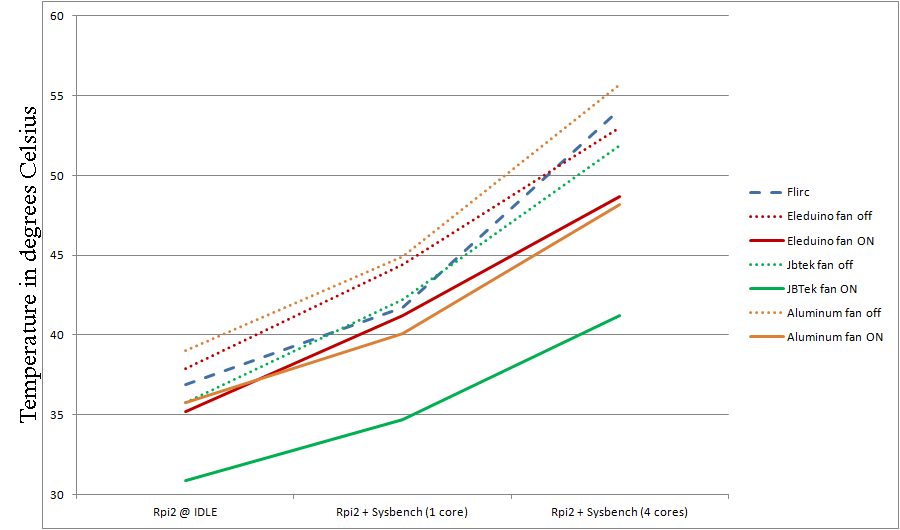
What should be immediately obvious is that the JBtek Acrylic case (which lacks side walls and has a sizable 40mm fan) is clearly the coolest. Even when the fan on the JBtek is not running, it is easily able to dissipate the heat from the RPi’s CPU due to the lack of side walls which would otherwise hold the heat in.
The JBtek without the fan running performs about as well as the FLIRC passive cooling case (which has no fan, just a heatsink block which is part of the case.)
The Eleduino and Aluminum cases clearly perform poorly without a fan, but turning on a 25mm fan allows both to just barely edge out the FLIRC case.
If silence is what you seek, then the FLIRC case performs adequately for most general purpose scenarios — even when 1 core is running at 100%. When all 4 cores are engaged at 100%, the FLIRC (unsurprisingly) has difficulty dissipating heat the same way the other enclosed cases do without a fan.
If overclocking is your game, you will definitely want a case that has some fan for active air flow.
Technical Review
Basic Cases
| Official Raspberry Pi case | JBtek Jet Black case | Premium Clear case | OneNineDesign RPi case | |
| Price | $13 | $8 | $9 | $10 |
| Color | White and Raspberry | Matte Black | Clear | Glossy Black |
| Material | Plastic | Plastic | Plastic | Plastic |
| Int. Port access | Removable top cover | none | Full | Full |
| Mounting | – | – | Two (2) screw mounts | Two (2) screw mounts |
| Fasteners | – | screws | – | – |
| Cooling | – | – | – | – |
| Assembly? | little | little | little | little |
| RPi A+ | Y | – | – | – |
| RPi B+ | Y | Y | Y | Y |
| RPi 2 & 3 B | Y | Y | Y | Y |
 |
 |
 |
 |
Specialty Cases
| SmartiPi LEGO case (VESA) | C4Labs Rebel case | Adafruit VESA case | C4Labs Zebra case | |
| Price | $25 | $19 | $18 | $15 |
| Color | Grey | Translucent | Clear | Clear / Wood |
| Material | Plastic | Acrylic Plastic | Acrylic Plastic | Acrylic Plastic / Wood |
| Int. Port access | Camera and GPIO | Full | Full | Full |
| Mounting | VESA (100mm) + GoPro mount | – | VESA (75 & 100mm) | Screw mount |
| Fasteners | 4 screws and 1 bolt | nuts and bolts | nuts and bolts | nuts and bolts |
| Cooling | – | Passive Heatsinks | – | – |
| Assembly? | little | some | yes | yes |
| RPi A+ | – | Y | Y | – |
| RPi B+ | Y | Y | Y | Y |
| RPi 2 B | Y | Y | Y | Y |
| RPi 3 B | Y | Y | Y | Y |
 |
 |
 |
 |
Cooling Cases
| Eleduino Acrylic case w/ 25mm fan | FLIRC RPi case | JBtek Acrylic case w/ 40mm fan | Aluminum alloy case w/ opt. 25mm fan | |
| Price | $13 | $15 | $9 | $20 |
| Color | Clear / Black | Silver / Black | Clear | Silver, Red, or Black |
| Material | Acrylic Plastic | Aluminum | Acrylic Plastic | Aluminum alloy |
| Int. Port access | Full | GPIO only | Full | GPIO only |
| Mounting | – | – | – | – |
| Fasteners | plastic nuts and bolts | screws | nuts and bolts | screws |
| Cooling | 25mm fan | case as heatsink | 40mm fan | optional 25mm fan |
| Assembly? | yes | little | yes | little |
| RPi A+ | – | – | – | – |
| RPi B+ | Y | Y | Y | Y |
| RPi 2 B | Y | Y | Y | Y |
| RPi 3 B | Y | Y | Y | Y |
 |
 |
 |
 |
Conclusion
After fiddling with all these cases for a few weeks, here are the recommended picks for best cases.
Basic Cases
The OneNineDesign RPi case ($10) is quite the stand-out. It looks good aesthetically, gives full access to the internal ports with room to snake the cables out the removable top, and is about as cheap as they get.
As an alternative, the Official Raspberry Pi case ($13) also looks pretty good and gives full case access, but costs a few dollars more than the rest.
Specialty Cases
The C4Labs Rebel case ($19) is a truly slick looking case. While it doesn’t provide protection from all sides, it’s probably good enough for the tinkerer who needs easy access to their RPi’s pin-outs. And the “cheat sheet” laser-etched into the acrylic top is a nice touch, too. It comes with heat sinks and supports RPi 1 A+, B+, and RPi 2 B models.
The Adafruit VESA case ($18) is another winner. It looks good in the simple acrylic construction and can mount to the back of a monitor or HDTV using the 75mm or 100mm VESA mounts. Like the Rebel case, it supports A+, B+, and RPi 2 B models.
Cooling Cases
The JBtek Acrylic case ($9) with 40mm fan rises above the rest in terms of cooling performance. The lack of sidewalls allows heat to escape easily and the 40mm fan brings cool air across the Raspberry Pi for excellent heat dissipation. And the price is right at $9!
As a silent alternative, the FLIRC case ($15) is a solid choice. It doesn’t dissipate heat as well as the JBtek acrylic case, but it DOES manage to remove heat better than pretty much all other full Raspberry Pi enclosures which lack a fan. And that’s impressive. This case is ideal for using your RPi as a media center or game emulator since it blocks access to the internal ports.
5 replies on “12 Raspberry Pi 2 & 3 model B cases — compared and reviewed”
There is now this aluminum case that act as a heatsink for the Raspberry Pi:
http://www.mechatronicsart.com/shop/raspberry-pi-3-fanless-enclosure/
$50, for the case? A little expensive for what amounts to a $30 computer. No?
Looks like a nice case but it would have to be half that price for most consumers to make that purchase. Honestly, I’d buy a Wicken Aluminum case if I was going for that high of a price tag.
The Flirc case is cast aluminium, the reason it has no solid core for the cooling heatsink is that this would have made it very difficult to case as uniform material thicknesses are required, it may have been feasible to cast in more cooling vanes but as the hole case acts as a large heatsink the benefits would be marginal for the increased production costs. As a balance between cost and cooling ability the Flirc case would be my personal choice
I just wanted to thank you for the great analysis of several cases. I ended up buying the JBTEK case which is the best to control temperature and also very cheap, under 9 USD. Thanks again!