In this tutorial, we’ll be using the PyCharm IDE Community edition.
Let’s get started by selecting Create New Project. As shown here, I called the project, py-cat-api. Right-click on “py-cat-api ” folder in the Project navigation panel and click New => Python Package. You can name the package similar to what you named your project. In this case, the_cat_api.
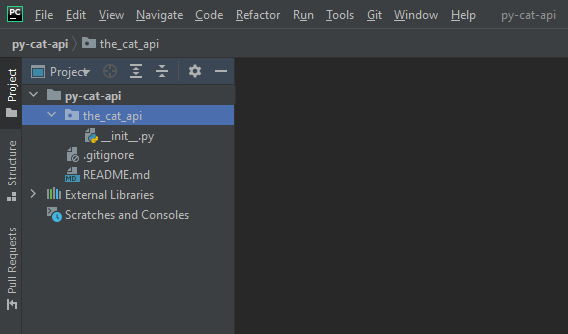
There should now be a subfolder in your project folder with a single empty file named __init__.py — This indicates to Python that this folder is a Python Package. (You could have just manually created a subfolder and manually added that same file, but this feature in the IDE saves you a step.)
So why did we create a folder with a subfolder of a similar name? Well, we’re setting up for creating a Git repository (the first folder) and putting a Python Package inside it (the second folder). If you’re familiar with Git, you know what to do. If not, don’t worry, we’ll get to this later.
Problem Scope
To understand what we’re about to do, it’s important to step back for a minute and understand the scope of the problem.
- What we have is a JSON REST API (TheCatAPI)
- What we want to do is create a uniform way of connecting to that API in Python.
The Python library we’re going to use to enable us to reach this service is known as requests.
In the PyCharm IDE, we’re going to File -> Settings (or PyCharm -> Preferences in MacOS) and down to Project: and select Project Interpreter. You’re going to need a Python3 interpreter of 3.6 or higher for this.
Then, we want to fetch the requests module, so we click on the [+] button on the top or the right (Windows) or the bottom (Mac). In the search window, type: requests
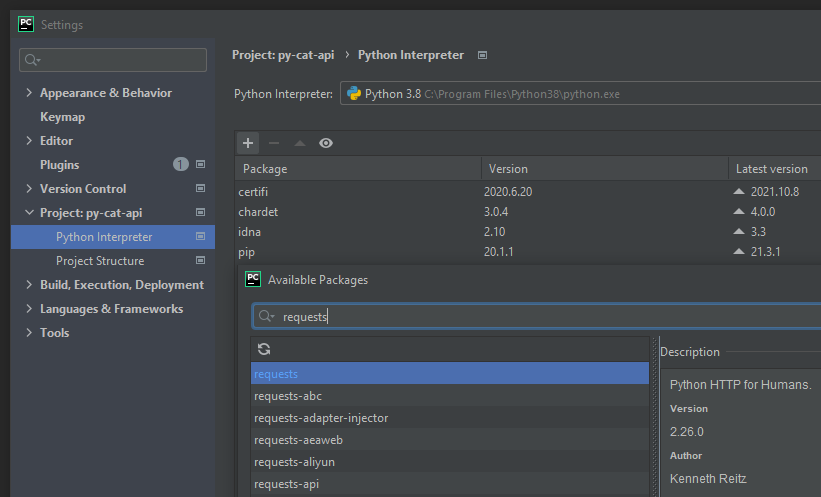
requests package in the Available Packages dialog box.Many packages will be listed. Select the one just called requests with the description “Python HTTP for Humans” by Kenneth Reitz. And click the “Install Package” button. After a few seconds, it should finish. Just close out the window.
You should now notice that requests (and all of its dependencies, like urllib3, certifi, etc.) are now installed into your project as well. Click OK and exit out of this screen.
Python requests module
What is the requests python module? It’s a 3rd party library written by a fellow named Kenneth Reitz that allows you to make HTTP (web) requests to various websites without you having to know much about Internet socket programming. This library does all the “heavy lifting” of sending and receiving data over HTTP connections for you. This is known as an abstraction, or a layer of abstraction.
Let’s get a sense of how requests works by popping open a Python Console window and playing with the requests library. (I’m going to use the >>> mark to indicate a command typed in the Python Console.)
First, we need to import requests into our Python environment.
>>> import requests
Now let’s fetch a cat from TheCatAPI!
>>> response = requests.get("https://api.thecatapi.com/v1/images/search")
So you got an empty line, right? If you don’t have your “variables” watch window open, click the “glasses” (👓) icon on the left side of your Python Console (mouse-over says “Show Variables”) — This should open another tandem window on the right side of your console. You should now see two lines:
>>> response = {Response}
Special Variables

If you click on the triangle (>) next to response, you’ll see all the data handed back to us in that one HTTP request. If you look carefully, you’ll see member variable in response named text. In it there is JSON data and a URL to a kitty.
To extract this JSON into a Python object we do the following:
>>> cat_list = response.json()
The Response class has a method called json() which will automatically convert any JSON data it received into an anonymous Python object. In this case, we could see in the text field that the primary containing object was a list (as denoted by [ being the first character.)
If you look at the cat_list variable in your watch window, you can see that it is, indeed, a list with 1 member in it containing a dictionary with info about a cat.
So how do we extract the URL from the dictionary?
>>> cat_url = cat_list[0].get("url")
>>> print(cat_url)
https://cdn2.thecatapi.com/images/somecatimage
HTTP status codes
Hey, that was great, wasn’t it? Everything went according to plan!
- But what happens when the REST API gives you an error?
- How do we handle that?
- What does that even look like?
Let’s use Postman again and change the previous URL to something nonsensical.
https://api.thecatapi.com/v1/images/asdf
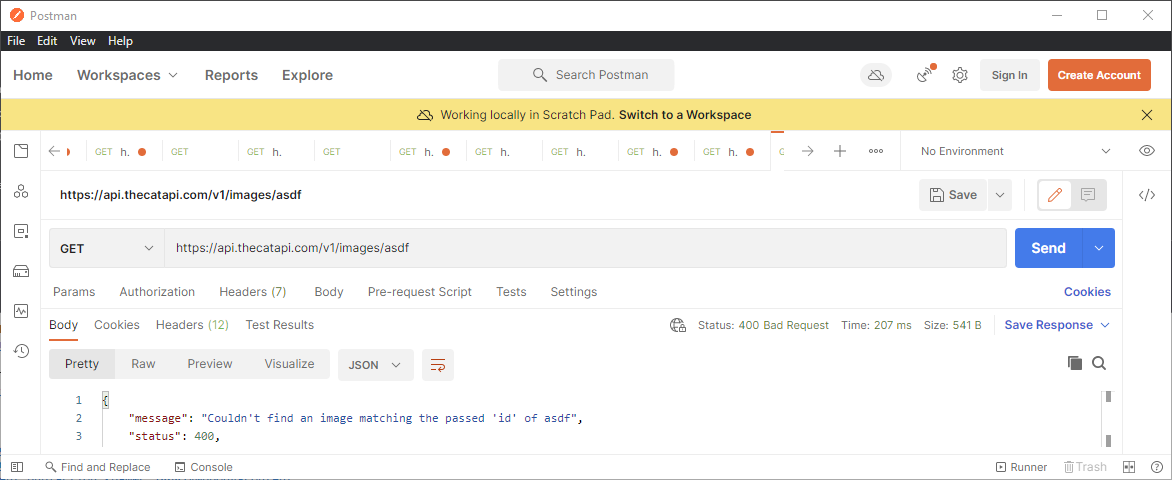
Notice in Postman that the request returned a Status of 400 Bad Request and returned a JSON result with a message saying what it thinks you did wrong as well as status and level fields.
Every HTTP Response has a numerical response status codes. As outlined in this Wikipedia entry on List of HTTP status codes: https://en.wikipedia.org/wiki/List_of_HTTP_status_codes
100 – 199: informational response
200 – 299: successful
300 – 399: redirection
400 – 499: client error
500 – 599: server error
In our first example when we first retrieved a kitty, we received a 200 (OK). But when we gave the REST API a bad URL, the server returned a 400 (Bad Request) telling us that our request was “bad” or “malformed”.
This leads us to an interesting side conversation about error codes…
I’m not gonna lie to you… I’ve never seen any REST API really get error handling 100% right. TheCatAPI is a really good API, but even the author of theCatAPI didn’t get it quite right here. For example:
The “message” was “Couldn’t find an image matching the passed ‘id’ of asdf”, yet the error was 400 (eg. malformed request) — As should be apparent, the error type (can’t find) is mismatched with the error code number.
The REST API should have returned either:
- a message saying “malformed request” with an error code of 400
-or- - a message saying “could not find that image” with an error code of 404.
All in all, this it quite a nit pick. I’ve seen some (really bad) REST APIs always return 200 (OK) even when there are colossal failures happening.
Fortunately, TheCatAPI is well programmed and this is a minor issue here. But we learned something by causing this 400 error.
- TheCatAPI generally uses correct HTTP status codes and can be relied on (broadly)
- TheCatAPI returns JSON with 3 fields on error:
message,status,level
This information will be helpful in our implementation of our low-level REST adapter.
Going back to our PyCharm IDE, right-click on the subfolder called the_cat_api and create a New => Python File and call it rest_adapter — You should now have your first .py file in your project. Let’s start by importing libraries that our REST Adapter will be depending on:
import requests
import requests.packages
from typing import List, Dict
As we alluded to earlier, we’re going to be leveraging the requests library, so we’re bringing in requests, the submodule packages. Also, we’ll be implementing type-hinting throughout this project since it is considered good practice and strong discipline — And it allows auto-completion of this library that we’re writing to work when used in IDEs like Pycharm and VS Code. Everyone likes auto-completion, right?
We’re also going to do Object Oriented Programming (OOP) here, so we’re going to create a RestAdapter class following the “Adapter” design pattern — More broadly, what we’re creating is often called a Wrapper Library.
Looking back at what we’ve learned about theCatAPI so far is that it has:
- website address (aka. a hostname)
- an (optional) API key for authentication
- a version number
- HTTPS (SSL / TLS encryption)
The REST adapter
Let’s create a class with a constructor with these parameters:
class RestAdapter:
    def __init__(self, hostname: str, api_key: str = '', ver: str = 'v1', ssl_verify: bool = True):
        self.url = "https://{}/{}/".format(hostname, ver)
        self._api_key = api_key
        self._ssl_verify = ssl_verify
        if not ssl_verify:
            # noinspection PyUnresolvedReferences
            requests.packages.urllib3.disable_warnings()
Now let’s breakdown what this class and __init__ constructor does.
Line 1: New class called RestAdapter
Line 2: We define our constructor __init__ with 1 mandatory parameter and 3 optional parameters.hostname is mandatory and is type-hinted as a stringapi_key is also type-hinted as a string, but is set with a default value of empty string (because theCatAPI can be used without an API key, remember?)ver is representative of the version of the API that we’re interested in using. Currently, theCatAPI only has 1 real version, so we’ve preset it to ‘v1’ssl_verify is more of an advanced feature, but it’s common enough that we’ve included it here in our example. It has a default value of True.
Line 3: We create a member variable to the RestAdapter class called url and we’re going to build a Web URL using the hostname and ver params that we passed in.
This URL will be used later when we try to interact with theCatAPI, but we want to build the URL now on construction so we don’t have to keep rebuilding it later.
Line 4: We save the api_key into a “private” member variable called _api_key
Line 5: We save the ssl_verify value into a private variable called _ssl_verify
Line 6,7,8: This is that advanced feature involving SSL/TLS that normally you don’t need to worry about, but should probably be included here.
With some REST APIs that you’re developing for, you may need to ignore that the SSL/TLS is self-signed/not-signed/expired. In production, this is bad practice to ignore an SSL/TLS certificate, but for development, this is acceptable.
These 2 lines of code allow you to signal to the requests library that if you set the param to False, you do not want it to check for signed encryption certificate validity.
Notice that the default value in our constructor is True, so that this doesn’t normally happen accidentally.
(The noinspection comment in the middle signals to your Pycharm IDE that it can safely ignore any unresolved references. This specific method in the requests library does not seem to be type hinted properly.)
Adding a GET method
Unfortunately, the RestAdapter class still doesn’t do anything of significance yet. Let’s look back at our way to GET a random kitty.
requests.get("https://api.thecatapi.com/v1/images/search")
Now let’s implement a more generalized “get” method in our RestAdapter class so that we can GET anything from theCatAPI! Inside the RestAdapter class, add the following method:
def get(self, endpoint: str) -> List[Dict]:
    full_url = self.url + endpoint
    headers = {'x-api-key': self._api_key}
    response = requests.get(url=full_url, verify=self._ssl_verify, headers=headers)
    data_out = response.json()
    if response.status_code >= 200 and response.status_code <= 299:     # OK
        return data_out
    raise Exception(data_out["message"])    # Todo: raise custom exception later
Line 1: We declare a new method called get with 1 mandatory parameter endpoint. The method is hinted to return a List of Dictionaries
Line 2: Take the url class member variable we created in the constructor and join it with the endpoint parameter
Line 3: Take the _api_key value and stuff it in a dictionary with the key x-api-key — This is a header dictionary which we will pass to the requests method
Line 4: This is the actual line that does the real work.
The full_url, the verify SSL flag, and the header dict (which contains the x-api-key) is passed to requests.get which goes out to the website. The data and results of the request is returned to response
Line 5: response is a Response object (a type within the requests library) which has a built-in method json()
This method “de-serializes” the JSON data returned and converts it to a Python object. Either a list of Python dictionaries or just a single dictionary.
Line 6,7: The Response object has a property called status_code which is an integer that represents an HTTP status code.
If status_code is within the range of 200 to 299, then everything went OK and we can return the data.
Line 8: Otherwise, something must have gone wrong and we should raise an Exception with the message returned to us from the request.
And what we have here is a very basic low-level REST adapter! Let’s test it out!
Testing the RestAdapter
In the Python console, we type:
>>> from the_cat_api.rest_adapter import RestAdapter
>>> catapi = RestAdapter(hostname = "api.thecatapi.com")
>>> cat_list = catapi.get("images/search")
>>> kitty = cat_list.pop()
>>> kitty.get("url")
https://cdn2.thecatapi.com/images/somecatimage
And sure enough, it works! Ok, let’s test the error case!
>>> cat_list = catapi.get("/images/badendpoint/")
Traceback (most recent call last):
File "", line 1, in
File "C:\PycharmProjects\py-cat-api\the_cat_api\rest_adapter.py", line 21, in get
raise Exception(data_out["message"])
Exception: Couldn't find an image matching the passed 'id' of badendpoint
And the error case works, too.
Enhancing the GET method
If you’ll recall, the “/images/search” endpoint has a bunch of parameters that we can pass to it to enhance our search.
Taken right from the documentation page: /images/search?limit=5&page=10&order=desc — would return 5 Images, from page 10 of entire collection in Descending order.
We could do something like this and include the params in the endpoint:
cat_list = catapi.get("/images/search?limit=5&page=10&order=desc")
But that doesn’t seem very Pythonic or pragmatic. Let’s extend the get method:
def get(self, endpoint: str, ep_params: Dict = None) -> List[Dict]:And change the requests.get line:
response = requests.get(url=full_url, verify=self._ssl_verify, headers=headers, params=ep_params)The request.get() method has a parameter called params in which you can pass a dictionary of your required parameters. Like so:
>>> my_params = {'limit': 5}
>>> cat_list = catapi.get("images/search", ep_params = my_params)
>>> len(cat_list)
5
Add a POST method
Now that we have a solid GET method, let’s create a POST method so that we can send things to the theCatAPI. Modeling our POST method after our GET method (shown again here):
def get(self, endpoint: str, ep_params: Dict = None) -> List[Dict]:
    full_url = self.url + endpoint
    headers = {'x-api-key': self._api_key}
    response = requests.get(url=full_url, verify=self._ssl_verify, headers=headers, params=ep_params)
    data_out = response.json()
    if response.status_code >= 200 and response.status_code <= 299:     # OK
        return data_out
    raise Exception(data_out["message"])
It should look something like this:
def post(self, endpoint: str, ep_params: Dict = None, data: Dict = None):
    full_url = self.url + endpoint
    headers = {'x-api-key': self._api_key}
    response = requests.post(url=full_url, verify=self._ssl_verify, headers=headers, params=ep_params, json=data)
    data_out = response.json()
    if response.status_code >= 200 and response.status_code <= 299:     # OK
        return
    raise Exception(data_out["message"])
Copy pasta! COPY PASTA! Oh noes!
That’s right, I just copied and pasted the get method, renamed it post, added a new data parameter and passed it into the json parameter in requests.post() method
This brings us to a side-bar about WET code, DRY code, and Refactoring in the next chapter… Step 3: Understanding WET code, DRY code, and Refactoring the low-level REST Adapter
Source code: https://github.com/PretzelLogix/py-cat-api/tree/02_rest_adapter
6 replies on “Step 2: Write a low-level REST adapter”
[…] Step 2: Write a low-level REST adapter […]
[…] Step 2: Create a low-level REST adapter […]
Just a couple of fixes from me…
from thecatapi.rest_adapter import RestAdapter should be: from the_cat_api.rest_adapter import RestAdapter
>>> cat_list = catapi.get(“/images/search”) should be: >>> cat_list = catapi.get(“images/search”)
Thanks for catching that! Updated!
In “Testing the RestAdapter”:
I get a 400 error on the line “catlist = catapi.get(“images/search”)”. More details on the error below:
400. That’s an error.
Your client has issued a malformed or illegal request. That’s all we know.
You appear to be going to `google.com` somehow. That’s not The Cat API which would explain why the endpoint `images/search` didn’t work for you. Also, someone else pointed out that the endpoint should be `/images/search`